
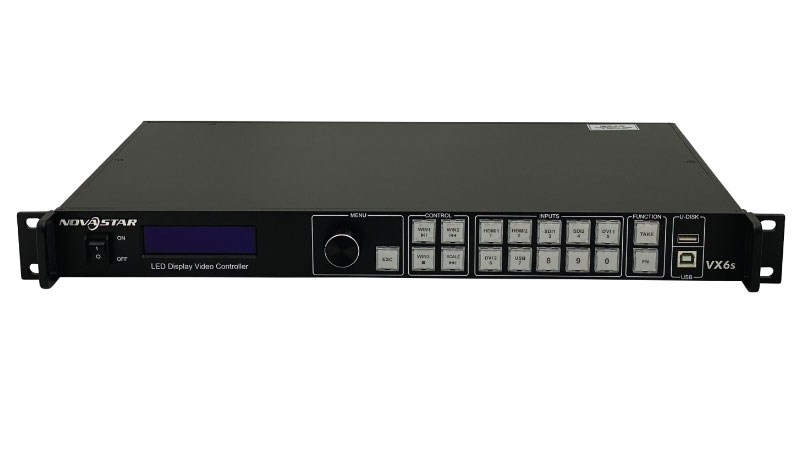
The NovaStar VX6s is a versatile all-in-one controller that functions both as a sending card and a video processor. It is designed to connect to a PC, manage various media sources, and seamlessly input and output these sources to an LED display wall.
Here you can find all the information about NovaStar VX6s.
Catalog:
2. Novastar VX6s Specifications
2.1 Input Connectors
2.2 Output Connectors
2.3 Control Connectors
2.4 Physical Specifications
3. Nova VX6s Manual & Guides
3.1 NovaStar VX6s Appearance and Functions
3.2 Nova VX6s Quick Configuration
3.3 Adjust the LED Screen Display Brightness with VX6s
3.4 Window Settings
3.5 Input Resolution Settings
3.6 System Modes
1. VX6s Novastar Features
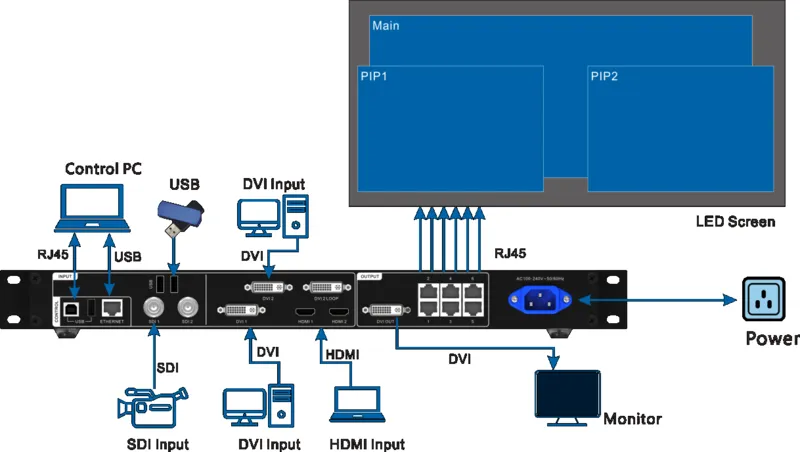
Novastar VX6s supports seven input types, including two 3G-SDI, two HDMI 1.3, one DVI, one DVI (IN+LOOP), and one USB.
For outputs, it includes six Gigabit Ethernet ports, capable of handling up to 3,900,000 pixels with a maximum width or height of 4096 pixels, and one DVI for monitoring, supporting PVW or PGM monitoring with adjustable resolution.
The VX6s provides three adjustable windows, each with flexible position, size, and z-order sorting.
It also features three scaling modes: full screen, pixel-to-pixel, and custom.
Screen configuration can be quickly or advanced, and it operates in two system modes: direct mode for content monitoring and switcher mode for easy transition from PVW to PGM with a single button.
Additional features of Novastar VX6s include screen brightness adjustment, the ability to link multiple VX6s units for larger screens, and the capacity to save up to 16 user presets for quick recall.
For synchronization, it supports locking to HDMI, SDI, or DVI input sources, ensuring vertical synchronization between outputs of multiple VX6s units.
2. Novastar VX6s Specifications
2.1 Input Connectors
| Connectors | Details |
| 2 x 3G-SDI |
|
| 2 x USB 2.0 | Connect to a mouse/keyboard or a USB drive to play media files stored in the drive. The supported USB drives and the formats of the media files in them are described as follows.
The USB drive cannot be partitioned or used as the system startup disk.
Audio coding: − MPEG Audio: MPEG1/2/2.5 Audio Layer1/2/3 − Windows Media Audio: WMA Version4/4.1/7/8/9, wmapro. − WAV Audio: MS-ADPCM, IMA-ADPCM, PCM. − FLAC Audio: Compress Level 0-8 − AAC Audio: ADIF, ATDS Header AAC-LC, and AAC-HE, AAC-ELD. − AMR Audio: AMR-NB, AMR-WB. |
| 2 x DVI |
− Direct mode: Width up to 3,840 pixels (3840×648@60Hz) − Switcher mode: Width up to 2,048 pixels (2048×1200@60Hz) − Height up to 1,600 pixels (1510×1600@60Hz)
800×600, 1024×768, 1280×720, 1280×768, 1280×800, 1280×1024, 1366×768, 1440×900, 1600×1200, 1680×1050, 1920×1080, 1920×1200 |
| 1 x DVI LOOP |
|
| 2 x HDMI |
|
2.2 Output Connectors
Connectors | Details |
6 x Ethernet | 6 Ethernet outputs |
1 x DVI | A monitoring connector can be set to preview the editing image or monitor the PGM. |
2.3 Control Connectors
Connectors | Details |
1 x Ethernet |
|
1 x USB |
|
1 x USB |
|
2.4 Physical Specifications
| Electrical Parameters | Power consumption | 65 W |
| Power supply | AC100V~240V 50/60Hz | |
| Operating Environment | Temperature | -20°C to +60°C |
| Humidity | 20% RH to 95% RH | |
| Storage Environment | Humidity | 10% RH to 95% RH |
| Physical Specifications | Dimensions | 483.6 mm × 275.1 mm × 45.0 mm |
| Net weight | 2.71 kg | |
| Total Weight | 5.9 kg | |
| Noise Level | 40 dB(A) | |
| Packing Information | Carrying Case | 530 mm × 370 mm × 140 mm |
| Accessory Box | 402 mm × 347 mm × 65 mm Accessories include: 1 × power cable (China) 1 × power cable (US) 1 × power cable (EU) 1 × USB cable 1 × DVI cable 1 × HDMI cable 1 × Ethernet cable | |
| Packing Box | 550 mm × 400 mm × 175 mm | |
| Certifications | CE, RoHS, FCC, IC, RCM, CB | |
3. NovaStar VX6s Manual & Guides
Part of the important operation guides are given here. You can download the VX6s NovaStar manual for the entire user guide. If you need more, you can visit our NovaStar Software page and NovaStar RCFG File Download.
3.1 NovaStar VX6s Appearance and Functions
Before doing the processes on VX6s, let’s take a look at the appearance of the NovaStar VX6s LED video processor. Most of the operations could be done by the Knob and ESC buttons.

| No. On the Above Picture | Button Name | Functions |
| 1 | ON/OFF button | Power button. |
| 2 | OLED screen | Display the current status and setting menus of the device. |
| 3 | Knob |
|
| 4 | ESC button | Pressing the button exits the current menu or operation. |
| 5 | Window control buttons |
Pressing a button enters the corresponding window property. menu. Statuses of button indicators: − On: The window is open. − Off: The window is closed. − Flashing: The window is being edited.
|
| 6 | Input source buttons |
Pressing the button switches the input source for the window. The button indicators indicate the statuses of the input source. Button indicator descriptions:
|
| 7 | Function buttons |
|
| 8 | USB |
|
3.2 Nova VX6s Quick Configuration
Before doing the processes on VX6s, let’s take a look at the appearance of the NovaStar VX6s LED video processor. Most of the operations could be done by the Knob and ESC buttons.
Prerequisites
- The LED screen is a regular one, not an irregular one.
- The cabinets of the LED screen are regular, and each cabinet has the same resolution.
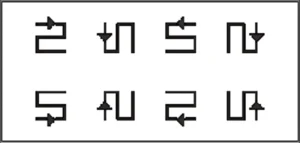
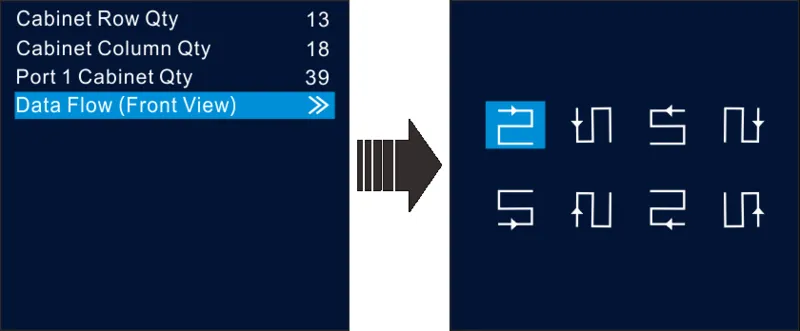
- The cabinet connection (data flow) must be one of the following 8 patterns. The physical connection of cabinets loaded by each Ethernet port must be along the same direction.
- During data flow settings, ensure that the Ethernet port 1 is at the beginning position of the whole physical connection and the ports must be connected in order.
Operating Procedure
Step 1. Power on the LED screen.
Step 2. Enter the Quick Config page: Menu page > Screen Settings > Quick Config.
Step 3. Set Cabinet Row Qty and Cabinet Column Qty based on the actual conditions of the LED screen.
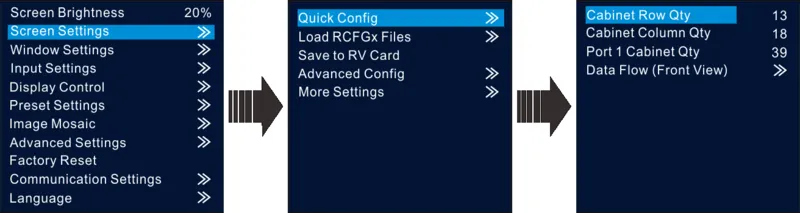
Step 4. Set Port 1 Cabinet Qty. The number of cabinets loaded by Ethernet port should follow the rules below.
- Ethernet port 1 ≥ Ethernet port 2 ≥ Ethernet port 3 ≥ Ethernet port 4 ≥ Ethernet port 5 ≥ Ethernet port 6.
- The number of cabinets loaded by each Ethernet port must be the integral multiple of the number of cabinet rows or columns in the LED screen.
Step 5. Rotate the knob to select Data Flow (Front View) and press the knob to select one data flow according to the current cabinet connection.
- When setting the data flow, you can view the results of different data flow patterns in real-time on an LED display by rotating the knob. When you are satisfied with the LED display image in which no image parts are overlapped or displayed repeatedly, press the knob to apply and save the selected data flow. If you press the ESC button, you will exit the current operation, and the data flow in the preview will not be saved.
Loading RCFGX Files
After the LED screen is powered on if a certain cabinet or the entire LED screen cannot be lit, you can load the receiving card configuration files (namely RCFGx files) that have been configured on NovaLCT software to the VX6s.
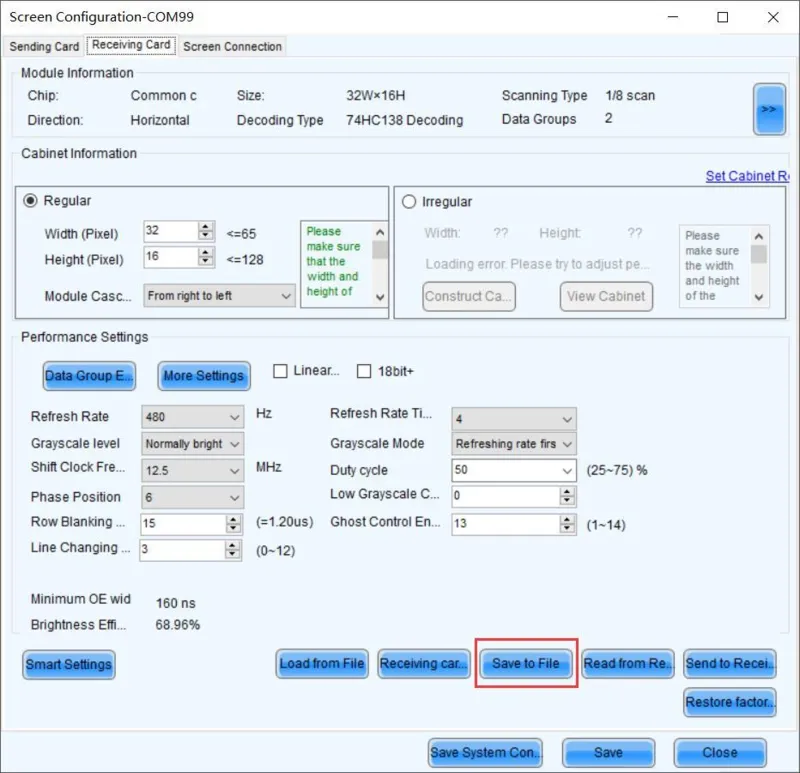
Step 1. On NovaLCT, after you configured the screen, click Save to File to save the configuration file to your PC.
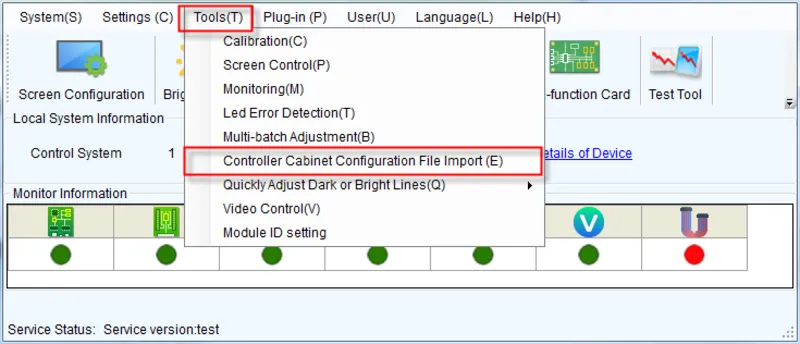
Step 2. On NovaLCT, choose Tools > Controller Cabinet Configuration File Import, click Add Configuration File, and select the configuration file you have saved to your PC in Step 1.
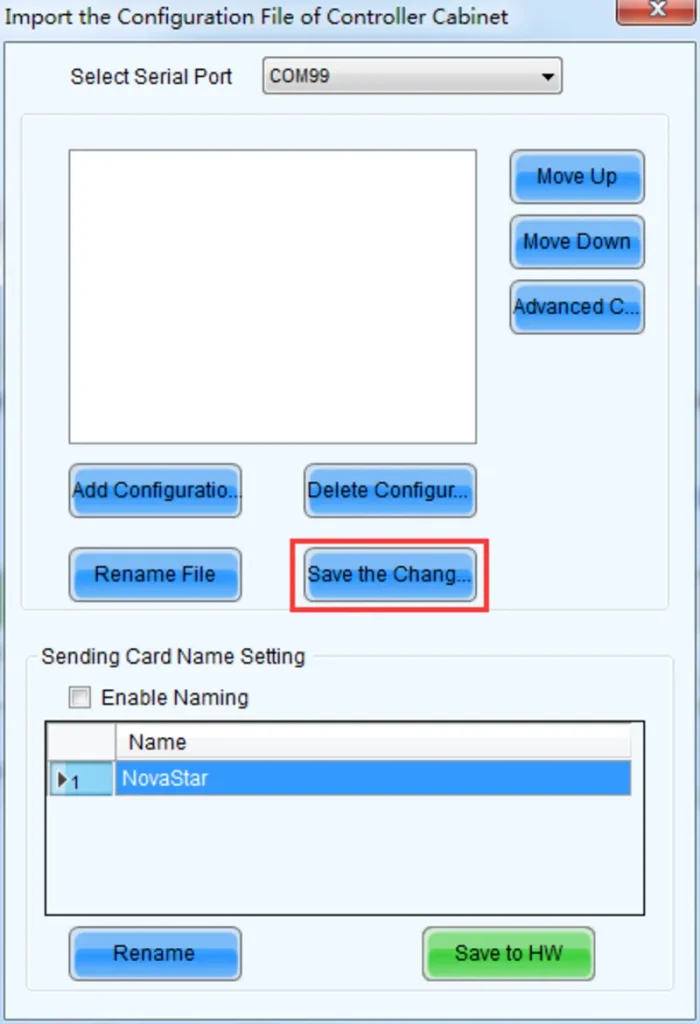
Step 3. Review the configuration file name and click Save the Change to HW to save the configuration file to the VX6s.
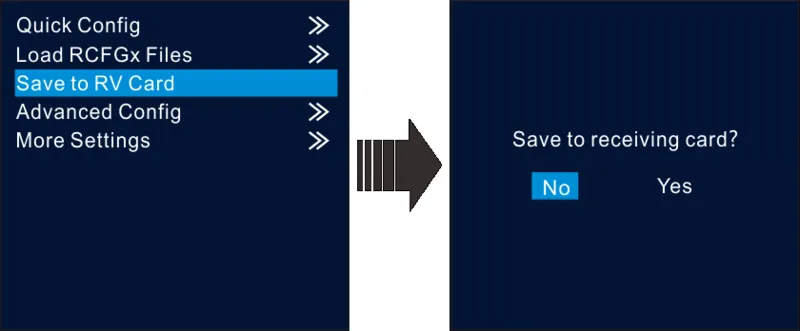
Saving to RV Card
After the cabinet configuration file is loaded or the receiving card color is changed, if you save the configuration data to the receiving card by using the Save to RV Card function, the configuration data will not be lost even if a power failure occurs.
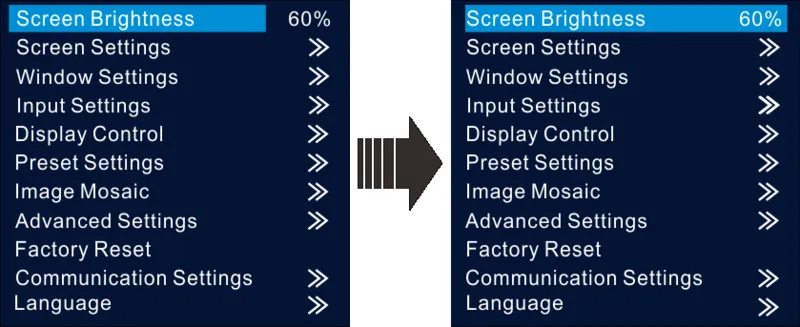
3.3 Adjust the LED Screen Display Brightness with VX6s
On the home screen, press the knob to enter the menu. Then, rotate the knob to select Screen Brightness and press the knob to enter the brightness adjustment status. At last, rotate the knob to adjust the brightness value. After you set the brightness value, press the knob to confirm it.
3.4 Window Settings
The VX6s supports up to 3 windows. The input source, size, position, priority, and input cropping of each window can be set.
Step 1. Rotate the knob to select Window1 Setting, and press the knob to enter the submenu.
Step 2. Rotate the knob to select a parameter item you want to adjust and press the knob to enter the parameter adjustment status. Then, rotate the knob to adjust the parameter value. At last, press the knob again to confirm the parameter value.
- Window1 State: The status of the current window.
- Input Source: The input source used by the current window.
- Scaling Mode: Three scaling modes are provided. The options are Full Screen, Pixel to Pixel, and Custom.
− Full Screen: Make the window image display in full screen.
− Pixel to Pixel: The window size is the same as the input source image resolution.
− Custom: Customize the image size. - H Width: The number of pixels in the horizontal direction.
- V Height: The number of pixels in the vertical direction.
- Initial X: The initial horizontal coordinate of the window.
- Initial Y: The initial vertical coordinate of the window.
- Priority: The displaying order of the window.
- Input Crop: The function of cropping the input source and displaying the cropped input source on the current window.
3.5 Input Resolution Settings
The resolutions of input sources can be changed on the VX6s. Currently, only HDMI and DVI connectors support the input resolution settings. To change the resolutions of other connectors, the only way is to change the output resolutions on the front-end devices.
Standard Resolution
The refresh rate of standard resolutions defaults to 60 Hz. If you want to change the refresh rate, go to the Custom menu. Standard resolutions include 800×600, 1024×768, 1280×720, 1280×768, 1280×800, 1280×1024, 1366×768, 1440×900, 1600×1200, 1680×1050, 1920×1080, 1920×1200.

Custom Resolution
Rotate the knob to set a custom width (increasing by even numbers), height, and refresh rate. After setting these parameters, rotate the knob to select Apply and press the knob to apply the settings. If you do not press the knob to apply the settings, the custom resolution will not take effect.

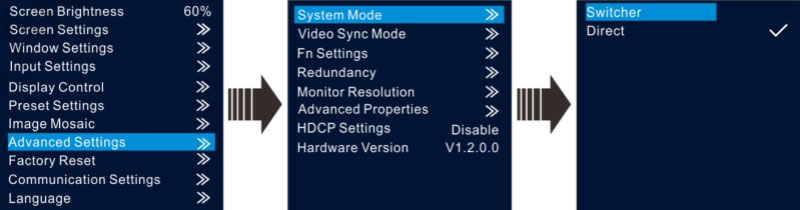
3.6 System Modes
Switcher Mode: Allows you to preview the edited image on the monitoring screen before it appears on the LED screen. Once satisfied, click “TAKE” to send the image to the LED screen.
Direct Mode: Displays the edited image on both the monitoring screen and the LED screen simultaneously, allowing you to see real-time changes as you edit.
Operation Guide Video:
4. Novastar VX6s Software & Firmware Download
The NovaLCT is used to configure the LED video screen. The ViPlex Mplayer software is used to play the media stored in the USB drive, set playback orders, and sort the media.
5. FAQ
What is the resolution of Novastar VX6s?
It supports input resolutions up to 1920×1200@60Hz
What is the port capacity of Novastar VX6s?
It supports 7 video inputs and 6 Gigabit Ethernet outputs.
What scenarios can Novastar VX6s be used in?
Advertising publish, retail store, shopping mall, display of dishes, welcome display, self-service business, exhibition hall, wayfinding, airport, subway, elevator, Restaurant & Hotel Supplies, education, medical treatment.
How many pixels is the Novastar vx6s?
3.9 million pixels.
What is the frame rate of Novastar vx6s?
60 Hz.
What is the price of VX6s Video Controller?
About the specific price, you can visit our LED Screen Cloud Platform.