
The NovaStar VX16s is a versatile all-in-one controller that combines video processing, control, and LED screen configuration in one compact device.
In this article, we’ll cover the essential features, operations, and everything you should know about the NovaStar VX16s, including pricing details and access to resources and downloads.
Catalogs:
1. NovaStar VX16s Video Processor Introduction
1.1 Key Features
1.2 Appearance
1.3 Price
2. NovaStar VX16s Specifications
3. Setup and Operation
3.1 Home Screen
3.2 Screen Brightness
3.3 Layer Settings
3.4 Quick Configuration
3.5 Preset Settings
3.6 Image Mosaic
4. Comparison with Other Models
5. VX16s Controller Applications
1. NovaStar VX16s Video Processor Introduction
1.1 Key Features
(1) Industry-Standard Input Connectors
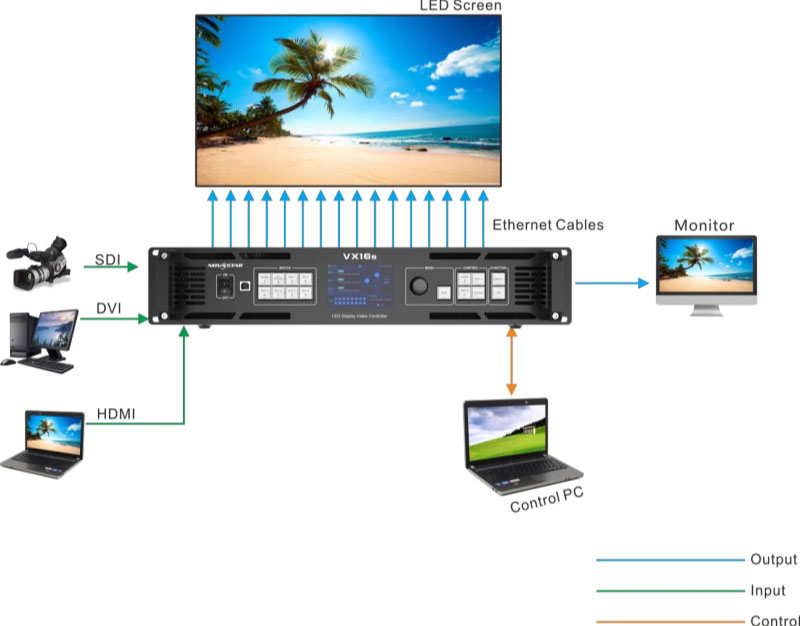
The VX16S provides a range of high-quality input options, including: 2x 3G-SDI, 1x HDMI 2.0, 4x SL-DVI.
These inputs support various video formats, ensuring seamless content management across different sources.
(2) Large Output Capacity
With 16 Ethernet output ports, the VX16S handles up to 10,400,000 pixels, making it ideal for large LED displays.
(3) Multi-Layer Control
The NovaStar VX16S offers three independent layers for versatile display control: 1x 4K×2K main layer, 2x 2K×1K Picture-in-Picture (PIP) layers, adjustable layer priorities
This feature allows for efficient content layout management across multiple layers, providing greater flexibility in presentations.
(4) DVI Mosaic
The device combines up to four DVI inputs to create a DVI Mosaic, forming an independent input source for larger or more complex display setups.
(5) Decimal Frame Rate Support
The VX16S supports specific frame rates such as 23.98 Hz, 29.97 Hz, 47.95 Hz, 59.94 Hz, 71.93 Hz, and 119.88 Hz, offering flexibility for various video production needs.
(6) 3D Display
The VX16S supports 3D display effects, providing depth to visual content. Activating 3D reduces the output capacity but enhances the viewing experience.
(7) Personalized Image Scaling
With three scaling options—pixel-to-pixel, full screen, and custom scaling—the VX16S tailors images to meet specific display requirements.
(8) Image Mosaic for Larger Screens
Up to four VX16S devices can be linked to create a seamless display across larger screens, perfect for big events and exhibitions.
(9) Easy Operation with V-Can
Controlled via V-Can software, the VX16S is simple to operate. Users can save up to 10 presets for quick access, making it convenient for fast transitions.
(10) EDID Management
The VX16S supports both Custom EDID and Standard EDID, ensuring precise control over the display’s input signal.
(11) Backup Device Mode
In case of a signal or Ethernet port failure, the backup device takes over instantly, keeping the display running smoothly without interruptions.
1.2 Appearance
1.2.1 Front Panel
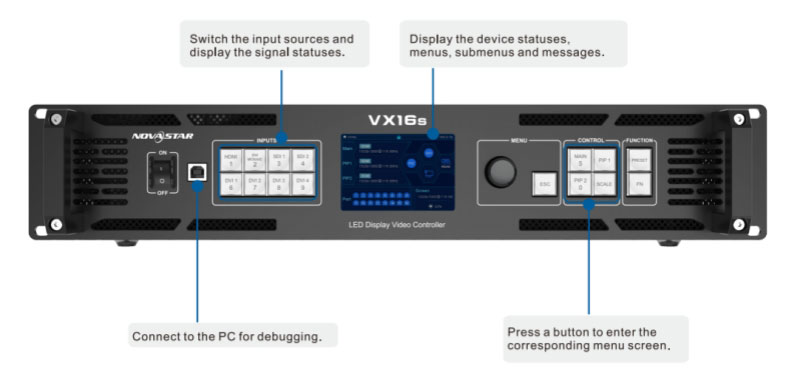
Button | Description |
Power switch | Turns the device on or off. |
USB (Type-B) | Connects to the control PC for debugging. |
Input source buttons | Selects the input source or resolution settings for each layer. |
TFT screen | Displays device status and messages. |
Knob | Rotates to navigate menu items and adjusts settings. Press to confirm. |
ESC button | Exits the current menu or cancels operations. |
Layer buttons | Manages settings for the main layer, PIP 1, PIP 2, and scaling. |
Function buttons | Accesses presets or custom shortcut functions (e.g., sync, freeze). |
1.2.2 Rear Panel
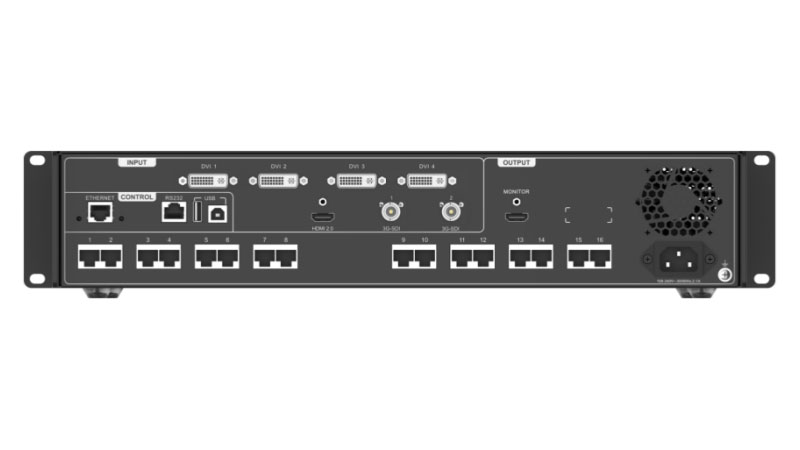
Connector | Quantity | Description | |
Input | 3G-SDI | 2 | Max resolution: 1920×1080@60Hz, no interlaced input. |
DVI | 4 | Max resolution: 3840×1200@60Hz, supports DVI Mosaic. | |
HDMI 2.0 | 1 | Max resolution: 3840×2160@60Hz, supports custom EDID. | |
Output | Ethernet ports | 16 | Supports up to 10,400,000 pixels, loads 650,000 pixels per port. |
Monitor (HDMI) | 1 | For monitoring output, max resolution: 1920×1080@60Hz. | |
Control | Ethernet | 1 | Connects to the control PC or network. |
USB | 2 | USB 2.0 (Type-B): Connects to the PC for debugging or linking another device.
USB 2.0 (Type-A): Connects to another device for output. | |
RS232 | 1 | Connect to the central control device. | |
1.3 Price
NovaStar VX16s Controller, with its cutting-edge features and exceptional performance, is priced at approximately $2,716.7. This competitive price reflects the advanced technology and versatility the VX16s brings to professional LED display solutions.
For the most accurate and up-to-date pricing information, you can register and log in to our LED Screen Cloud Platform. This platform provides convenient self-service inquiries, enabling you to check prices of VX16s or other NovaStar Products by yourself and access additional professional details tailored to your needs.
2. NovaStar VX16s Specifications
| Electrical Specifications | Power connector | 100-240V~, 50/60Hz, 2.1A |
| Power consumption | 70 W | |
| Operating Environment | Temperature | 0°C to 50°C |
| Humidity | 20% RH to 85% RH, non-condensing | |
| Storage Environment | Temperature | -20°C to +60°C |
| Humidity | 10% RH to 85% RH, non-condensing | |
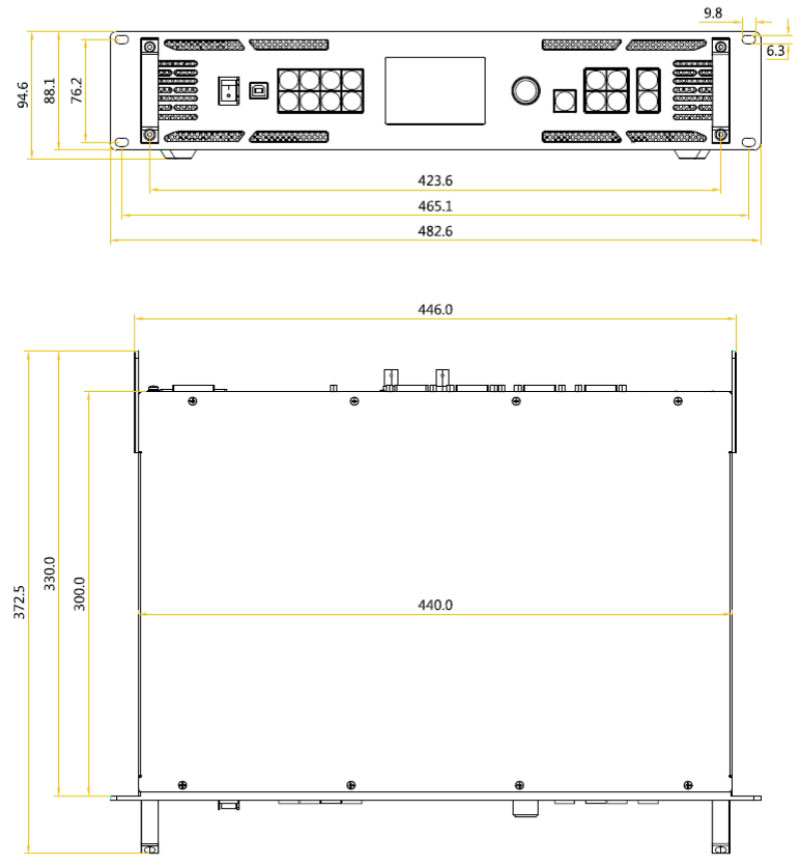
| Physical Specifications | Dimensions | 482.6 mm × 372.5 mm × 94.6 mm |
| Net weight | 6.22 kg | |
| Gross weight | 9.78 kg | |
| Packing Information | Carrying case | 530.0 mm ×420.0 mm ×193.0 mm |
| Accessories | 1x European power cord 1x US power cord 1x UK power cord 1x Cat5e Ethernet cable 1x USB cable 1x DVI cable 1x HDMI cable 1x Quick Start Guide 1x Certificate of Approval | |
| Packing box | 550.0 mm ×440.0 mm ×215.0 mm | |
| Certifications | CE, FCC, IC, RoHS, UL, CB, KC | |
| Noise Level (typical at 25°C/77°F) | 45 dB (A) | |
3. Setup and Operation
3.1 Home Screen
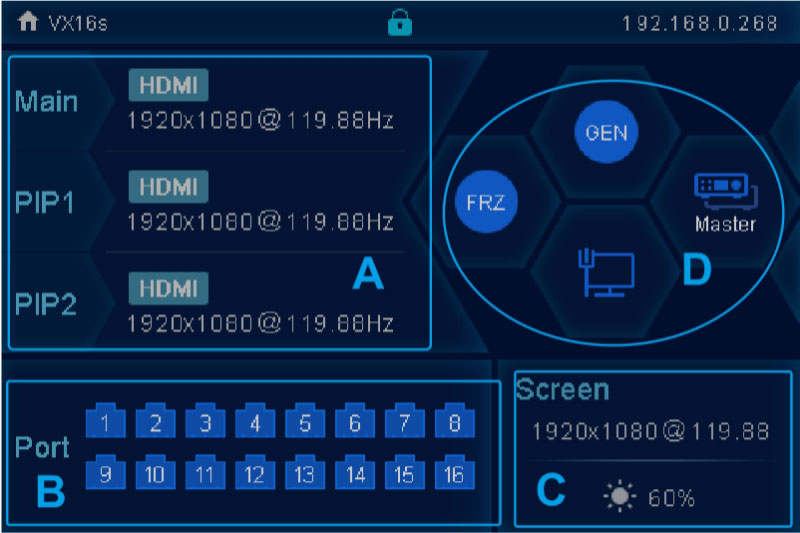
| Area | Icon | Meaning | |
| A | The layer is active, and the input source name along with its resolution is displayed. | ||
| The layer is inactive. | |||
| B | The VX16s is in video controller mode, and this Ethernet port is connected. | ||
| This Ethernet port is disconnected. | |||
| This Ethernet port is connected and functions as the backup output. | |||
| C | Configured screen resolution and frame rate | ||
| Screen brightness level | |||
| D | Synchronization | Genlock function activated | |
| Genlock function deactivated | |||
| Genlock function is in the process of being activated | |||
| Failed to activate the Genlock function | |||
| Display control | LED screen is currently black | ||
| LED screen is displaying the chosen test pattern | |||
| The LED screen is showing the current input source | |||
| The output image is frozen. | |||
| BKG | The BKG function is enabled. | ||
| The BKG function is disabled. | |||
| Communication | The VX16s is communicating with the control PC through USB. | ||
| The VX16s is communicating with the control PC through LAN. | |||
| The VX16s is not connected to the control PC. | |||
3.2 Screen Brightness
You can adjust the screen brightness to match the surrounding light, making it easier on the eyes. Proper brightness adjustment can also help extend the lifespan of the LED screen.
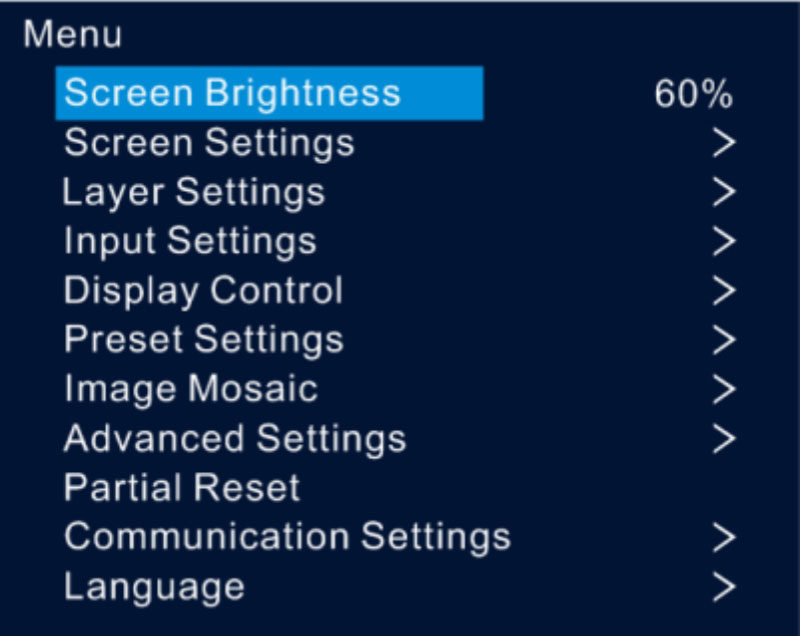
Step 1: On the home screen, press the knob to access the main menu.
Step 2: Select Screen Brightness and press the knob to confirm.
Step 3: Rotate the knob to adjust the brightness. The LED screen will display the changes in real time. Once satisfied, press the knob to apply the new brightness setting.
3.3 Layer Settings
Step 1: Press the knob to access the main menu.
Step 2: Rotate the knob to choose Layer Settings, then press to enter the layer settings screen, where you can configure the following:
- Main Layer
- PIP 1 and PIP 2

Main Layer and PIP:
| Menu | Description |
| Status | Open or close the current layer. Note: Press MAIN, PIP1, or PIP2 on the front panel to access the Layer Settings menu on the LCD screen. |
| Input Source | Select the input source for the current layer. Note: HDMI and DVI Mosaic sources are only for the main layer. |
| Scaling Mode | Choose from three options: Full Screen, Pixel to Pixel, or Custom. |
| H Width | Set the horizontal width of the layer, up to 32,768 pixels. |
| V Height | Set the vertical height of the layer, up to 32,768 pixels. |
| Initial X | Set the initial horizontal coordinate of the layer. |
| Initial Y | Set the initial vertical coordinate of the layer. |
| Input Crop | Crop the input source to fill the entire layer. Status: Enable or disable the input crop. H Width: Set the cropped width (64 to the input width). V Height: Set the cropped height (64 to the input height). Initial X: Horizontal start point of the crop. Initial Y: Vertical start point of the crop. |
| Priority | Set the display order of layers (1, 2, 3). 1: Send to the back. 2: Place in the middle. 3: Bring to the front. |
| Reset | Reset all layer settings to their default values. |
3.4 Quick Configuration
Requirement:
- The LED screen must be a standard screen.
- The cabinets must be uniform, with identical resolution across the screen.
- The following data flow patterns are supported. Each Ethernet port should follow the same direction, connecting downward to the next.
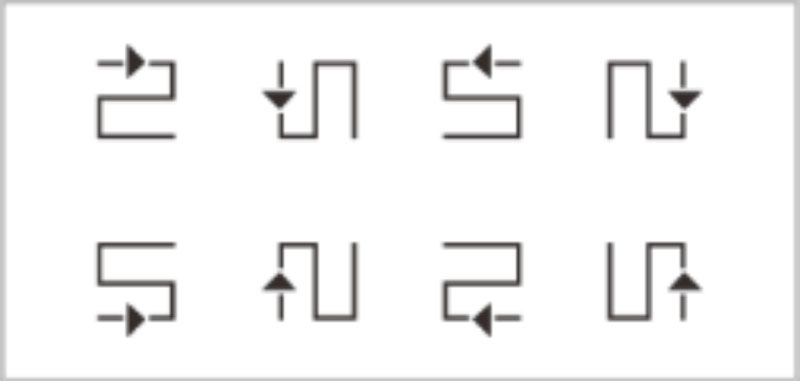
- Ethernet port 1 should always initiate the physical connection.
Steps:
Step 1: Power on the LED screen.
Step 2: From the home screen, press the knob to access the main menu. Rotate the knob to navigate to Screen Settings > Quick Configuration, then press the knob to enter.
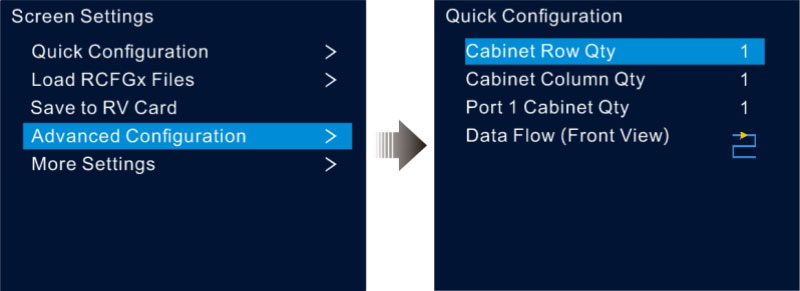
Step 3: Adjust Cabinet Row Qty and Cabinet Column Qty based on the actual number of rows and columns in the screen’s cabinet layout.
Step 4: Rotate the knob to select Port 1 Cabinet Qty and set the number of cabinets loaded through Ethernet port 1.
Step 5: Choose Data Flow (Front View) and press the knob. Then, select the appropriate data flow pattern for the cabinets.
As you set the data flow, the LED screen will display the results in real time. If the screen content appears correctly, with no overlap or repetition, press the knob to save your configuration.
3.5 Preset Settings
The VX16s supports up to 10 presets, allowing users to save, load, and clear configurations.
Step 1: Rotate the knob to navigate to Preset Settings and press to enter the preset settings screen.
Step 2: Select the desired preset by rotating the knob, then press it. A dialog box will appear with four options: Save, Load, Clear, and Copy To.
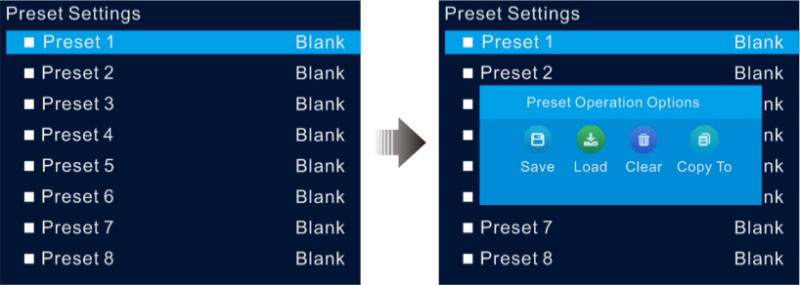
Save: Store the current layer settings into the chosen preset.
Load: Apply the selected preset’s layout to the current layer.
Clear: Erase all contents from the chosen preset.
Copy To: Duplicate the layout from the current preset to a different preset.
Note:
If the target preset already contains data, using Copy To will replace the existing data with the new configuration.
3.6 Image Mosaic
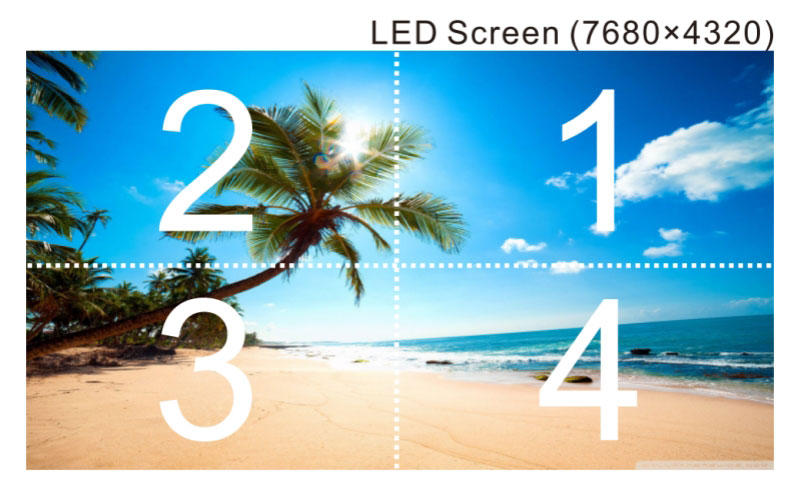
The image mosaic function is essential when the resolution of an LED screen exceeds the capacity of a single VX16s unit. By linking multiple VX16s units, their combined loading capacity matches the total resolution of the screen.
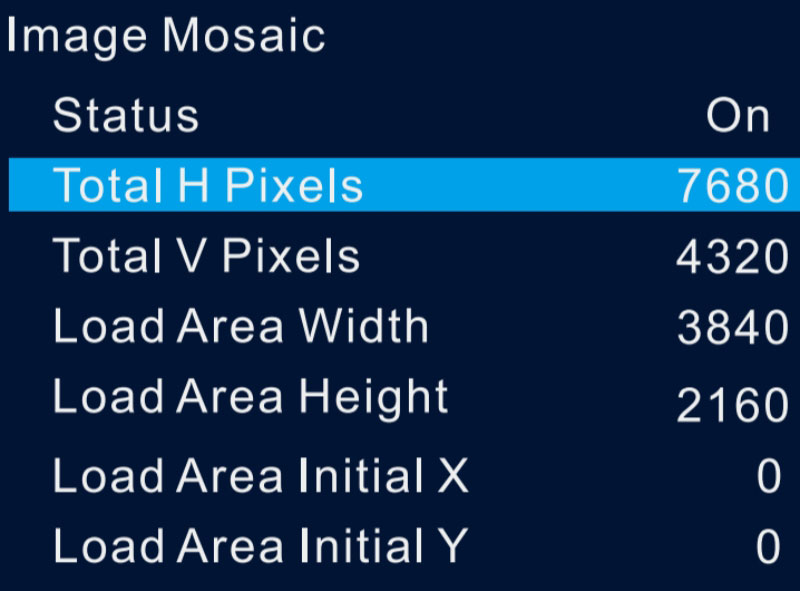
For example, if the LED screen resolution is 7680×4320, which is beyond the capacity of one VX16s unit, you would need four VX16s units to handle the full resolution through image mosaic. The size and position of each load area are shown as follows:
4. Comparison with Other Models
| Device Model | VX16s | VX1000 | VX600 | VX400 |
| Loading Capacity | 10.4 million pixels | 6.5 million pixels | 3.9 million pixels | 2.6 million pixels |
| Max Width & Height | Max width: 16384 pixels Max height: 8192 pixels | Max width: 10240 pixels Max height: 8192 pixels | ||
| Layers | 1x 4K×2K main layer 2x 2K×1K PIP | 3x 4K×1K | 3x 2K×1K | 2x 2K×1K |
| Input Connectors | 2x 3G-SDI 1x HDMI 2.0 4x SL-DVI | 1x 3G-SDI 2x HDMI 1.4 2x DVI(HDMI 1.4) 1x OPT1 | 1x 3G-SDI 2x HDMI 1.3 1x DVI 1x OPT1 | 1x 3G-SDI 2x HDMI 1.3 1x DVI 1x OPT1 |
| Output Connectors | 16x Ethernet ports 1x Monitor | 10x Ethernet Ports 1x HDMI1.3 1x HDMI1.4 LOOP 1x DVI LOOP 1x 3G-SDI LOOP 2x OPT | 6x Ethernet Ports 1x HDMI1.3 1x HDMI1.3 LOOP 1x DVI LOOP 1x 3G-SDI LOOP 2x OPT | 4x Ethernet Ports 1x HDMI1.3 1x HDMI1.3 LOOP 1x DVI LOOP 1x 3G-SDI LOOP 2x OPT |
| Presets | 10 | |||
| Control Connectors | 1x Ethernet Port 2x USB (input & output) 1x RS232 | 1x Ethernet Port 2x USB (input & output) 1x GENLOCK (IN & LOOP) | 1x Ethernet Port 2x USB (input & output) 1x GENLOCK (IN & LOOP) | 1x Ethernet Port 2x USB (input & output) 1x Light Sensor |
5. VX16s Controller Applications
Stage and event productions: The VX16s provides seamless video processing and scaling, perfect for live events, concerts, and theatrical productions.
Conferences and exhibitions: It supports high-quality image display, making it a reliable solution for corporate events, product launches, and trade shows.
High-end rental services: With its powerful processing capabilities and ease of use, the VX16s is well-suited for rental companies managing large-scale events and displays.
Fine-pitch LED displays: The VX16s excels in delivering precise, high-resolution visuals for fine-pitch screens, providing superior image clarity and detail.
6. NovaStar VX16s User Manual and Firmware Download
For free NovaStar products user manuals, firmware updates, and other NovaStar resources, simply visit our NovaStar Software Download page.
7. Nova VX16s FAQs
What is the maximum resolution supported by the NovaStar VX16s?
The VX16s supports a maximum input resolution of 3840×2160@60Hz and can load up to 10,400,000 pixels.
Does the VX16s support 3D display?
Yes, the VX16s supports 3D display effects, but the device’s output capacity will be halved when the 3D function is in use.
What are the input connectors available on the VX16s?
The VX16s offers industry-standard connectors, including 2x 3G-SDI, 1x HDMI 2.0, and 4x SL-DVI inputs.
Does the VX16s support custom scaling?
Yes, the VX16s provides three scaling options: pixel-to-pixel, full screen, and custom scaling, allowing users to adjust the image to their specific needs.
What happens if there is a signal loss or a port failure?
The VX16s features a device backup design, which ensures that if a primary device fails, a backup device can take over without interruption.
