
NovaStar TU40 Pro is a groundbreaking playback control processor, meticulously crafted for optimal LED screen performance. This innovative device seamlessly combines an Android system with advanced video processing, offering unparalleled interaction and control capabilities. With the ability to support up to 13 million pixels, the TU40 Pro transforms any presentation into a stunning visual experience. Its versatility is unmatched; whether in a corporate showroom or an outdoor display, it adapts effortlessly to various environments without the need for complex installations.
As we delve deeper into the features and specifications of the TU40 Pro, let’s explore its design and how it can elevate your LED applications to new heights.
Table of Contents:
1. NovaStar TU40 Pro Introduction
1.1 Appearance
1.2 Price
1.3 Specifications
1.4 Dimensions
2. Main Features
2.1 Inputs and Outputs
2.2 Device Controls
3. TU40 Pro NovaStar Functions
5. Operation Guide
5.1 Menu Introduction
5.2 Getting Started
5.3 Usage of the Remote
1. NovaStar TU40 Pro Introduction
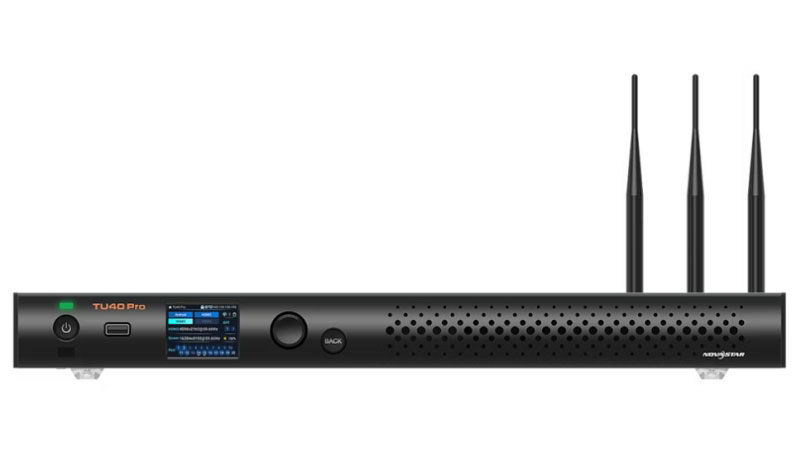
1.1 Appearance

Front Panel

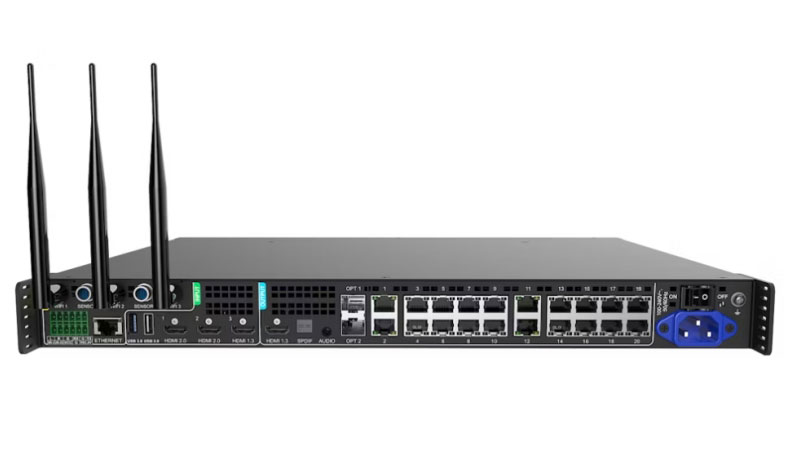
Rear Panel
1.2 Price
As for pricing, the TU40 Pro is competitively positioned within the market, reflecting its innovative features and robust performance. To find the specific price and explore additional details, we recommend visiting our LED Screen Cloud Platform, where you can access the latest pricing information and make informed purchasing decisions.
1.3 Specifications
| Electrical Specifications | Input voltage | 100-240V~, 50/60Hz, 2.5A Max |
| Rated power consumption | 53.9 W | |
| Storage Space | RAM | 8 GB |
| Internal storage | 128 GB | |
| Operating Environment | Temperature | -20°C to +50°C |
| Humidity | 5% RH to 85% RH, non-condensing | |
| Storage Environment | Temperature | -20°C to +70°C |
| Humidity | 5% RH to 95% RH, non-condensing | |
| Physical Specifications | Dimensions | 445.0 mm × 383.0 mm × 49.9 mm |
| Net weight | 4.54 Kg | |
| Gross weight | 7.90 kg (including product, accessories, and packaging materials) |
1.4 Dimensions
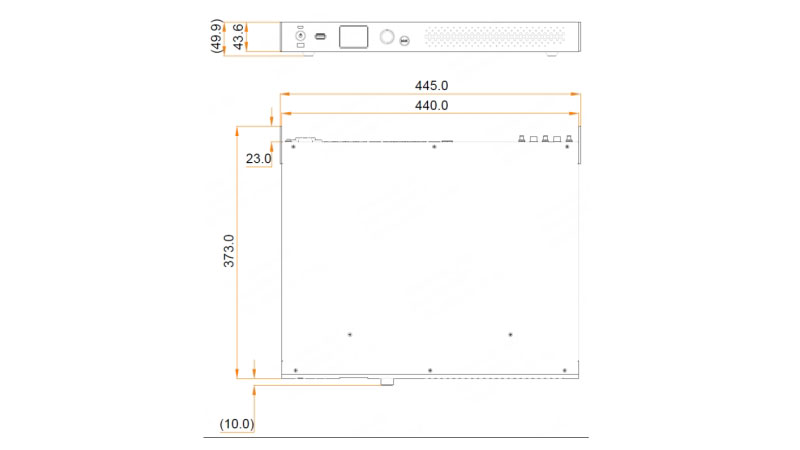
TU40 Pro
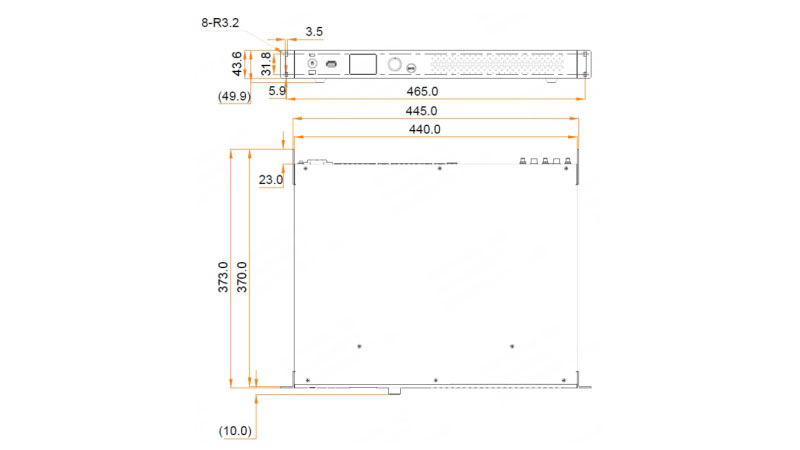
TU40 Pro with Hanging Brackets
2. Main Features
2.1 Inputs and Outputs
HDMI Inputs:
1x HDMI 1.3 input
2x HDMI 2.0 inputs
These inputs provide high-quality video transmission, making it easier to handle a variety of content sources with precision.
USB Inputs:
2x USB 2.0 inputs
1x USB 3.0 input
The USB 3.0 port allows you to connect devices such as a mouse, keyboard, camera, or speaker. It’s also essential for USB-based playback, performing firmware updates, and exporting system logs.
HDMI Output:
1x HDMI 1.3 output
This output is intended for monitoring and device debugging, enabling precise troubleshooting and performance checks.
Ethernet Outputs:
20x Gigabit Ethernet outputs
These outputs ensure high-speed data transmission to LED displays, supporting even the most complex visual presentations.
OPT Outputs:
2x optical outputs for fiber conversion
Perfect for long-distance transmission, these OPT outputs offer reliable performance in fiber-based applications.
Audio Outputs:
The TU40 Pro offers multiple audio outputs to cater to different audio systems:
1x SPDIF digital audio output
1x 3.5mm audio output
1x HDMI eARC audio output
1x Phoenix audio output
These options ensure flexibility in managing both analog and digital audio signals, providing high-quality sound experiences.
Output Image Scaling:
The TU40 Pro supports extensive image scaling capabilities:
Width range: 64 to 16,384 pixels
Height range: 64 to 8,192 pixels
Total load capacity: up to 13 million pixels
This achieves optimal performance for any screen size or resolution.
2.2 Device Controls
Gigabit Ethernet Control:
Equipped with a Gigabit Ethernet port that supports TCP/IP protocol, the TU40 Pro allows for seamless and stable network communication, enabling remote access and control through standard network infrastructure.
Energy-Efficient Standby Mode:
The device features a low-power mode, consuming less than 0.5W when in standby. You can easily wake it up via an infrared remote, providing both energy savings and convenience.
Relay Connection for Power Management:
A relay can be connected to the device, allowing for streamlined power management of the LED display. This feature simplifies controlling power states, especially in larger installations.
Mobile App Control (VNNOX Care):
The VNNOX Care mobile app adds a layer of intelligence to LED screen control. Available for smartphones, this app enables users to configure their LED screens within 10 minutes. The app also provides convenient features like scanning QR codes to set up screens, adjusting topology by taking pictures, and monitoring device statuses in real time.
Remote Control:
The TU40 Pro can be fully managed using an infrared remote, offering users the ability to operate the device from a distance, making it easier to control large display setups.
Bluetooth 5.1:
The built-in Bluetooth 5.1 module connects seamlessly to a variety of peripherals such as a Bluetooth voice remote, mouse, keyboard, sound system, and other commonly used devices. This makes the TU40 Pro versatile in terms of input and interaction.
Front Panel LCD Control:
Users can control the device through the front panel LCD, providing a quick and efficient way to manage the system. Though touch control is not supported, the LCD offers clear and responsive feedback for easy operation.
Peripheral Support:
The device supports various peripherals, including cameras, sound systems, and infrared touch frames, ensuring flexibility in integrating with external equipment to meet the needs of different scenarios.
3. TU40 Pro Functions
Android 13.0 Desktop System: Operates on Android 13.0, supporting third-party apps for added functionality.
Screen Annotation: Enables real-time drawing and comments, ideal for interactive meetings and presentations.
Wireless Screen Mirroring: Supports 3840×2160@30Hz mirroring across Windows, macOS, iOS, and Android devices, making presentations and collaborations seamless.
ViPlex Handy Reverse Control: Allows speakers to control the LED screen from their devices, enhancing interactivity during presentations.
Powerful Processing: Powered by quad-core A73 and A53 ARM processors, with 8 GB RAM and 128 GB storage, it supports 4K video decoding for smooth playback.
Flexible Playback: Handles up to 4 streams of 4K video and supports various lower resolutions for multi-stream playback. Control via app, remote, or USB plug-and-play makes content management easy.
Dual Wi-Fi Modes: Supports both Wi-Fi and hotspot connections for greater control flexibility.
Dynamic Engine: Optimizes each frame for enhanced image contrast and detail while reducing power consumption, extending LED lifespan. Requires A10s Pro receiving card for full functionality.
AI Image Enhancement: Intelligent image processing improves color, brightness, sharpness, and motion for superior visuals.
HDR Playback: Supports HDR content, delivering rich, dynamic visuals.
Customizable Display Modes: Four preset modes (standard, meeting, vivid, skin) with adjustable brightness, contrast, and saturation for the best display effects.
Eye Comfort Mode: Reduces eye strain during prolonged viewing sessions.
4. Applications
Commercial Displays:
With asynchronous content playback and enhanced interactive features, the TU40 Pro simplifies media management. The upgraded Screen Elf app and remote control functionality provide smoother, more stable content delivery. Whether you’re managing advertisements or delivering interactive experiences, the TU40 Pro makes it seamless and reliable.
Conference Rooms:
The TU40 Pro is designed with built-in Android OS and an intuitive interface, offering TV-like interaction for ease of use. It supports wireless screen mirroring and is compatible with various video conferencing software, allowing any LED screen to become an instant meeting solution. Add accessories like cameras or infrared touch frames, and your display transforms into an advanced conference system.
Showrooms:
Ideal for showrooms, the TU40 Pro supports asynchronous program playback with on-demand content selection at the material level. Its integration with central control systems and visualization platforms ensures smooth operation, providing a streamlined solution for managing multimedia presentations in showrooms and exhibitions.
Notes:
- NovaStar TU40 Pro is more suitable for conference/fixed installation/asynchronous use. In these usage scenarios, it can replace the NovaStar VX series and is more cost-effective; but compared with the VX series, it has fewer interfaces and no other button operations (zoom/video source switching/cropping, etc.)
- NovaStar TU40 Pro is not suitable for rental use. For example, if you need to temporarily switch the camera position during a concert, the operation is inconvenient.
5. Operation Guide
5.1 Menu Introduction
Navigating the NovaStar TU40 Pro is made simple through its intuitive menu system, displayed on the front LCD panel.
5.1.1 Instructions
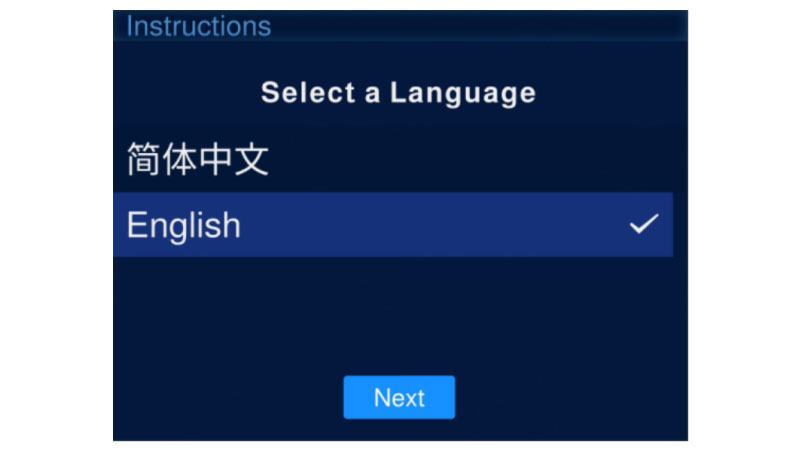
Step 1: When you power on the device, instructions will appear on the LCD screen. Use the rotary knob to toggle between language options, such as Simplified Chinese or English, and press the knob to confirm your choice.
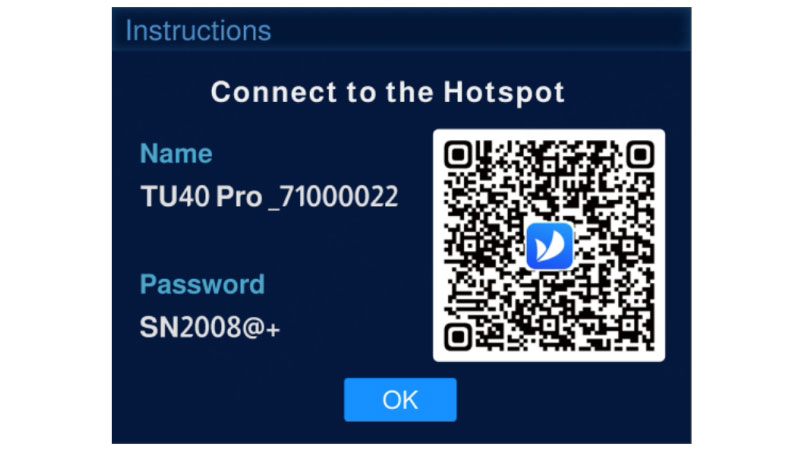
Step 2: After selecting your language, proceed by choosing Next. You’ll then need to connect to the device’s hotspot. Once the connection is established, confirm by selecting OK and pressing the knob.
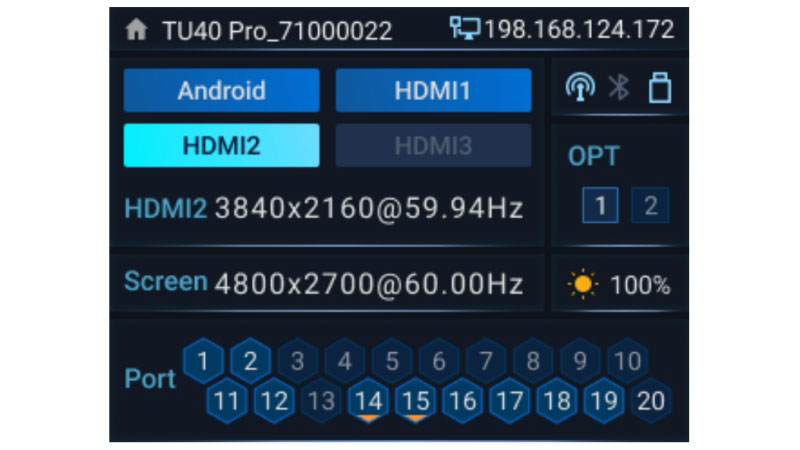
5.1.2 Home Screen
Once the hotspot connection is successful, the home screen will appear on the LCD panel. Here, you can view key information about the device, such as its status and configuration.
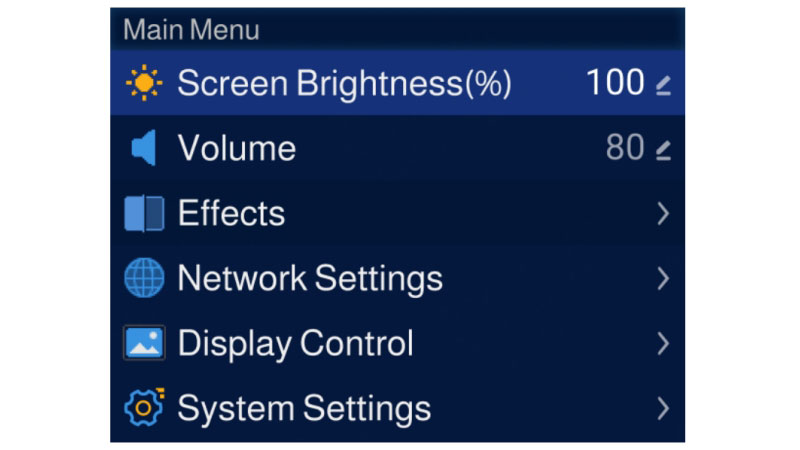
5.1.3 Main Menu
From the home screen, press the knob to enter the main menu. This menu provides access to various settings and features, allowing you to configure and control the TU40 Pro with ease.
5.2 Getting Started
5.2.1 Hardware Setup
Step 1: Begin by unpacking the TU40 Pro and all its components.
Step 2: Gather all the required accessories, such as the Ethernet cables, remote control, and the mirroring dongle.
Step 3: Set up the hardware environment by following the diagram provided. If needed, connect additional peripherals like a mouse, keyboard, sound system, camera, or infrared touch frame to enhance your setup.
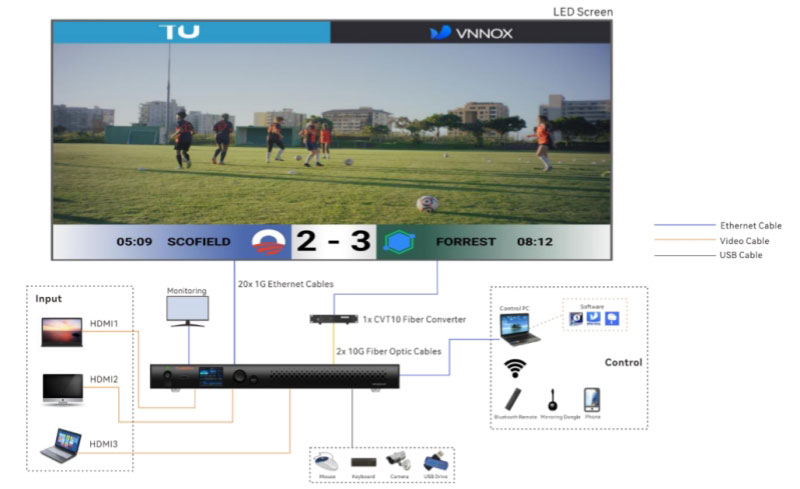
Step 4: Connect the Ethernet cables from your LED screen to the designated Ethernet output ports on the TU40 Pro, following the correct order for optimal performance.

5.2.2 Installing Necessary Applications
Search for and download ViPlex Handy and VNNOX Care from the app store.
ViPlex Handy makes program editing, publishing, and screen management simple and intuitive.
VNNOX Care offers streamlined screen configuration, topology adjustments, seam corrections, and automatic backup of screen settings.
5.2.3 Configuring the LED Screen
Step 1: Open the VNNOX Care app.
Step 2: On the Local Config page, tap Quick Start and follow the prompts to configure your LED screen.
For more detailed instructions, navigate to Profile > Help Center in the app to access the user manual.
5.2.4 System Initialization
To ensure smooth playback and publishing of programs using both internal and external sources, follow these steps when setting up the TU40 Pro for the first time:
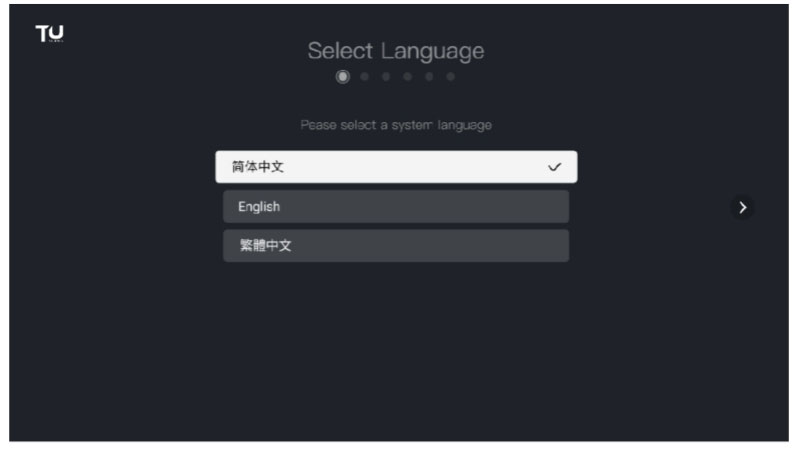
Step 1: Select your preferred system language from 简体中文, English, or 繁體中文.
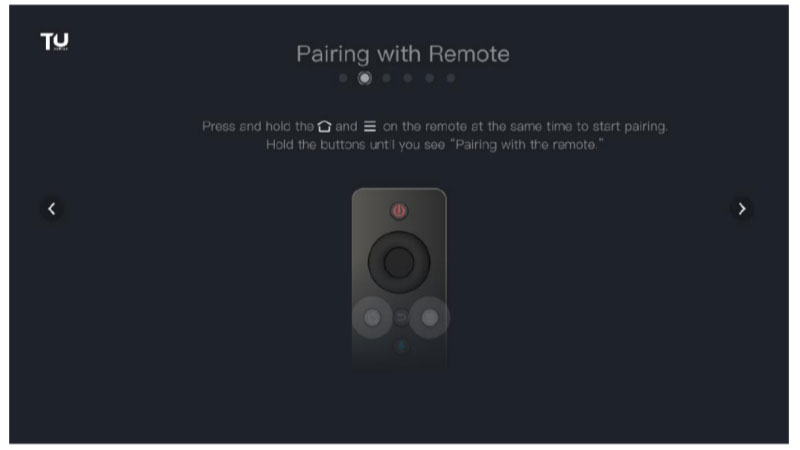
Step 2: Pair the remote via Bluetooth by pointing it at the TU40 Pro’s infrared sensor, then press and hold the Home and Menu buttons simultaneously until the “Pairing with the remote” prompt appears.
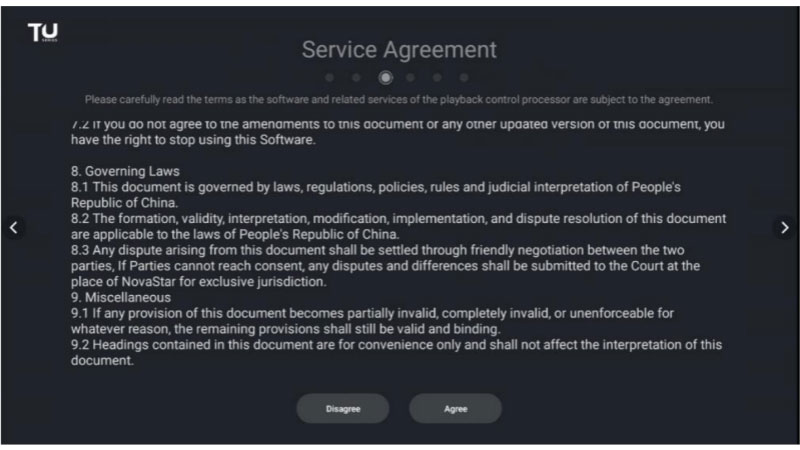
Step 3: Carefully review and agree to the Service Agreement.
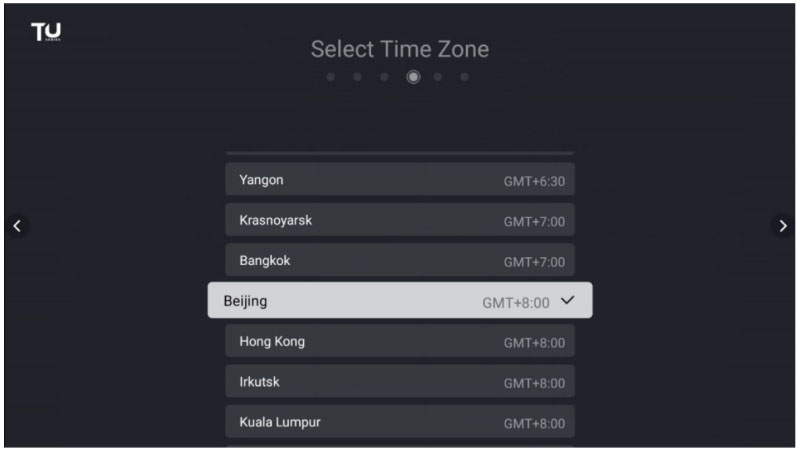
Step 4: Choose your correct time zone.
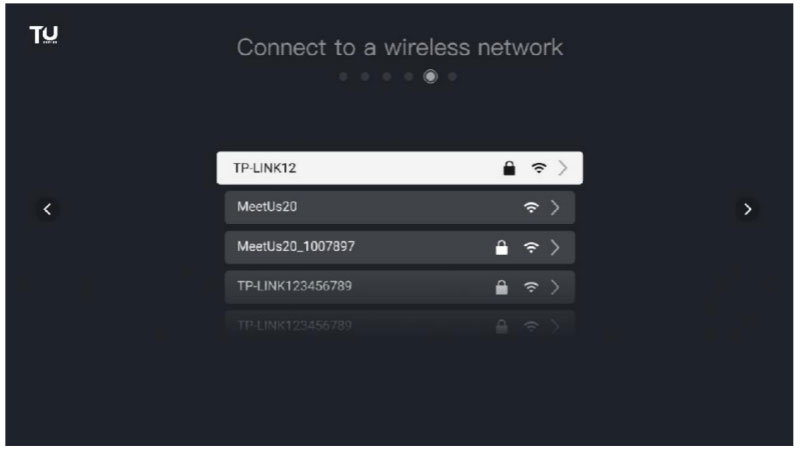
Step 5: Connect to a Wi-Fi network by selecting it, entering the password, and clicking Connect.
Step 6: Rename your device for easier identification and connection with other devices.
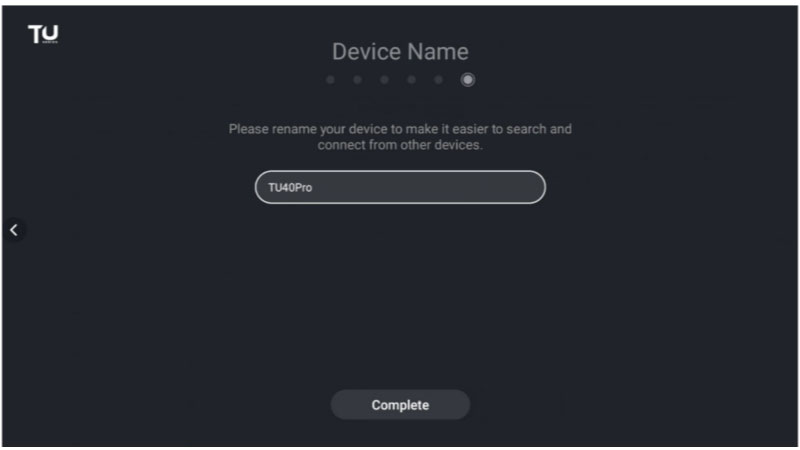
Step 7: Once these settings are completed, your TU40 Pro is fully initialized and ready for use. You can now start controlling and managing your LED playback efficiently.
5.3 Usage of the Remote
5.3.1 Remote Control Buttons
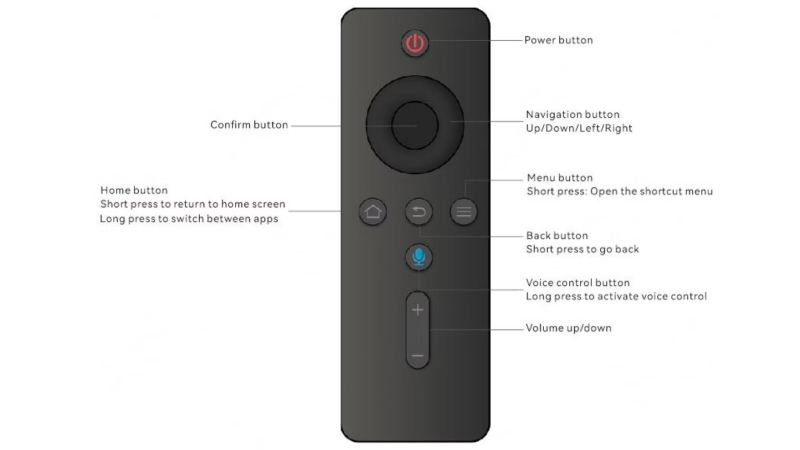
The NovaStar TU40 Pro remote control comes equipped with several key buttons designed to provide quick and easy access to the device’s functions.
5.3.2 Bluetooth Pairing Process
To pair the remote with the TU40 Pro via Bluetooth:
Point the remote toward the device’s infrared sensor.
Simultaneously press and hold the Menu and Home buttons.
Keep holding until you see the “Pairing with the remote” prompt at the bottom of the screen. This indicates the pairing process is underway.
6. TU40 Pro Resources Download
To make the most of your NovaStar TU40 Pro, it’s essential to have access to the latest firmware, software, and user manuals.
For all necessary downloads, including the latest TU40 Pro firmware, ViPlex Handy, VNNOX Care, and other NovaStar resources, visit our NovaStar Software download page. This page contains a comprehensive collection of NovaStar resources that will assist you in getting the best performance from your device, and you can Register LedInCloud first.
7. FAQs about TU40 Pro
What is the primary function of the NovaStar TU40 Pro?
The TU40 Pro is an advanced LED playback control processor that integrates sending card, Android OS, and video processing capabilities. It offers robust control for a variety of LED display applications, including screen mirroring, content management, and system configuration.
What is the maximum pixel load capacity of the TU40 Pro?
The TU40 Pro can handle up to 13 million pixels, making it capable of managing large, high-resolution LED displays with ease.
Can the TU40 Pro be used for wireless screen mirroring?
Yes, it supports wireless screen mirroring from platforms such as Windows, macOS, iOS, and Android. The maximum supported resolution for mirroring is 3840×2160 at 30Hz.
How can I control the TU40 Pro remotely?
You can control the TU40 Pro remotely through its front panel LCD, infrared remote, Bluetooth-enabled peripherals, or mobile apps like ViPlex Handy and VNNOX Care.
Which applications can the TU40 Pro be used in?
TU40 Pro is versatile and is very suitable for conference/fixed installation/asynchronous.
What are the different methods to control playback on the TU40 Pro?
Mobile App: Use ViPlex Handy for intelligent playback control, program editing, and publishing.
Remote Control: Manage local programs, perform basic program edits, and control playback.
USB Playback: Supports standalone playback, allowing you to plug and play content from USB devices.
Does the TU40 Pro support AI-based image enhancement?
Yes, the TU40 Pro comes with AI image enhancement, which intelligently recognizes the content being played and optimizes colors, contrast, and sharpness for each frame, enhancing the visual experience.
