From this article, you will learn all about NovaStar NovaLCT. No matter you want to free download the NovaStar LCT Software, find some guides about NovaLCT screen configuration or how to use it, or the difference between NovaStar NovaLCT and SmartLCT.
Catalog:
2. NovaLCT Software Free Download and Install
3. Nova LCT Software Functions and Features
4. NovaStar Nova LCT Applications
NovaLCT Synchronous
NovaLCT Asynchronous
5. NovaLCT Manual & User Guides
How to Update NovaLCT Software
NovaStar LCT Screen Configuration
Firmware Program Update
NovaLCT Adjust Brightness Manually
NovaStar NovaLCT Screen Monitoring
1. What Is NovaStar Nova LCT?
NovaStar NovaLCT is a software used on Windows to configure the control system, monitor, set, and adjust the LED Screen. It can be used as:
- NovaLCT LED Configuration Tool for Synchronous Control System: The images are played and controlled on the screen synchronously with the video source (such as on a PC or camera).
- NovaLCT LED Configuration Tool for multimedia players of Asynchronous Control System: The resources are played and controlled asynchronously. The program is pre-stored on the local device. Then, it will be sent and played on the LED screen wall.
2. NovaLCT Software Free Download and Install
Click the links below to download NovaLCT-related resources. Register LedInCloud for more NovaStar Software and Resources.
2.1 NovaStar NovaLCT V5.5.0
2.2 NovaStar NovaLCT V5.4.8
2.3 NovaLCT Install
Ensure you have a Windows PC ready before setting up NovaLCT. Temporarily turn off any antivirus software to prevent installation interference.
Extract the contents of the installation package, initiate the .exe file, and proceed with the instructions provided by the setup wizard to finalize the installation process.
Should a firewall notification emerge, permit the installation to continue. In instances where your PC lacks the serial port driver or possesses an outdated version, the NovaLCT installer will take care of the installation or update automatically.
3. Nova LCT Software Functions and Features
3.1 Function Introduction
Operating System Compatibility: Primarily runs on Windows OS.
Synchronization Support: NovaLCT supports synchronization with application scenarios and requires coordination with the receiving card.
Hardware Control: It operates monitoring cards and multifunction cards.
Intelligent Settings: Supports smart settings for the required LED display screens.
Custom Adjustments: Allows customization of brightness adjustment and supports power control.
Hardware Monitoring: Monitors hardware to enable information viewing.
Key Information Display: Allows viewing of critical information, making your display information management easier.
3.2 Software Features
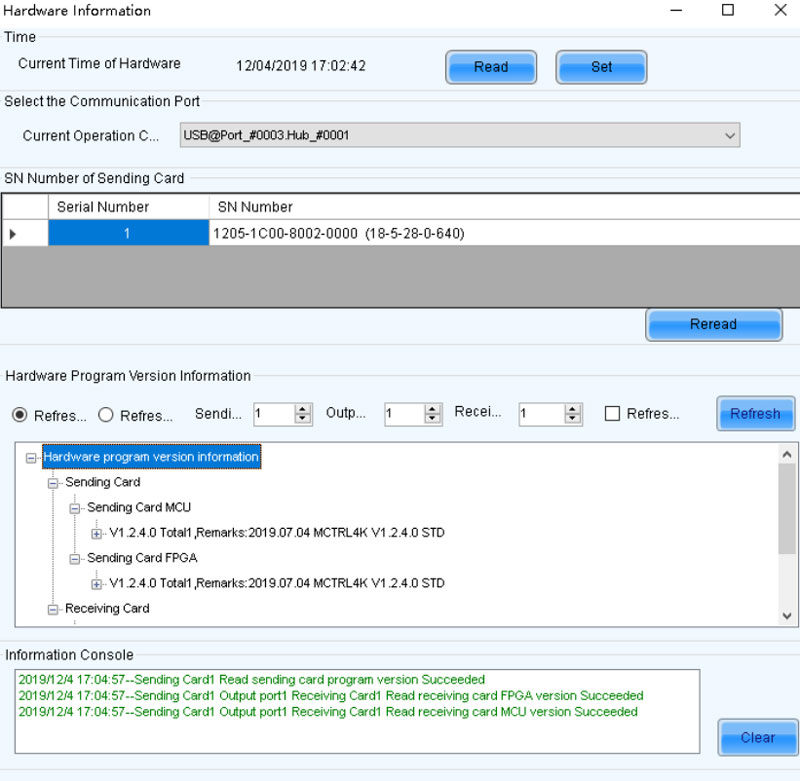
Hardware Information Viewing: Check hardware information and display pre-stored images.
Display Adjustment: Adjust display effects, enable cloud monitoring, and manage lamp board Flash.
Relay Management: Manage the relay of receiving cards, configuration information, and the main window position.
Screen Control: Control the screen, monitor, inspect, and adjust multiple batches.
Controller Configuration: Import controller box configuration files and quickly adjust brightness lines.
Video Control: Utilize video control, testing tools, calculators, and external programs.
Advanced Login: Supports advanced synchronization login, demo mode login, and media player login.
4. NovaStar Nova LCT Applications
NovaLCT displays different features and parameters when working with different devices and programs. It can be used in NovaStar sender boxes, Nova MCTRL 600 controllers, Nova MCTRL 660 controllers, NovaStar VX4S controllers, etc.
4.1 NovaLCT LED Configuration Tool for Synchronous Control System
In synchronous mode, the PC is only used to control the LED display wall, and the media source is transferred by DP/HDMI/DVI cable from other devices.
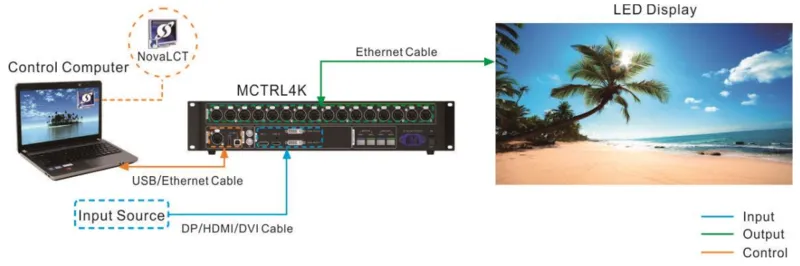
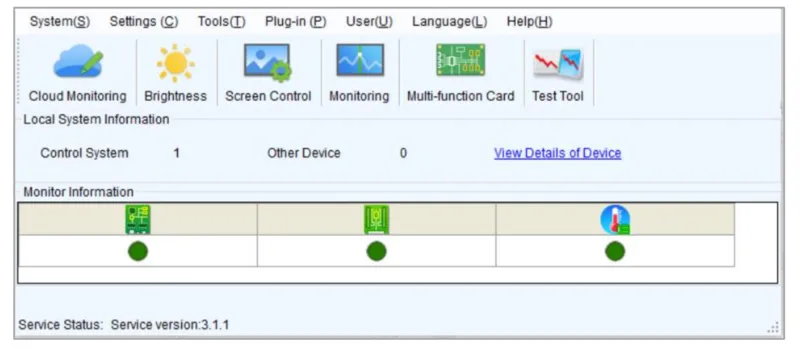
If the hardware is successfully connected and the sending card is operating normally, NovaLCT will connect to the sending card automatically. After the successful connection, the NovaLCT main window displays the sending card quantity and monitoring information about the control system.
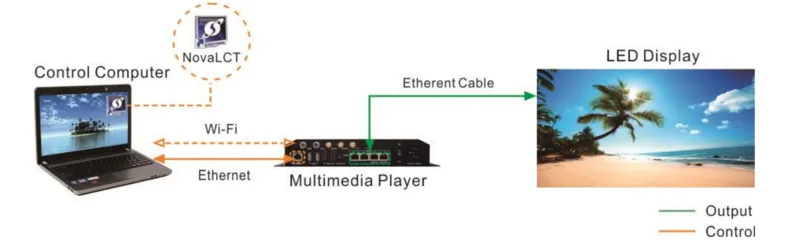
4.2 NovaLCT LED Configuration Tool for Asynchronous Multimedia Play Control System
In this asynchronous mode, the ethernet works as the control cable and media source transmission cable (the media sources are stored on the PC).
Direction connection via Ethernet cable:
Simply connect the control computer to the Multimedia Player using an Ethernet cable. For this to work, ensure the Multimedia Player’s DHCP is active. Then, in NovaLCT, navigate to Plug-in > DHCP Service, choose your PC’s IP address, and activate the DHCP Service.
Direction connection via Wi-Fi:
Link the control computer, which runs NovaLCT, to the Multimedia Player over Wi-Fi. If your Multimedia Player comes with an integrated Wi-Fi AP, this connection can be established without any additional setup.
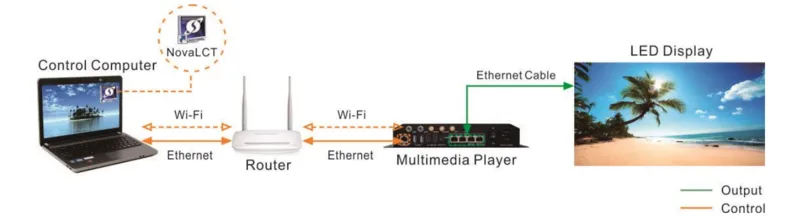
Wired LAN connection:
Connect your control computer and multimedia player to the same wired LAN using an Ethernet cable. This plug-and-play method requires no additional configuration.
Wireless LAN connection:
For a wireless setup, ensure both the control computer and multimedia player are on the same Wi-Fi network. This connection type is viable if your multimedia player is Wi-Fi STA compatible. Remember to enable the player’s DHCP settings. To connect, use configuration software like ViPlex to log into the multimedia player, then link it to the router’s Wi-Fi AP via the network configuration page.
5. NovaLCT Manual & User Guides
The operation NovaStar LCT manual guides are available with asynchronous and synchronous modes.
5.1 How to Update NovaLCT Software?
If you’re not running the latest Nova LCT software, an “Online Update” dialog will appear. To update to the new NovaLCT version, follow these steps:
Step 1: Click OK.
Step 2: Click Get Update.
Step 3: Once you have downloaded the update packag, click Install Update and wait for the installation.
5.2 NovaLCT Screen Configuration
To quickly complete NovaLCT screen configuration, load either a cloud or local configuration file. It’s important to note that NovaLCT is currently limited to configuring standard screens only.
- For a Cloud Configuration File: Ensure the control computer has an internet connection.
- For a Local Configuration File: Have the system configuration file (.scfg and .zip) ready.
While you can view the information in both the cloud configuration file and local .zip file within NovaLCT, editing is not possible until the data is transmitted to the hardware.
Conversely, the local .scfg file allows for both viewing and editing in NovaLCT before sending the information to the hardware.
Operation Steps
Step 1: Access the multimedia player by logging in.
Step 2: Navigate to Settings > Screen Configuration via the menu bar to initiate the dialog.
Step 3: Choose one of the following methods to upload a configuration file as needed.
Load From The Cloud Platform
- Choose “Cloud Restore” and pick a node from the dropdown menu.
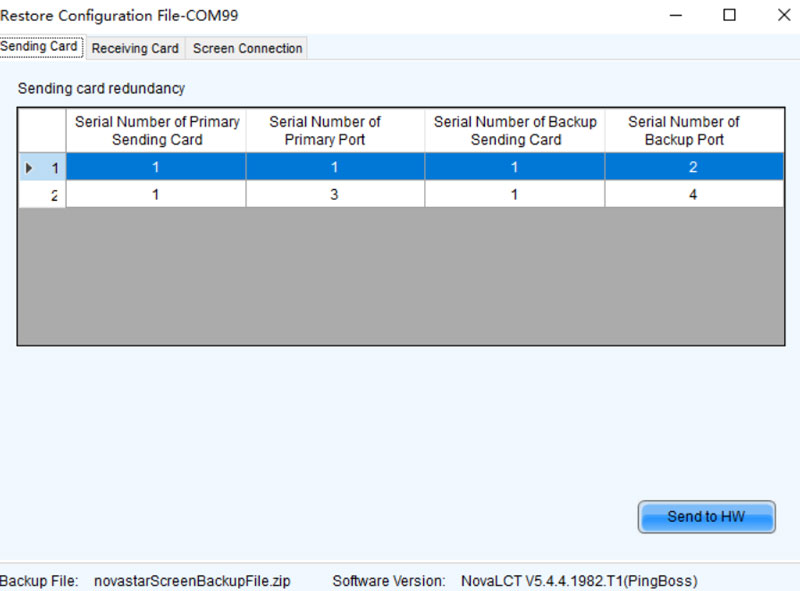
- Hit “Next” to bring up the “Restore Configuration File” dialog.
- Select the appropriate tab and dispatch the configuration file to your hardware.
Receiving Card: Opt for “Send By Topology” or “Send By Physical Address,” adjust the necessary parameters, and click “Send to Specified RV Cards” to transfer the receiving card configuration file to your hardware. If selecting an area via the software is impractical when “Select by Topology” or “List” is chosen, use “Select Operating Area on Screen” to pick the area directly on the display window.
Screen Connection: Press “Send to HW” to forward the screen connection file to your hardware.
In the pop-up dialog, select either “Save to HW” or “Don’t Save to HW.”
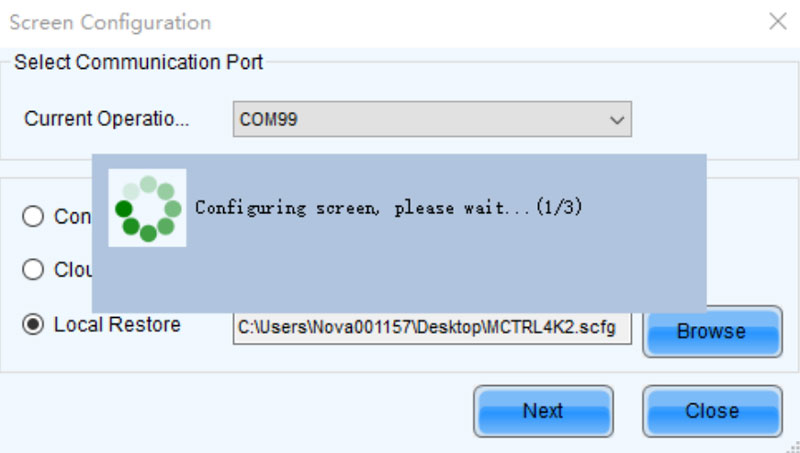
Load From Local PC
- Select Local Restore.
- Click Browse to select a configuration file, and Open it.
Refer to the visuals and steps under the “Load from cloud platform” section for the .zip local configuration file.
The loading progress for the .scfg local configuration file will be shown. Once the file is loaded, the dialog box will close on its own.
5.3 Firmware Program Update
Check and update your current firmware program version of the receiving card and sending card
Step 1: Sign in to the multimedia player.
Step 2: Enter “admin” to access the program loading interface.
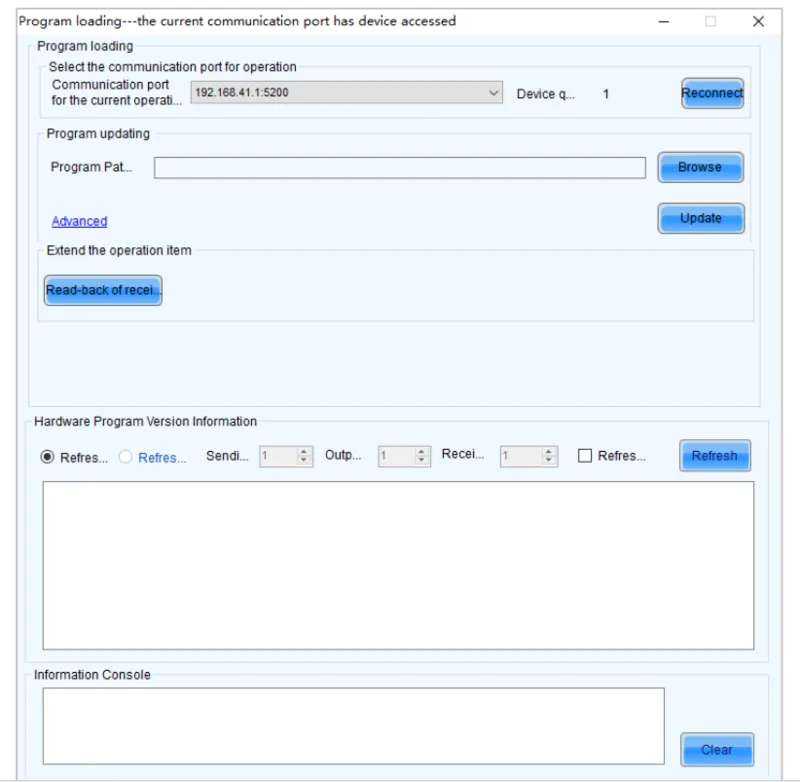
Step 3: Select the appropriate communication port. If reconnection to the multimedia player is necessary, select Reconnect.
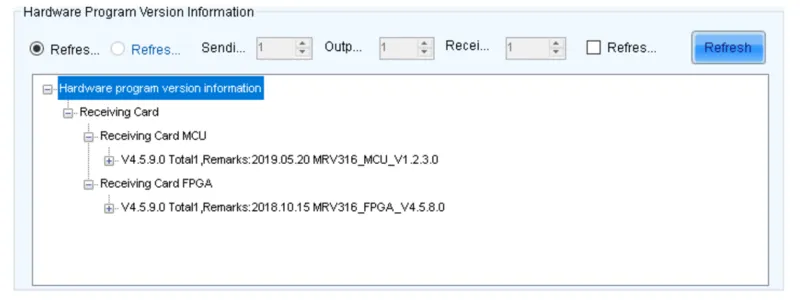
Step 4: Define the range for the update and click Refresh to check the current firmware version on your hardware. If your module includes an MCU, choose Refresh Module MCU to review the MCU’s version.
Step 5: Click Browse, pick a firmware package, and confirm with OK.
Step 6: Go to Advanced and choose the components you wish to update, and confirm with OK.
Step 7: Initiate the update by clicking Update.
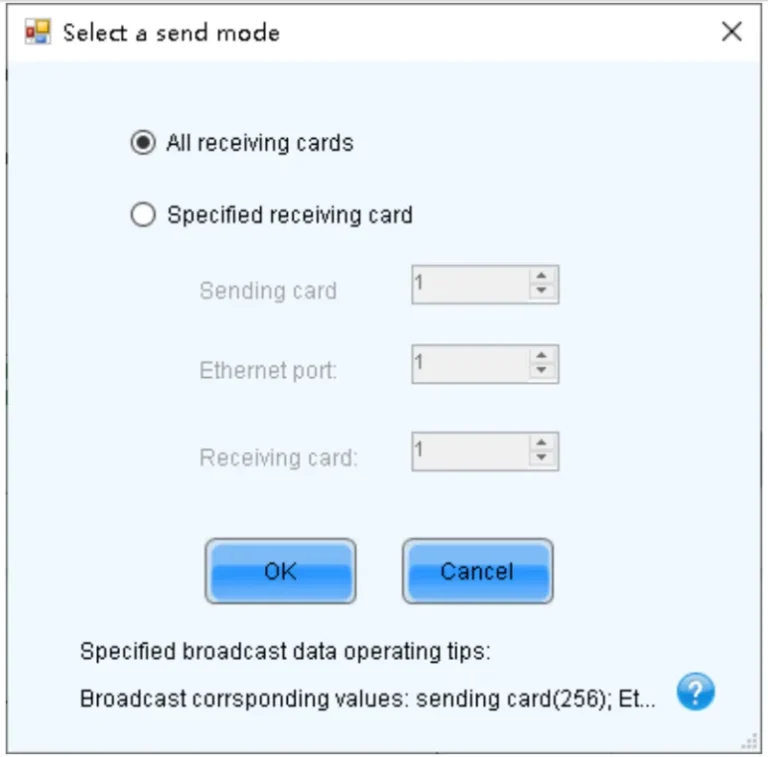
Step 8: Decide whether to update all receiving cards or just a specific one, then confirm with OK.
Step 9: Once the update is completed, click OK.
5.4 NovaLCT Adjust Brightness Manually
Step 1: Sign in to the multimedia player.
Step 2: Click on “Brightness” or go to Settings > Brightness in the menu bar.
Step 3: Use the slider to modify brightness levels and choose between Grayscale or Contrast. If your screen is equipped with TBS6332 or TBS6336 chip receiving cards, you can set up Gamma Interlink.
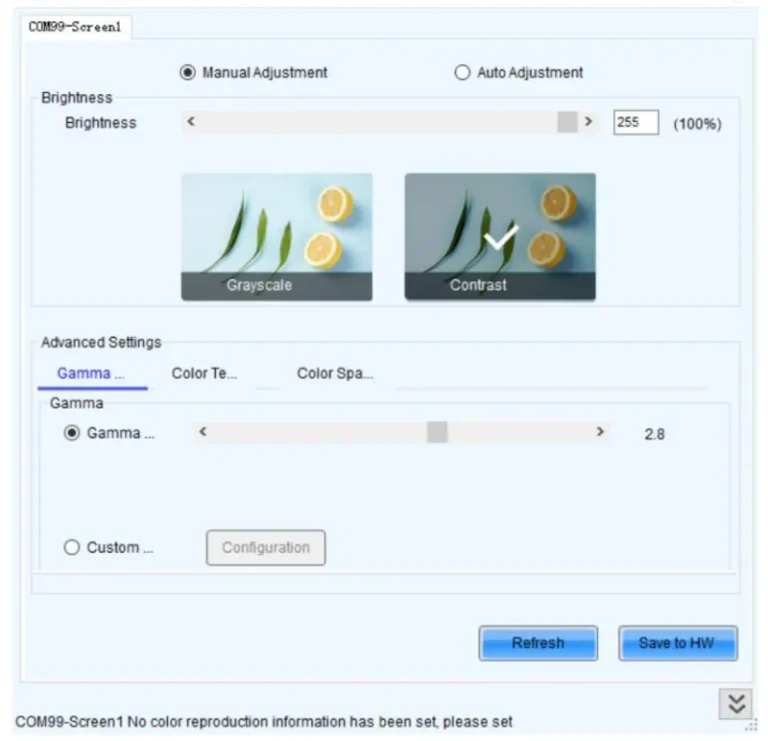
Step 4: Proceed as needed:
- Adjust Gamma: Access “Gamma Value Adjustment” and move the slider to alter the Gamma value, or define a custom Gamma as outlined in “Custom Gamma.”
- Adjust Color Temperature: Select “Rough Adjustment” and move the slider to change the color temperature, or opt for “Precise Adjustment” and apply a predefined custom color temperature. For setting up a new custom color temperature, refer to “Custom Color Temperature.”
- Adjust Color Space: Turn off color space, activate a standard color space (PAL/NTSC), or implement a custom color space. Instructions for creating a custom color space are available in “Custom Color Space.”
Step 5: Once you’ve completed the setup, click “Save to HW” to store the configurations on the hardware.
5.5 NovaStar NovaLCT Screen Monitoring
For centralized remote monitoring of your screens’ operational status, register them with NovaStar VNNOX Care.
5.5.1 Register Screens with VNNOX Care
Save configuration files to register online screens.
Step 1: In the menu bar, select User > Advanced Synchronous System User Login. Input the password and press Login. The standard password is “admin.”
Step 2: From the menu bar, go to Settings > Screen Configuration to bring up the dialog box.
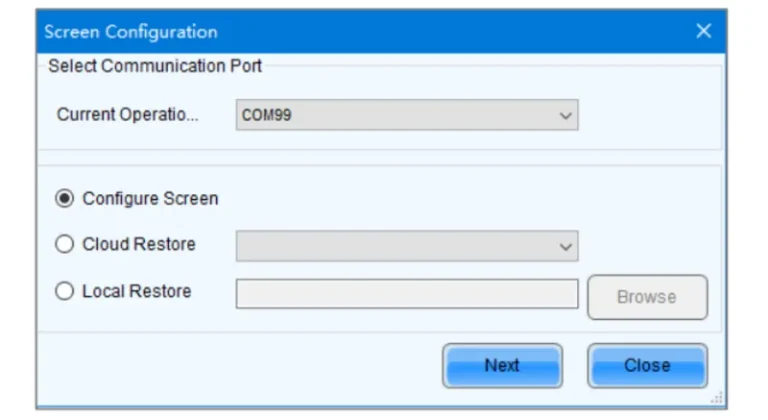
Step 3: Pick a communication port.
Step 4: Choose Configure Screen and hit Next.
Step 5: On the Screen Configuration page, select Save System Configuration File to display the dialog box.
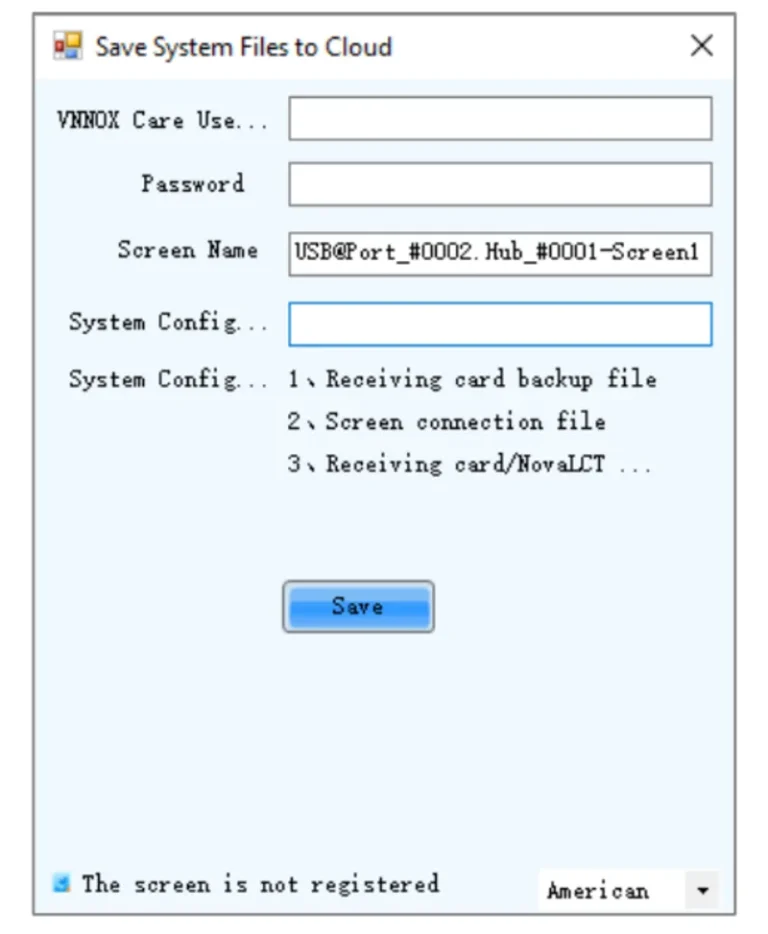
Step 6: Type in your VNNOX Care username and password, assign a screen name and system configuration file name, and choose a server node on the bottom right.
Step 7: Once settings are complete, select Save.
Step 8: Close the prompt box after a successful save.
5.5.2 View and Configure Monitoring
The use of a monitoring card precludes simultaneous hub monitoring and smart module usage.
Step 1: Select Tools > Monitoring from the menu bar to access the monitoring page. Alternatively, right-click the desktop taskbar and choose Open MonitorSite.
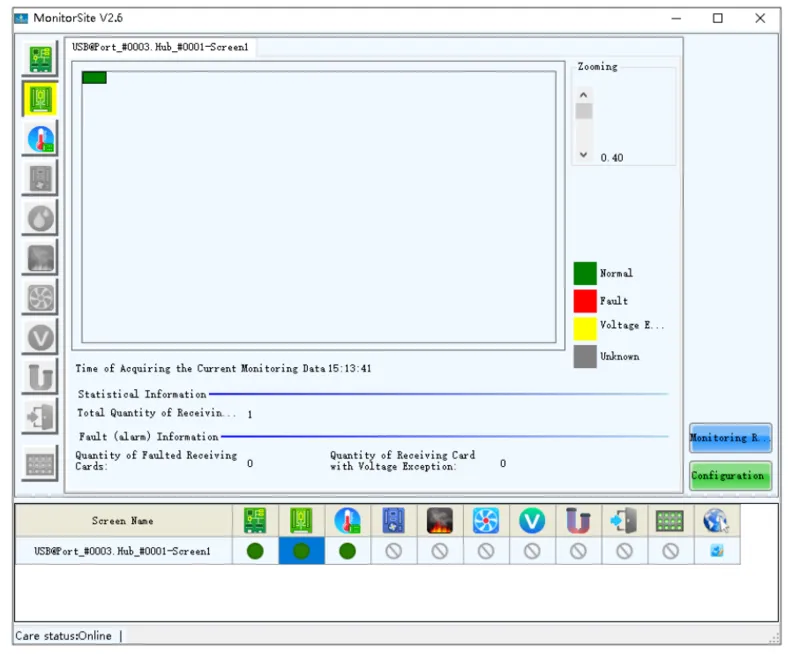
Step 2: Click on the monitoring item found on the left or at the bottom of the page to inspect detailed monitoring data.
Step 3: Hit Configuration to adjust monitoring settings, including Refresh Period, Hardware Settings, Alarm, Monitoring Control, Email, and Email Log.
5.5.3 More Operation Guides
6. NovaStar NovaLCT VS NovaStar SmartLCT
NovaLCT and SmartLCT are both software solutions from NovaStar designed for configuring LED displays, but they cater to different user needs and skill levels.
NovaStar NovaLCT
• More Professional: Geared towards industry professionals like manufacturers, developers, and technical support engineers.
• Comprehensive Features: Provides a complete array of tools for LED display management, such as brightness and chroma tuning, calibration, and screen setup.
• Reliability: Esteemed as the industry benchmark for its dependability and extensive features.
• Windows-Based: Exclusively compatible with Windows OS.
• Advanced Use: Ideal for intricate configurations and calibrations.
• Professional Users: Best suited for users well-versed in LED display tech.
• NovaStar Products: Recommended when utilizing NovaStar’s synchronous control systems and multimedia players.
NovaStar SmartLCT
• User-Friendly: Crafted for users with less technical experience, featuring an intuitive graphical user interface.
• Creative Design: Facilitates 360° rotation and inventive screen layouts.
• Uniformity Across Batches: Modifies coefficients to harmonize display uniformity, addressing variances from different production batches.
• Dual Hot Backup: Guarantees consistent data flow and display stability.
• Simplified Configuration: Optimal for straightforward and visually guided screen setup.
• Intuitive Interface: Favored by those who seek an easy-to-navigate user experience.
• Creative Features: Incorporates features like 360° rotation for adaptable visual presentations.
7. FAQs
a. Is NovaStar software free?
We offer Novastar Software and NovaStar RCFG File Download, firmware updates and product specifications.
b. What hardware components can NovaLCT control?
NovaLCT can operate monitoring cards, multifunction cards, and manage various LED display settings.
c. What types of adjustments can I make to my display using NovaStar Nova LCT?
Users can adjust display effects, manage cloud monitoring, handle lamp board Flash, and configure relay settings for receiving cards.
d. What monitoring capabilities does Nova LCT offer?
NovaLCT offers comprehensive monitoring capabilities, including hardware information viewing, display effect adjustments, cloud monitoring, and batch adjustments for multiple screens.