
Developed by NovaStar Technology, NovaLCT is a powerful software solution. It manages and controls LED displays with unparalleled precision.
Whether setting up a simple display or managing a complex array of screens, NovaLCT is there to help.
1. NovaStar NovaLCT Introduction
1.1 What is NovaLCT?
NovaLCT stands for NovaStar LED Control Software. It is a comprehensive software designed for configuring and managing LED display systems.
The software acts as a central hub for controlling every aspect of an LED display, including screen setup, color calibration, and hardware connectivity.
With NovaLCT, users can easily create, edit, and manage screen configurations.
The software supports a wide range of NovaStar hardware, making it a versatile solution for both small installations and large, complex display networks.
1.2 Benefits
Precise Control: Users are able to fine-tune parameters such as brightness, contrast, and color balance.
Ease of Use: NovaLCT features an intuitive interface that allows users to easily configure and manage their LED displays. The step-by-step setup process and real-time feedback reduce the learning curve and allow users to get displays up and running quickly.
Versatility: NovaLCT supports a wide range of NovaStar hardware, making it suitable for a variety of applications from retail displays to large outdoor screens. Its versatility allows users to rely on a single software solution for many types of installations.
Real-time Monitoring: Real-time monitoring and diagnostic features help users identify and resolve issues in a timely manner.
Advanced Configuration Options: NovaLCT includes advanced features such as multi-screen management, pixel mapping, and color calibration. Users can create complex display setups and achieve consistent visual quality across all screens.
Backup and Restore: Users can save their screen configurations and restore them when needed.
2. Getting Started with NovaLCT
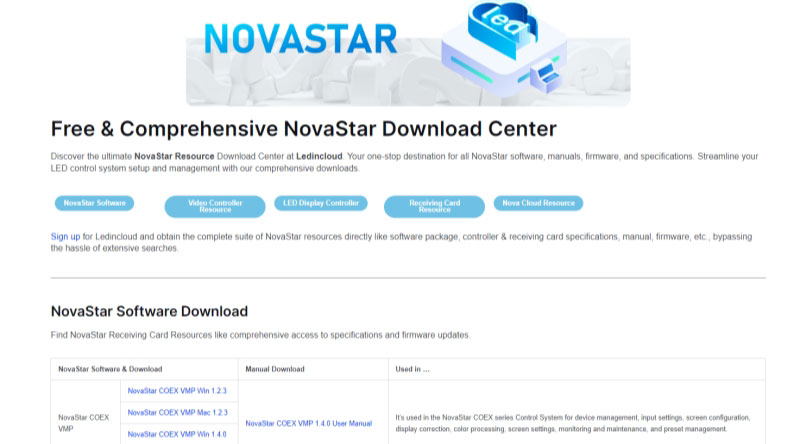
You can click the following files to download.
a. If you need a different version or other NovaStar Software Downloads, you can visit our website: LED Screen Cloud Platform.
b. Locate NovaLCT software or other softwares.
c. Download the necessary files.
d. Install NovaLCT.
Once the download is complete, follow these steps to install NovaLCT:
Locate the Installation File: Find the NovaLCT installation file you downloaded (typically named “NovaLCT_Setup.exe”).
Run the Installer: Double-click the installation file to start the installation process.
Follow the On-Screen Instructions: The installation wizard will guide you through the setup process. Accept the license agreement, choose your installation directory, and proceed with the installation.
Complete the Installation: Once the installation is complete, you may need to restart your computer to finalize the process.
3. Step-by-Step Guide of NovaLCT Screen Configuration
3.1 Check Firmware
Before you dive into configuration, you need to verify that all devices are online and running the correct firmware version. Here’ s how:
a. Log into NovaLCT: Open the NovaLCT software and log in using the password “admin”.
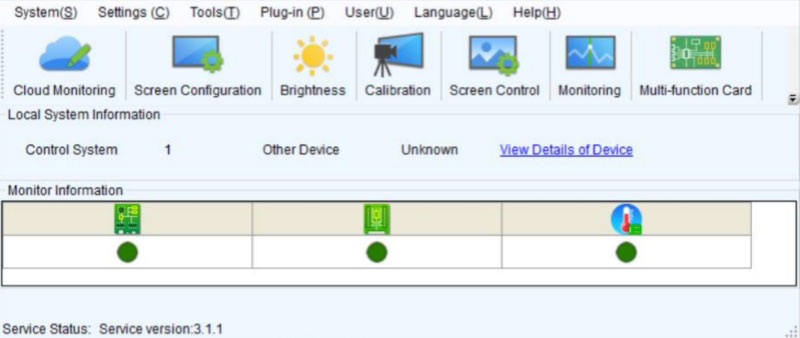
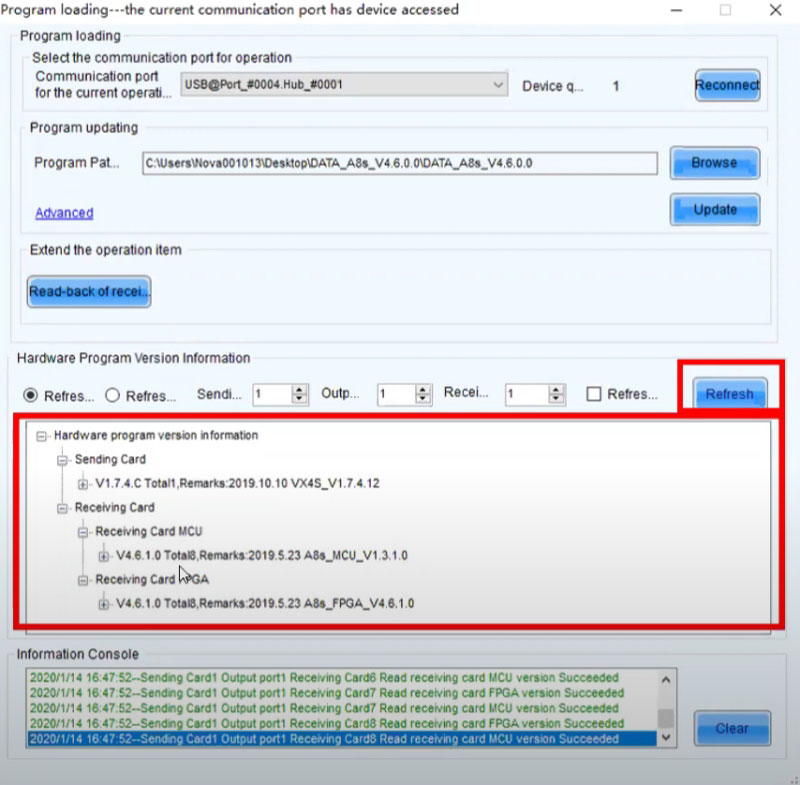
b. Check Device Status: Navigate to the main interface and click the “Refresh” button. All connected devices, including the sending and receiving cards, will be displayed on the page.
c. Verify Firmware Versions: Check the firmware versions of your devices. For example, the sending card VX4S has firmware version 1.7.4, and the receiving card A8s has firmware version 4.6.1.
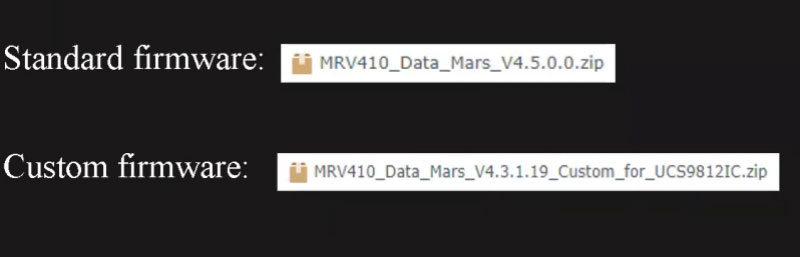
d. Understand Firmware Types: There is a big difference between standard firmware and custom firmware. Custom firmware is tailored for users with specific functions, so users are advised not to change it easily without consulting the screen manufacturer.
3.2 Graphics Card Settings
Follow these steps to configure your graphics card:
a. Set Display Resolution: Right-click on your desktop and select “Display settings”.
b. Adjust Scale and Layout: Set “Scale and Layout” to 100% so that the screen displays correctly without errors.
c. Match Resolutions: Set the graphics card resolution to match the LED display resolution for seamless display.

3.3 Sending Controller Settings
The sending controller (sending card) needs to be configured to match your screen and video input settings:
a. Access Screen Configuration: In NovaLCT, navigate to the screen configuration interface.
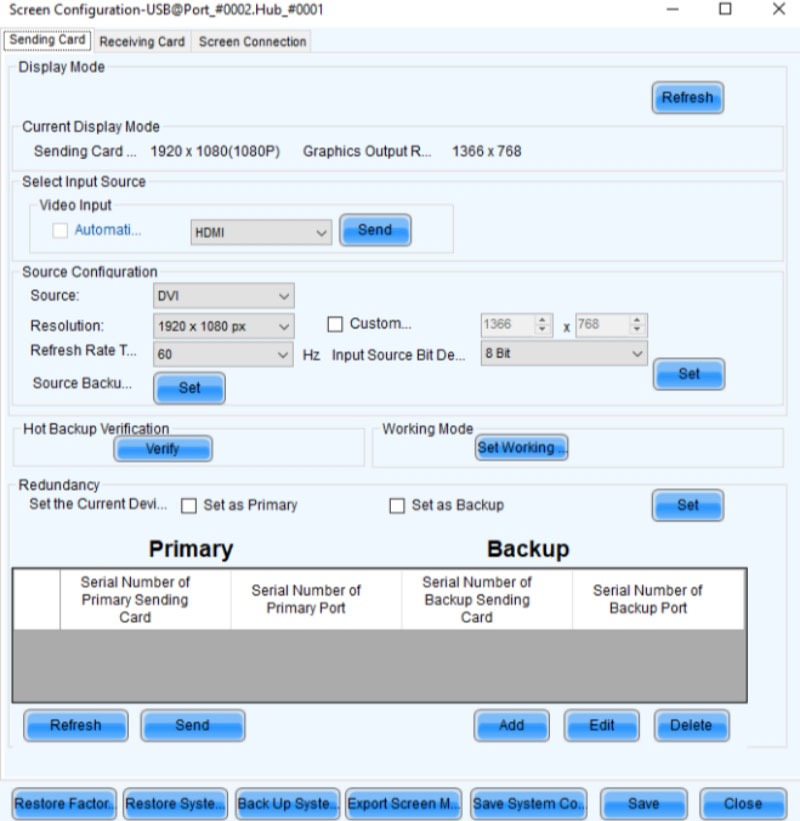
b. Configure Source Settings: On the sending card page, set the source configurations.
Choose the video source.
Set the resolution to match your screen resolution.
Adjust the refresh rate to match the video input refresh rate.
Save Settings: Click the “Set” button to apply the settings. Then, click “Refresh” to check if the settings are applied successfully.
Verify and Save: Ensure all settings are correct and save them to the hardware.

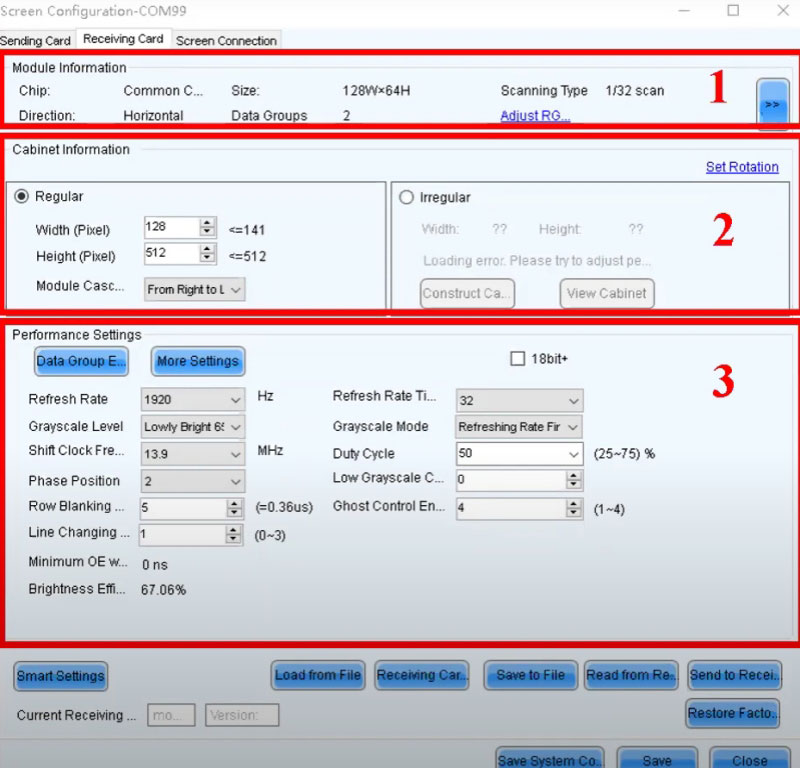
3.4 Receiving Card Settings
Configuring the receiving cards involves setting up module information, cabinet details, and performance parameters. Here’s how:
a. Load Configuration Files: Load the rcfgx (receiving card configuration) files provided by your manufacturer.
b. Click “Load from file” to load the rcfgx files into NovaLCT.
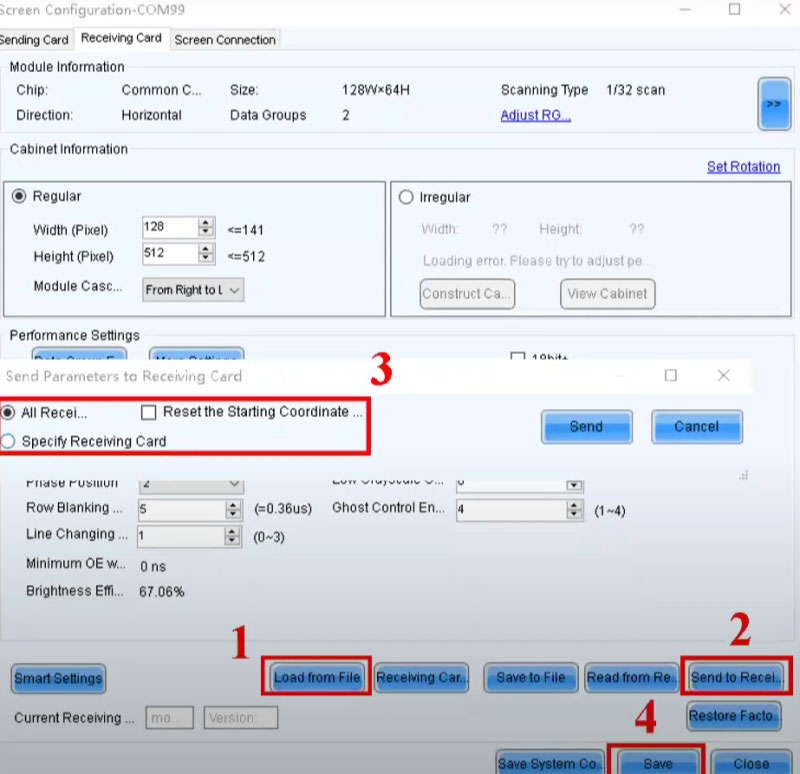
c.Click “Send to receiving card” to apply the settings.
d.Choose Target Cards: Select whether to send the configuration to all receiving cards or specific ones.
e.Use “All receiving card” for uniform cabinets.
f.Use “Specific receiving card” for varied cabinet configurations.
g.Read Existing Configurations: If you lack rcfgx files but have functional cabinets, read and save the existing configuration.
h.Click “Read from receiving card”.
i.Specify the receiving card’ s position and save the configuration.
j.Important: Always save the rcfgx files after making changes to avoid losing configurations.
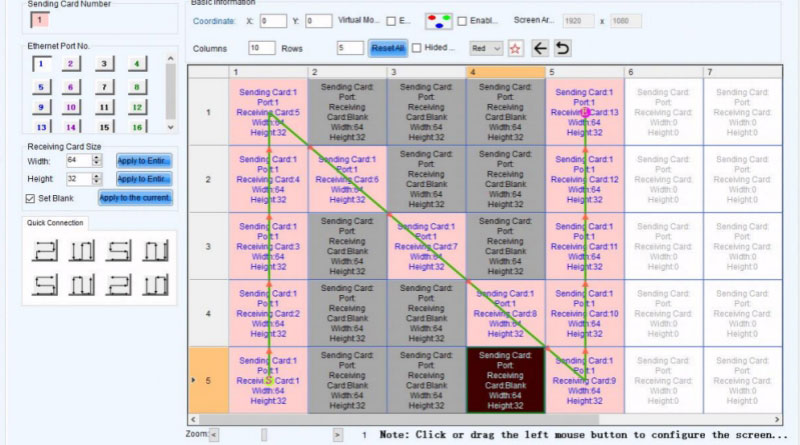
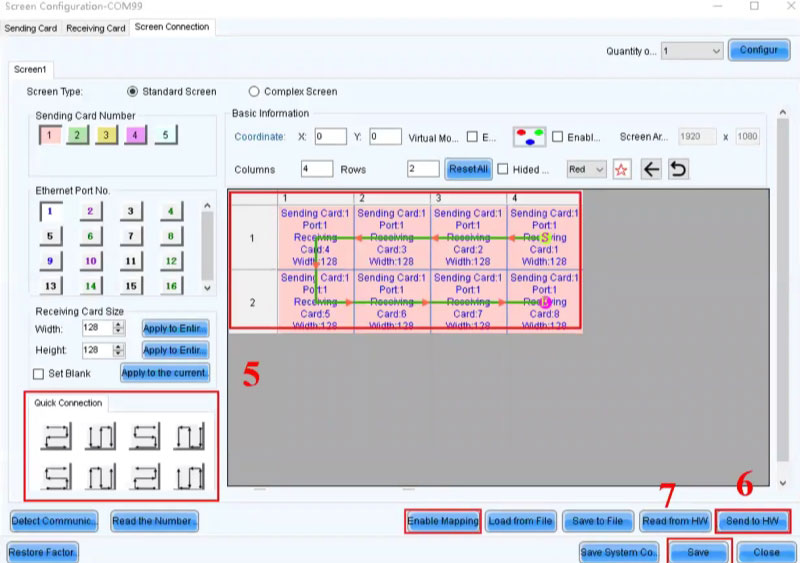
3.5 Screen Connections
a. Configure Screen Quantity: Set the screen quantity to one for basic configurations.
b. Input Columns and Rows: Enter the number of columns and rows in your screen setup.
c. Select Sending Cards: The software will detect connected sending cards. Select the appropriate number and Ethernet port numbers.
d. Set Receiving Card Size: Input the height and width of the receiving cards, usually matching the cabinet size.
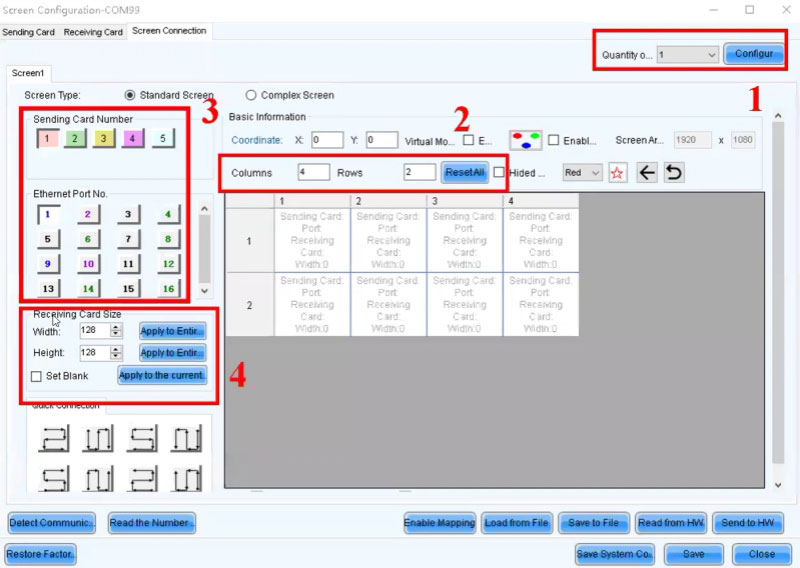
e. Map Cabinets: Use the quick connection feature or manually map each cabinet to its corresponding position:
f. Select a sending card and Ethernet port.
g. Click each cabinet to indicate its position in the setup.
h. Save Configurations: After completing the settings, save them to the hardware to ensure they are retained even after powering off the system.
i. Final Note: Saving configurations at each step.
3.6 Operation Guides Videos
4. Additional Resources
To maximize your experience with NovaLCT and NovaStar products, we provide a wealth of NovaStar Software.
Register LedInCloud to access free software downloads, including the latest versions of NovaLCT.
We offer comprehensive user manuals and detailed information about all NovaStar products.
5. Conclusions
By following this comprehensive guide to NovaLCT Screen Configuration and leveraging the other resources we provide, you can make your LED display configuration a success and achieve high-quality visuals.