
NovaStar VX 400 is an all-in-one LED Video controller. It can work as a video processor, LED Video sender, and LED video controller. Support kinds of video format resources and HDMI audio input resources. A VX400 unit can drive up to 2.6 million pixels, with the maximum output width and height up to 10,240 pixels and 8192 pixels respectively, which is ideal for ultra-wide and ultra-high LED screens.
More information like vx400 applications, specifications, resource downloads, etc., are going to be shown in the following sections.
1. NovaStar VX400 Applications
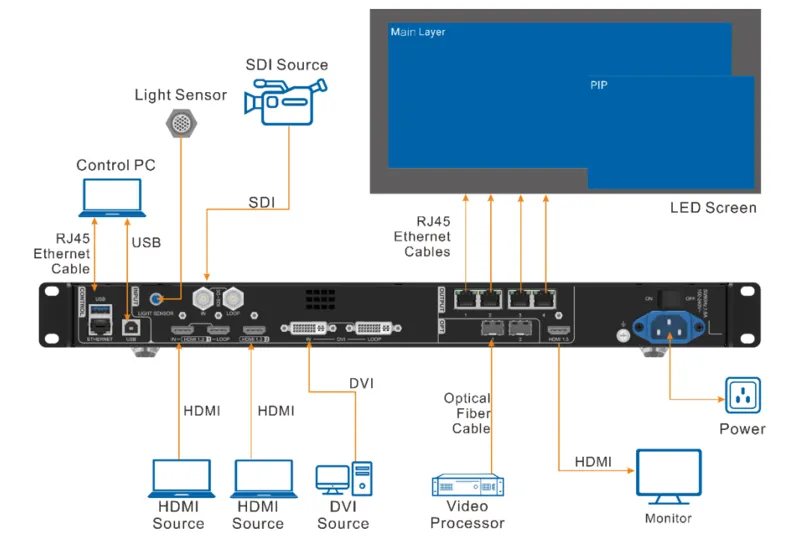
1.1 Work as a video controller
The HDMI output connector is used for monitoring in video controller mode.
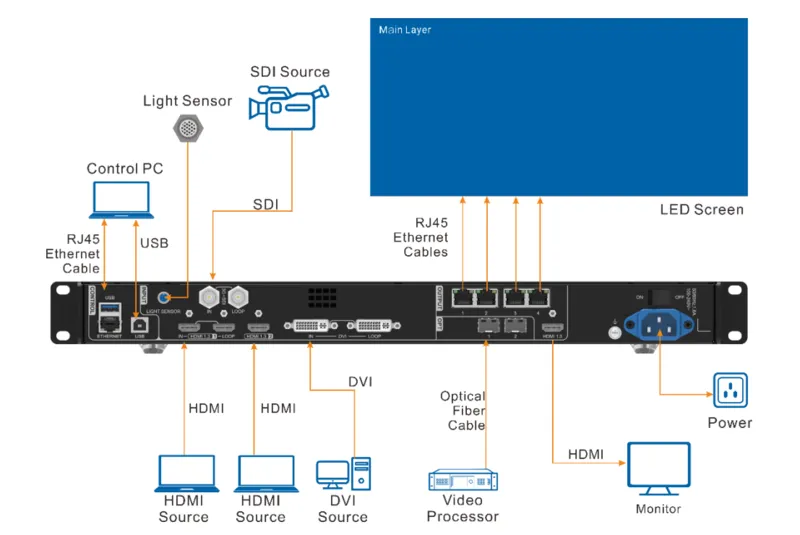
1.2 Work in Bypass mode
In bypass mode, only the main layer can be used, the PIP layer is unavailable.
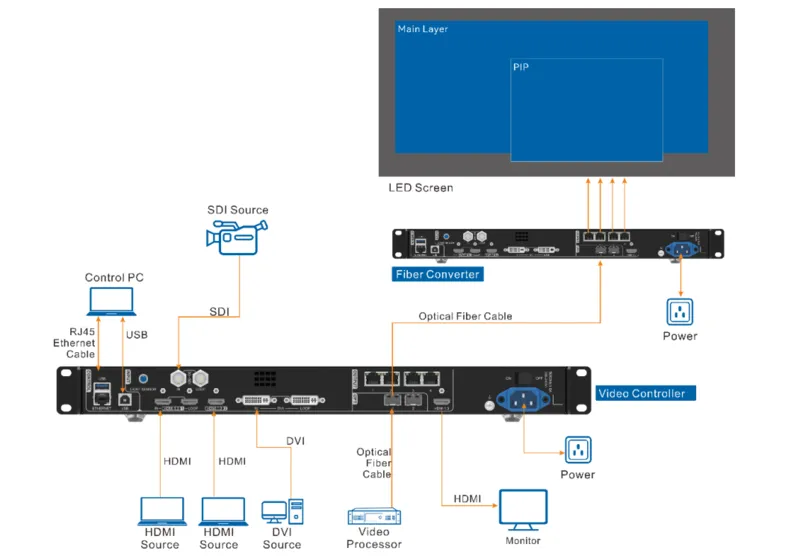
1.3 Work as a fiber convert
When you transfer data over a long distance, this work mode can be useful. Except for VX400, you also need a fiber converter in this work mode.
2. VX400 Price
The price of NovaStar VX400 is about 880 USD. You can consult us for the specific price. I recommend you to register our LedInCloud Price Calculator, which can help you check the price and download the consultation for free. We also have a professional team to serve you.
3. NovaStar VX400 Specs
3.1 Nova VX 400 Connector Specifications
Input Connectors:
| Connectors | Details |
| 1 x 3G-SDI |
|
| 2 x HDMI 1.3 |
Max. width: 3840 (3840×648@60Hz) Max. height: 2784 (800×2784@60Hz) Forced inputs supported: 600×3840@60Hz
|
| 1 x DVI |
Max. width: 3840 (3840×648@60Hz) Max. height: 2784 (800×2784@60Hz) Forced inputs supported: 600×3840@60Hz
|
Output Connectors:
Connectors | Details |
4 x Ethernet ports | Gigabit Ethernet ports: Max. loading capacity: 2.6 million pixels Max. width: 10,240 pixels Max. height: 8192 pixels Ethernet ports 1 and 2 support audio output. When you use a multifunction card to parse the audio, be sure to connect the card to Ethernet port 1 or 2. Status LEDs:
On: The port is well-connected Flashing: The port is not well connected, such as a loose connection Off: The port is not connected
On: The Ethernet cable is short-circuited Flashing: The communication is good and data is being transmitted Off: No data transmission |
1 x HDMI 1.3 |
|
Optical Fiber Ports:
Connectors | Details |
2 x OPT | OPT 1: Self-adaptive, either for video input or for output
OPT 2: For output only, with copy and backup modes. OPT 2 copies or backs up the output on 4 Ethernet ports |
Control Connectors:
| Connectors | Details |
| 1 x Ethernet |
Connect to the control PC or router. Status LEDs:
|
| 1 x LIGHT SENSOR | Connect to a light sensor to collect the ambient brightness, allowing for automatic screen brightness adjustment. |
| 2 X USB |
|
3.2 Nova VX 400 Physical Specifications
| Electrical Parameters | Power connector | 100–240V~, 1.6A, 50/60Hz |
| Rated power consumption | 28 W | |
| Operating Environment | Temperature | 0°C to 45°C |
| Humidity | 20% RH to 90% RH, non-condensing | |
| Storage Environment | Temperature | –20°C to +70°C |
| Humidity | 10% RH to 95% RH, non-condensing | |
| Physical Specifications | Dimensions | 483.6 mm × 301.2 mm × 50.1 mm |
| Net weight | 4 kg | |
| Packing Information | Accessories | 1x Power cord 1x HDMI to DVI cable 1x USB cable 1x Ethernet cable 1x HDMI cable 1x Quick Start Guide 1x Certificate of Approval 1x Safety Manual |
| Packing size | 550.0 mm × 175.0 mm × 400.0 mm | |
| Gross weight | 6.8 kg | |
| Noise Level (typical at 25°C/77°F) | 45 dB (A) | |
4. NovaStar VX400 Appearance
Before we do any operations, we need to be familiar with the buttons on Nova VX400. Let’s take a look at the following table and picture:

| The Number in the Picture Above | Area Name | Features |
| 1 | LCD screen | Display the device status, menus, submenus, and messages. |
| 2 | Knob |
|
| 3 | ESC button | Exit the current menu or cancel an operation. |
| 4 | Control area |
MAIN/PIP: Open or close a layer, and show the layer status. Status LEDs:
SCALE: A shortcut button for the full-screen function. Press the button to make the layer of the lowest priority fill the entire screen. Status LEDs:
|
| 5 | Input source buttons |
Show the input source status and switch the layer input source.
Notes:
|
| 6 | Shortcut function buttons |
|
5. NovaStar VX400 Manual and Software
VX400 Work with NovaStar software NovaLCT and V-Can to finish your in-field LED Screen operations and controls like screen configuration, output resolution settings, backup settings, layer adjustments, preset management, firmware update, light settings, etc.
LedInCloud provides the latest NovaStar Software Download. Here we will also guide you on how to do some necessary operations.
5.1 Device Update
Download the latest NovaStar firmware for your VX400 device updation. You can only update VX400 in V-Can or NovaLCT.
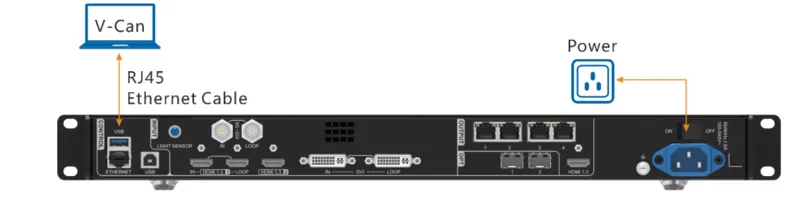
Before the update, use an Ethernet cable to connect the device to the control PC with V-Can installed, as shown in the below figure.
Firmware Update in V-Can:
- Step 1: Decompress the downloaded firmware package.
- Step 2: Start the V-Can software.
- Step 3: Go to System > Firmware Update to enter the update page.
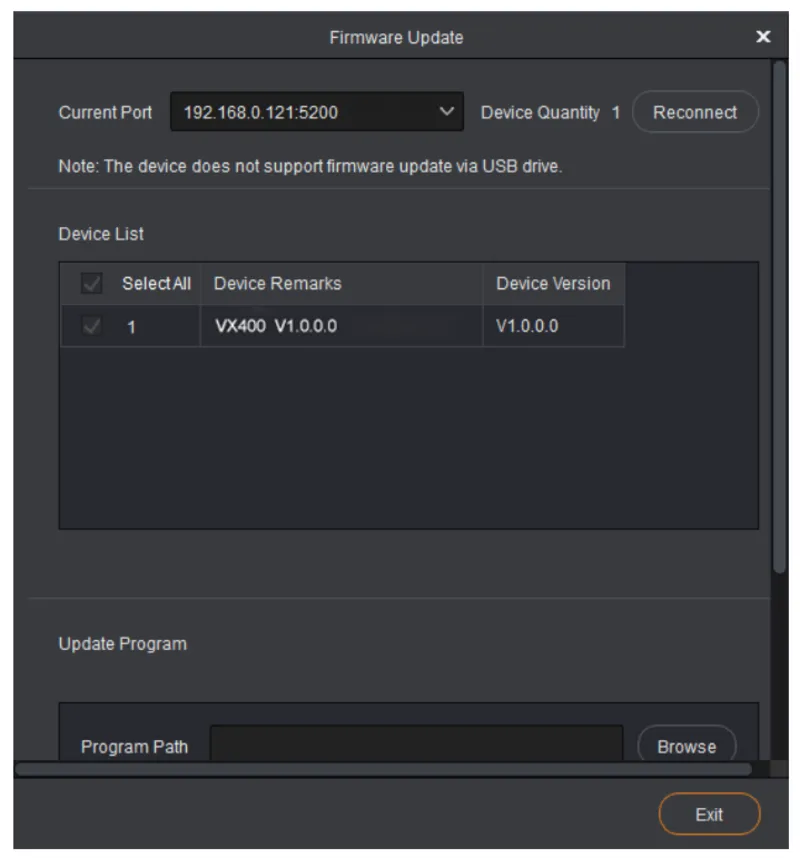
- Step 4: Click Browse in the Update Program area to open a window where you can select the location of the downloaded firmware package.
Note:
If you need to update multiple devices, check the boxes next to the desired devices in the Device List.
- Step 5: Click OK to add the update package.
- Step 6: Click Update to start the update process.
- Step 7: After the update, you can check whether the device is the latest version in the Device List area.
Yes => Go to Step 8.
No => Contact our technical support staff to find out the reason and update the device again. - Step 8 Click Exit to exit the update page.
Firmware Update in NovaLCT:
- Step 1: Run NovaLCT.
- Step 2: Go to User > Advanced Synchronous System User Login, enter the password (default: “admin”) and click Login.
- Step 3: Type the secret code “admin” to open the program loading page.
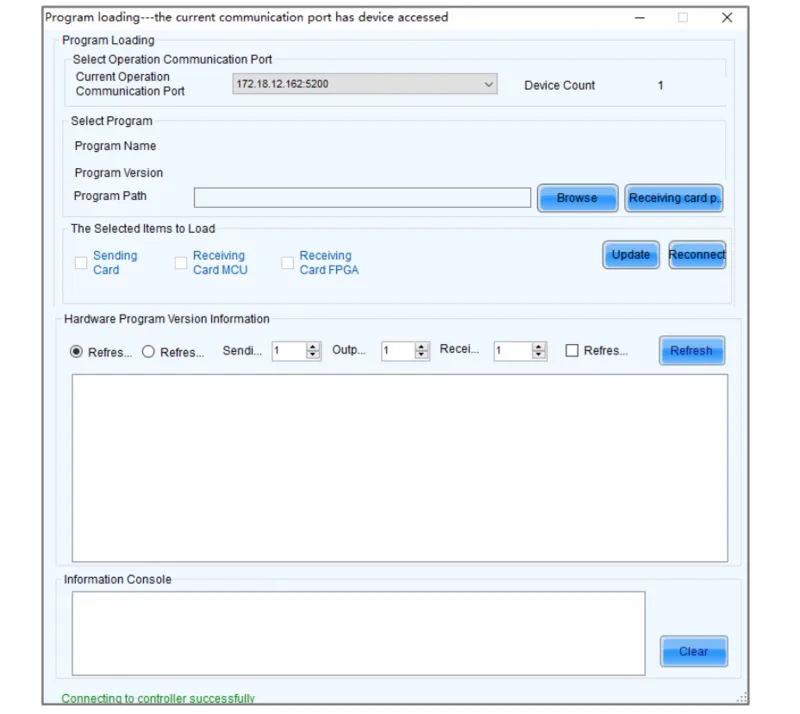
- Step 4: Click Browse and select the program package.
- Step 5: Click Update and the system will update the VX400 firmware program.
- Step 6: After the update, the VX400 will restart automatically.
- Step 7: After the update, click Refresh under Hardware Program Version Information to check whether the version is updated.
– Yes => Go to Step 8.
– No => Contact the device’s technical support and troubleshoot the problem. Then, update the firmware again. - Step 8: Close the program loading page.
5.2 Device Backup/Restore
Backup:
- Step 1 In V-Can, go to System > Backup to open the backup window.
- Step 2 Click Export.
- Step 3 Select a local path to save the backup file.
- Step 4 Enter a name for the backup file.
- Step 5 Click Open to complete the backup.
Note:
The default name of the backup file is “Device model-YMD-hour-minute-uback.img”. You can rename the file, but you cannot change the filename extension.
Restore:
- Step 1 Go to System > Restore to open the restore window.
- Step 2 Click Import.
- Step 3 Select the local path where the backup file is saved.
- Step 4 Select the backup file.
- Step 5 Click Open to complete the restore.
5.3 Screen Brightness Adjustment
The LED screen brightness can be adjusted automatically when using vx400 NovaStar. Here is the guidance for how to do so.
– Connect NovaStar VX400 to a light sensor.
– Download NovaLCT V5.4.4.6 or a later version on your PC.
- Step 1: In NovaLCT, go to User > Advanced Synchronous System User Login and log in to NovaLCT.
- Step 2: Click Brightness or go to Settings > Brightness to open the brightness configuration page.
- Step 3: Select Auto Adjustment to open the automatic brightness adjustment page.
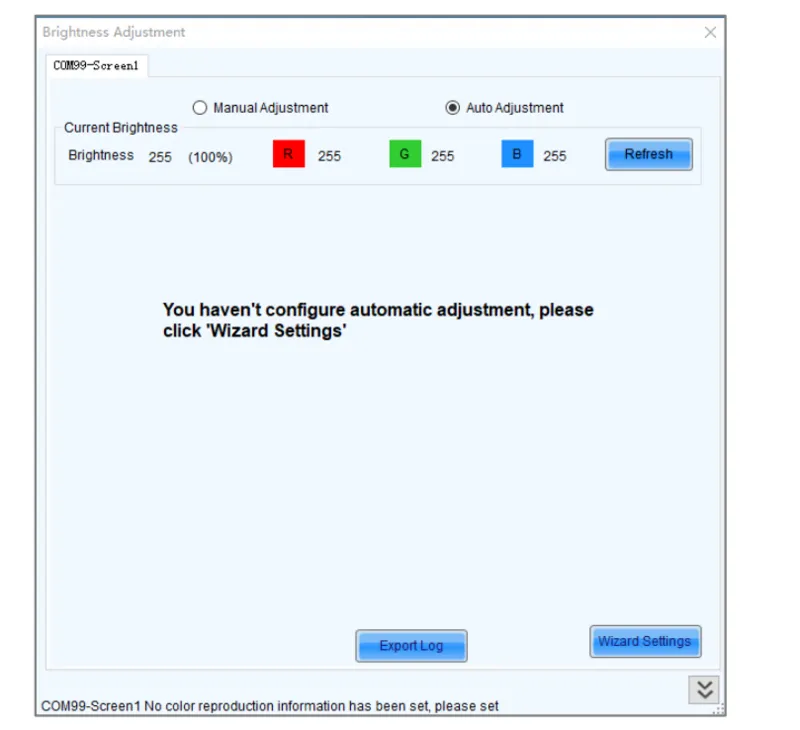
- Step 4: Click Wizard Settings to open the adjustment type settings page.
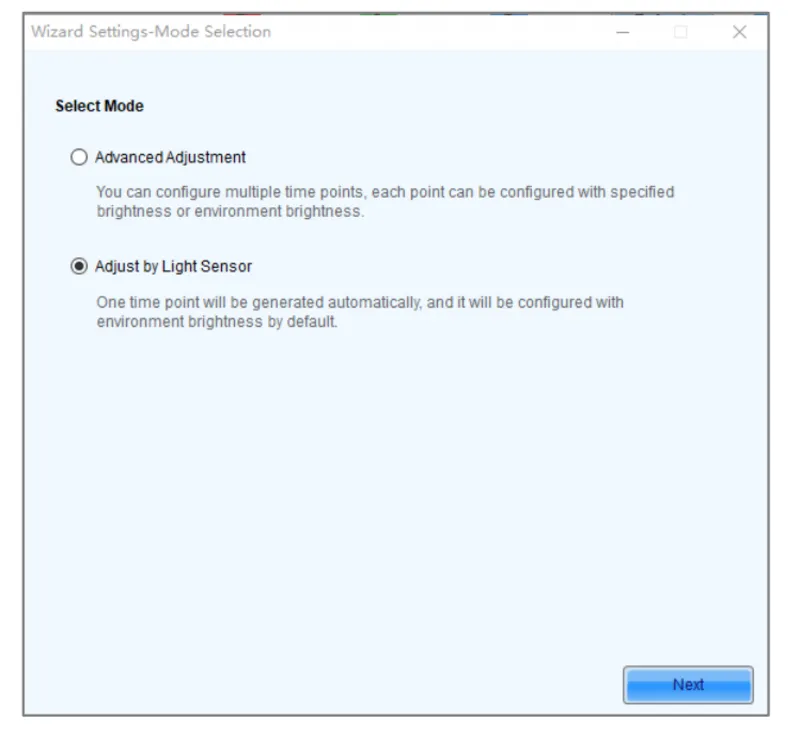
- Step 5: Select Adjust by Light Sensor and click Next to open the light sensor settings page.
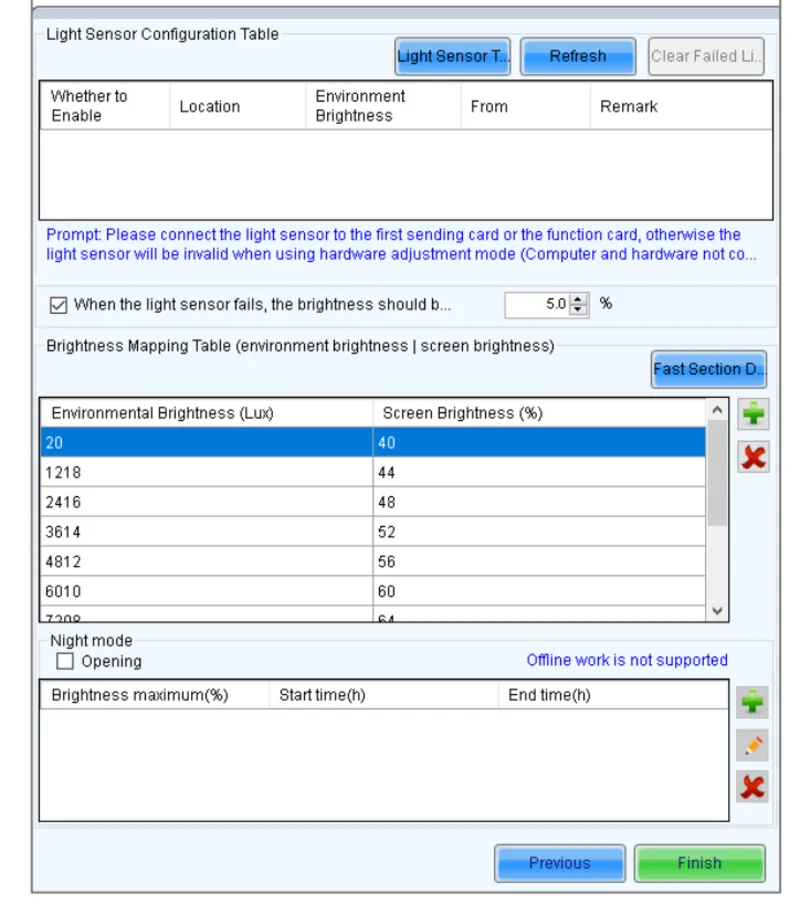
– Light Sensor Test: Test the light sensors connected to the control system, including the light sensors connected to all sending cards and multifunction cards.
– Refresh: Refresh the connection status of the light sensors to handle the situation that new light sensors are connected or the light sensors are disconnected.
– Clear Failed Light Sensor Information: Clear the light sensors that you do not use.
- Step 6: Select the light sensors to enable them.
- Step 7: Select When the light sensor fails, the brightness should be adjusted to and set a brightness value.
If this function is not enabled, when the light sensor fails, the brightness keeps the last updated value. - Step 8: Click Fast Section Division to open the fast section division configuration page.
Fast section division can equally divide the ambient brightness range and screen brightness range into a specified number of segments. The software can adjust the actual screen brightness to a value between the set screen brightness segments according to the corresponding current ambient brightness.
- Step 9: Click OK to complete the brightness section settings. The sections and the corresponding brightness values will be shown in the table on the light sensor settings page.
– Click ➕ to add a section for the relation between the ambient brightness and screen brightness.
– Click × to delete the selected section.
- Step 10: Select Opening to enable the automatic adjustment mode at night.
– Adding the night mode
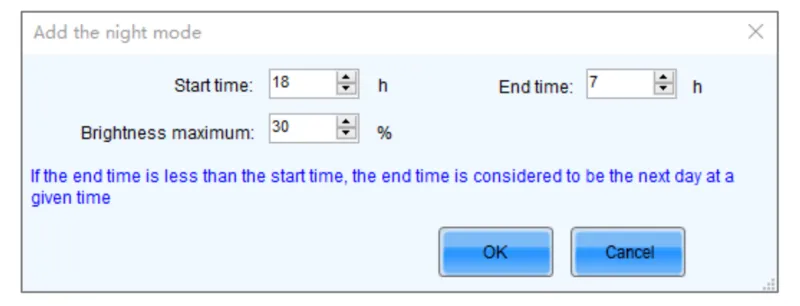
- Step 11: Click Finish to complete the light sensor brightness adjustment configuration.
- Step 12: Click Save to make the light sensor configuration parameters take effect.
- Step 13: Set the effective time for the automatic brightness adjustment.
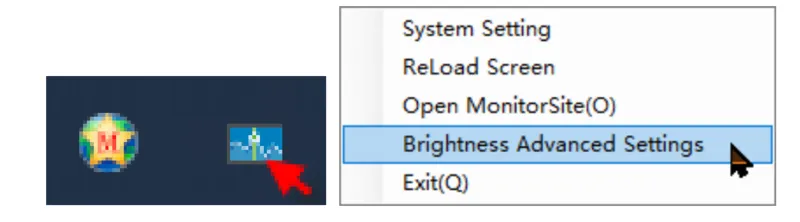
– On the taskbar, right-click the MonitorSite icon and choose Brightness Advanced Settings.
– Select Enable Brightness Gradient.
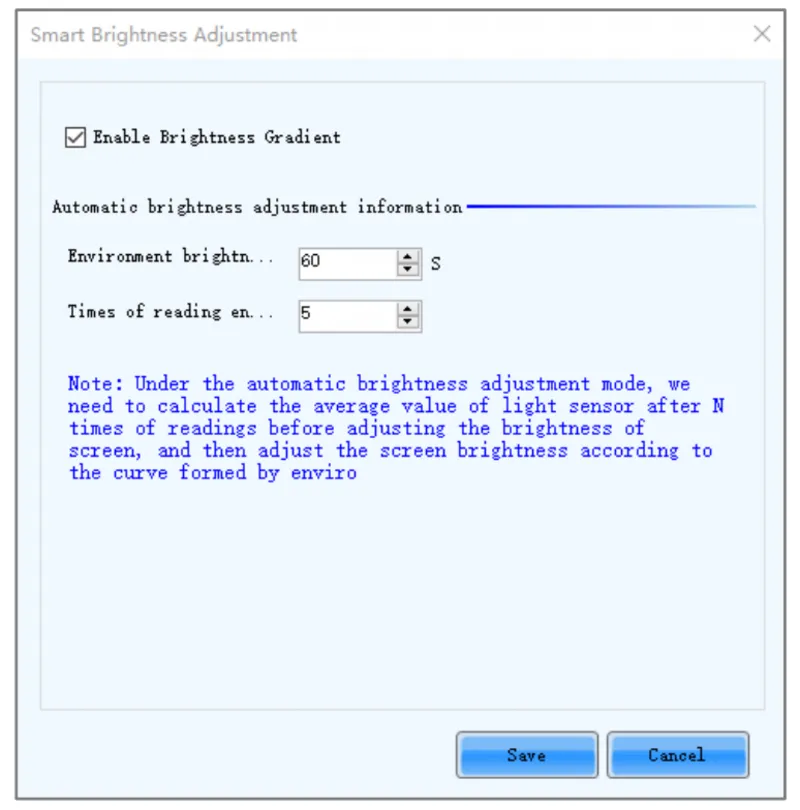
– Under Automatic brightness adjustment information, set the Environment brightness detecting cycle and Times of reading environment brightness.
The effective time for automatic brightness adjustment = Environment brightness detecting cycle × Times of reading environment brightness.
For example, if the cycle is 60 seconds and the number of times is 5, the effective time for automatic brightness adjustment is 5 minutes.
5.4 Scaling Operation and Mosaic Functions Settings
6.FAQs
What is the resolution of the NovaStar VX400?
A VX400 unit can drive up to 2.6 million pixels, with the maximum output width and height up to 10,240 pixels and 8192 pixels respectively.
What are the input and output specifications of the VX400?
Inputs: 2x HDMI, 1x DVI, 1x VGA, 1x SDI, 1x CVBS
Outputs: 4x Ethernet ports, 1x HDMI, 1x DVI
Is the VX400 compatible with all types of LED screens?
Yes, the VX400 is designed to be compatible with a wide range of LED screens, making it a versatile choice for different display setups.