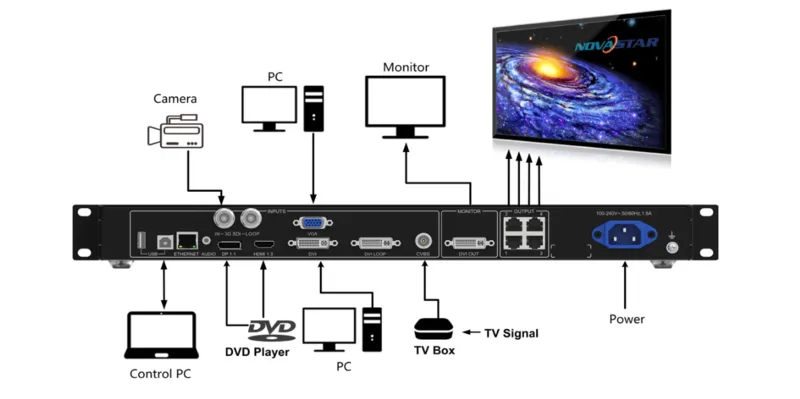
The NovaStar VX4S-N is a now-discontinued all-in-one LED screen controller used to control LED displays and process images. You can find all the information and resources related to the VX4S-N in this article.
Here are the key functionalities of NovaStar VX4S-N:
1. Highlights of NovaStar VX4S-N
For Input, Output, and Control:
- 4x Gigabit Ethernet outputs, capable of loading up to 2,300,000 pixels.
- Multiple device units can be connected for image mosaic.
- Independent external audio output supported.
- High bit-depth video input: 10-bit and 8-bit.
For Display Effect:
- Seamless high-speed switching and fade effect supported, to present professional-quality images.
- Adjustable PIP position and size, free control at will.
- The Nova G4 engine is adopted, enabling exquisite image display with a good sense of depth, without flickering and scanning lines.
- White balance calibration and color gamut mapping based on different features of LEDs used by screens, to ensure the reproduction of true colors.
- NovaStar’s new-generation pixel-level calibration technology has been adopted, ensuring a fast and efficient calibration process.
For Configuration:
- Quick screen configuration: You don’t need computer software for system configuration.
- An innovative architecture was adopted, allowing for smart screen configuration.
- The screen debugging can be completed within several minutes, which greatly shortens the preparation time on the stage.


2. Nova VX4S N Controller Specifications
2.1 Input
| VX4S-N Input Connectors | Details |
| 1 x 3G-SDI | Up to 1920×1080@60Hz input resolution. Support for progressive and interlaced signal inputs. Support for deinterlacing processing. Support for loop through. |
| 1 x AUDIO | A connector for connecting the external audio. |
| 1 x VGA | VESA standard, up to 1920×1200@60Hz input resolution. |
| 1 x CVBS | A connector for accepting PAL/NTSC standard video inputs. |
| 1 x DVI |
VESA standard, up to 1920×1200@60Hz input resolution. Support for custom resolutions.
|
| 1 x HDMI 1.3 |
Up to 1920×1200@60Hz input resolution. Support for custom resolutions.
|
| 1 x DP |
Up to 1920×1200@60Hz input resolution. Support for custom resolutions
|
2.2 Output
| VX4S-N Output Connectors | Details |
| 4 x Ethernet port |
4 ports load up to 2,300,000 pixels.
|
| 1 x DVI OUT | A connector for monitoring the output images. |
2.3 Control
| VX4S-N Control Connectors | Details |
| 1 x Ethernet | Connect to the control PC for communication. Connect to the network. |
| 1 x USB (Type-B) | Connect to the control PC for device control. Input connector to link another device. |
| 1 x USB (Type-A) | Output connector to link another device. |
2.4 Physical Specifications
| Type | Details | |
| Electrical Specifications | Power connector | 100-240V~, 50/60Hz. 1.5A |
| Power consumption | 25 W | |
| Operating Environment | Temperature | –20°C ~ +60°C |
| Humidity | 20% RH to 90% RH, non-condensing | |
| Storage Humidity | 10% RH to 95% RH, non-condensing | |
| Accessories | 1x Power cord 1x USB cable 1x DVI cable 1x HDMI cable 1x User Manual | |
| Certifications | CE, RoHS, FCC, UL, CMIM | |
| Noise Level (typical at 25°C/77°F) | 38 dB (A) | |

3. NovaStar VX4SN Resource Download
4. VX4S-N NovaStar Guides
4.1 How to Connect VX4S-N Devices


4.2 How to Set the Input Resolution on NovaStar VX4S-N?
Choose a Standard Resolution:
Selection is made in the preset resolution of the controller. If there is no preset resolution, you can select the second method and customize the resolution.

Set Custom Resolution:
Set Horizontal Res, Vertical Res, and Custom· refresh rate, and then select “Apply” and press the knob for application. If the application is not confirmed, the custom resolution is invalid.

4.3 How to Set the Screen?
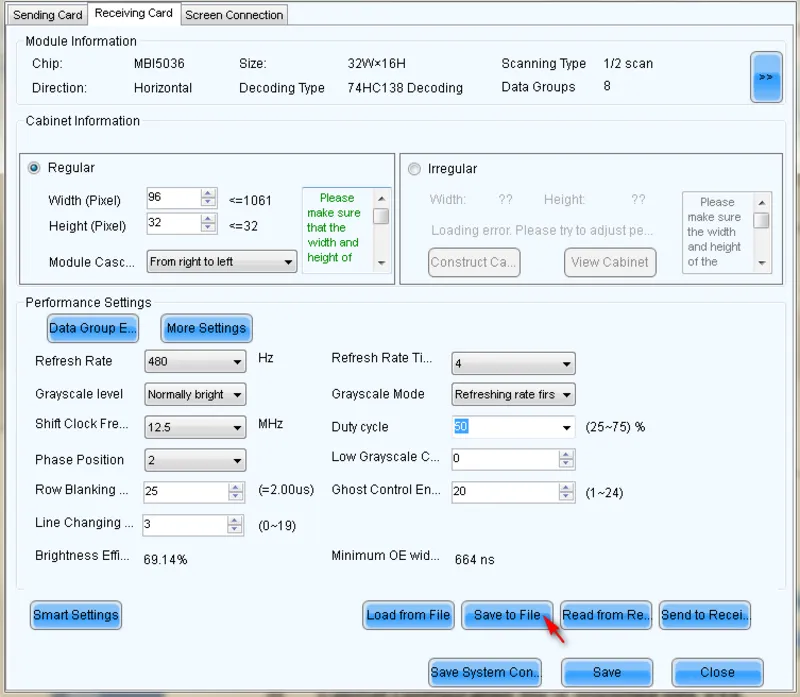
Step 1: Do this step if the cabinet is in abnormal display, first, load the cabinet file, and save it to the receiving card. Here are the details:
Load Cabinet Files:
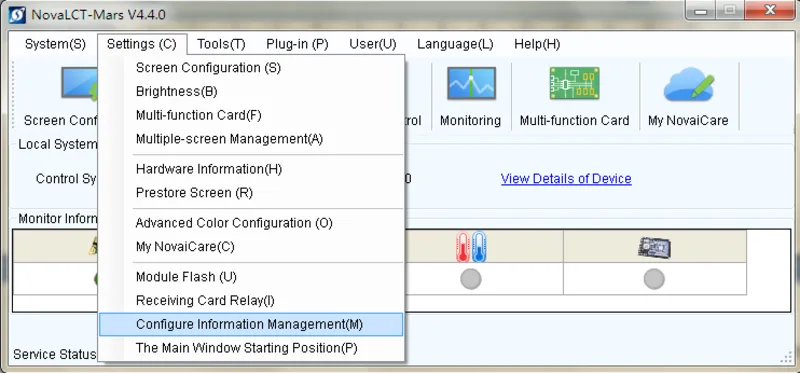
The VX4S-N is connected to a PC. NovaLCT-Mars runs on the PC and the cabinet setting file saved previously is imported into the controller.
- Save the cabinet configuration file:
After the receiving card is configured, click and save the cabinet configuration file (.rcfg) to the local file on the PC.

- The cabinet configuration file is imported into the VX4S-N.

- Load Cabinet Files.

Save to RV Card:
All current configurations about the receiving card of the VX4S-N are saved into the receiving card and will not be lost after a power fault.
Step 2: Do this step if the cabinet is displayed normally. Return to the “Screen Settings” submenu. Rotate the button to switch to the submenus of other options respectively to perform configurations.

Step 3: Set Cabinet Row Qty and Cabinet Column Qty according to the actual situation of
the screen.
Step 4: Set Port1 Cabin-et Qty. The device has some limitations on the cabinet quantity of
ports.
Step 5: Set the Data Flow (Front View).
Note:
- If the number of ports with loads is n (n≤4), the first n-1 ports must load the same number of cabinets, which must also be an integral multiple of the number of cabinet rows or columns and be greater than or equal to the number of cabinets for the nth ports.
- In the case of special-shaped cabinets, different cabinet sizes, and special-shaped screens, the NovaLCT-Mars software is required to be connected to configure the screen.
- During the Data Flow setting, you must ensure that the data flow of each port is downward in the same direction.
- During the Data Flow setting, you must ensure that Port 1 is the start position of the whole data flow connection.
- The VX4S-N can load 2.3 million (2048×1152@60Hz) pixels in maximum. The width of the lateral load can reach 3840 pixels at maximum (3840×600@60Hz); the longitudinal load can reach 1920 pixels at maximum (1200×1920@60Hz).
4.4 How to Set the Output?
Case 1: Disable Scaling
The sizes of the output and input images are the same, and the original scale output is used.
- If the input resolution is smaller than the LED display in one direction, the LED display may not become bright in this direction.
- If the input resolution is greater than the LED display in one direction, the input contents may not be displayed completely in this direction.
- This option applies to the application scenarios requiring point-to-point display. Horizontal offset and vertical offset of images can be set according to the needs, and at this time the displayed contents may move to the left or top at the LED display.
![At this point [Scaling] is disabled-NovaStar VX4S-N](https://www.ledincloud.com/wp-content/uploads/2024/04/At-this-point-Scaling-is-disabled-NovaStar-VX4S-N_4_11zon.webp)
Case 2: Auto Fit
At this point [Scaling] is enabled, and [Auto Fit] is enabled. When enabling [Auto Fit], the input contents will be fully zoomed to the size of the LED display, and the input contents will be adaptive to the size of the LED display. This mode is suitable for full-screen playback of the contents
Case 3: Custom Scaling
Step 1: Set the input Capture, i.e., capture part of the interesting screens from one starting point of inputting image and display it on LED display. It is generally required to
set Horizontal Res (smaller than or equal to the lateral resolution of the input source),
Vertical Res (smaller than or equal to the vertical resolution of input source),
horizontal X and vertical Y.

Step 2: Set the output layer, the size of the layer is smaller than or equal to the size of the LED display; after setting the layer, the images can only be adaptive to the displayed size within the range of the layer. This option applies to the application scenarios requiring reserving a border at the LED display or restricting the playing area.

After setting according to the above two steps, the captured contents will only be input and displayed at the set area on the LED display, as shown below:

4.5 How to Use Image Mosaic Functions
For large display screens, multiple VX4S-N units must be cascaded to handle the load. There are two Image Mosaic methods: Equal Division or Unequal Division.
Equal Division: Each VX4S-N covers an identical area. Simply set the total pixel count, the number of rows and columns for the entire screen, and assign a serial number to each VX4S-N.
Unequal Division: Each VX4S-N can cover a different area. You’ll need to set the total pixel count, define the load area size, and specify the starting position for each VX4S-N.
Mosaic Function Operation Example: The process is demonstrated in the video on the right.
4.6 How to Operate Scaling
Custom Scaling:
Step 1: Set the input Capture (capture part of the interesting screens from one starting point of inputting image and display it on LED display).
You’ll need to configure the Horizontal Resolution (which should be equal to or smaller than the input source’s width), the Vertical Resolution (equal to or smaller than the input source’s height), and the horizontal (X) and vertical (Y) starting points.

Step 2: Set output layer
Define the size of the output layer, which should be equal to or smaller than the LED display. Once the layer is set, the image will adapt to the display size within the layer’s boundaries.

Operation Guide Video:
5. What Is the Novastar VX4S-N Price?
The price is about $1,100.00 (This is a lower price in the market.)
If you are interested in learning about the prices of other Novastar products, you can Register LedInCloud Price Calculator, where we provide free price inquiries and resource downloads in our LED Screen Cloud Platform.
6. FAQs
6.1 What is the capacity of Novastar VX4S-N?
It’s 2.3 million (2048×1152@60Hz) pixels at maximum.
6.2 What are the dimensions of VX4S-N?
- Dimensions: 482.6 mm × 250.0 mm × 50.0 mm
- Net weight: 2.55 kg
- Gross weight: 5.6 kg
- Carrying case: 540 mm × 140 mm × 370 mm
- Packing box: 555 mm × 405 mm × 180 mm
6.3 What is the frame rate of the Novastar VX4S-N?
You can customize the refresh rate: 60Hz, 59.94Hz, 50Hz, 30Hz.
