
Come to meet Huidu HDPlayer, your ally in the LED display. Straight from the tech wizards at Huidu Technology, this full-color control tool is as easy as pie.
Whether you’re juggling A601/602/603, A30/30+, C10/C30, or D10/20/30 control cards, HD Player download has your back. It’s not just about managing screens—it’s about crafting your story. 3D text, documents, clocks, images, and videos with a few clicks.
Catalogs:
1. Main Functions of Huidu HDPlayer
2. How to Get Started with HDPlayer LED Software?
2.1 HD Player LED Software Free Download
2.2 Easy Installation Steps
2.3 HDPlayer Interface
2.4 How to Send Program with HD Player
2.5 System Setting
2.6 Configuring Network Settings
2.7 Updating Programs
2.8 Firmware Upgrades
2.9 Hidden Functions
1. Main Functions of Huidu HDPlayer
Huidu HDPlayer is a professional LED display control software developed by Shenzhen Huidu Technology. It supports synchronous and asynchronous control systems, enabling users to manage content playback, hardware settings, and network configurations for LED screens of all sizes. Key applications include digital billboards, stage displays, retail signage, and transportation hubs.
1.1 Robust Program Editing
In Huidu HD Player, users can create and customize content with ease. From text and 3D text to images and videos, the possibilities are endless. Its intuitive interface ensures even beginners can produce professional-quality displays.
1.2 Quick Program Updates
Huidu HDPlayer download supports rapid program updates, allowing your content stays fresh and relevant. Whether you’re updating a single screen or multiple displays, HDPlayer handles it swiftly.
1.3 Powerful System Control
Users can manage and monitor their displays in real time. This includes adjusting brightness, contrast, and other display settings. The software also offers remote management capabilities, making it easy to control displays from anywhere.
1.4 Multi-Model Control Card Support
Compatibility is a standout feature of HD Player Huidu. It supports a wide range of control cards, including A601, A602, A603, A30, A30+, C10C, C10, C30, C30C, D10, and D30. This flexibility ensures it can meet the needs of various LED display systems.
2. How to Get Started with HDPlayer LED Software?
2.1 HDPlayer LED Software Free Download
Downloading HDPlayer LED software is quick and straightforward. Click to start the download instantly. The file size is manageable, ensuring a speedy process.
Visit our LED Screen Cloud Platform, to get other HuiDu Resource Download you want, and get more Huidu software download.

2.2 Easy Installation Steps
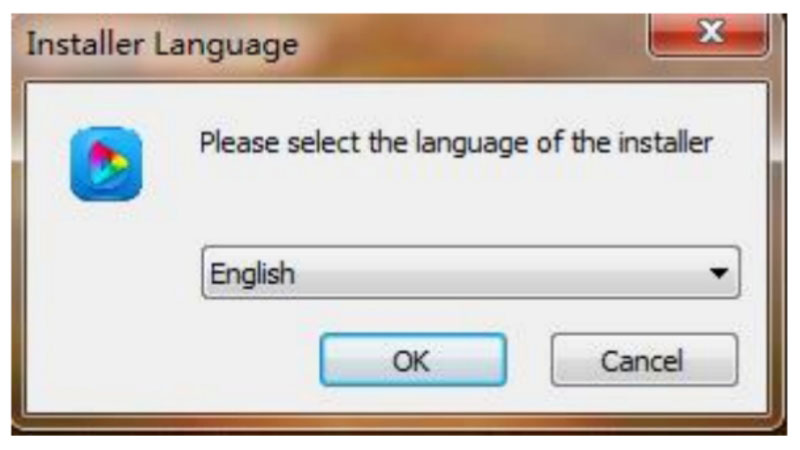
(1) Open the file, double click the icon HD Player 7.10.2.0.exe or HDPlayer 7.4.40.0.exe. Select the installer Language, click “ok”.
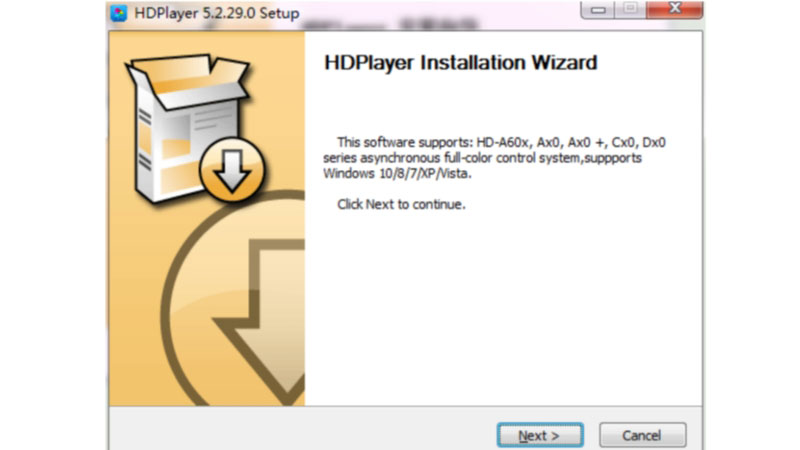
(2) Installation Interface, Click “Next”.
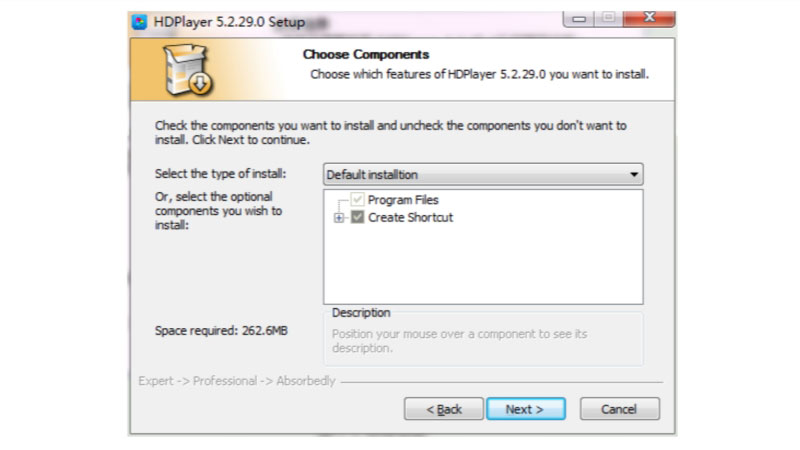
(3) Confirm the Installation type, Click “Next”.
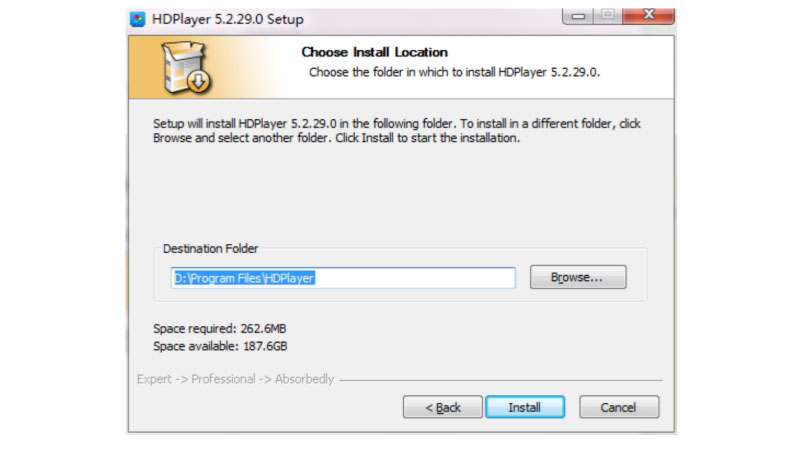
(4) Choose Installation Path, Click “Install”.
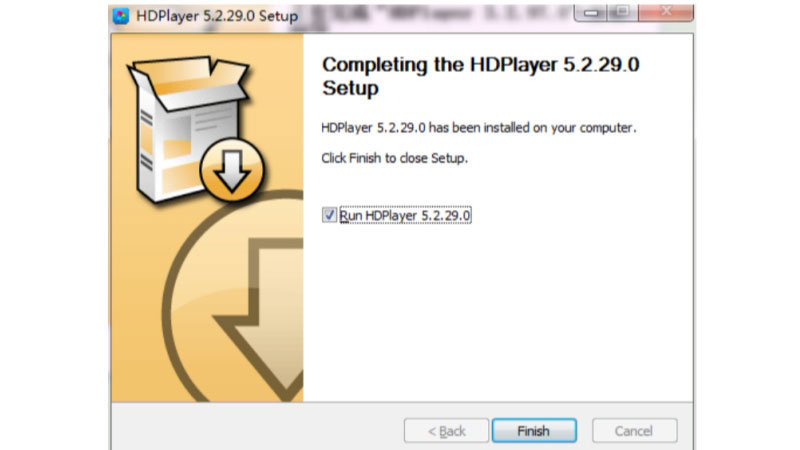
(5) Click “Finish”.
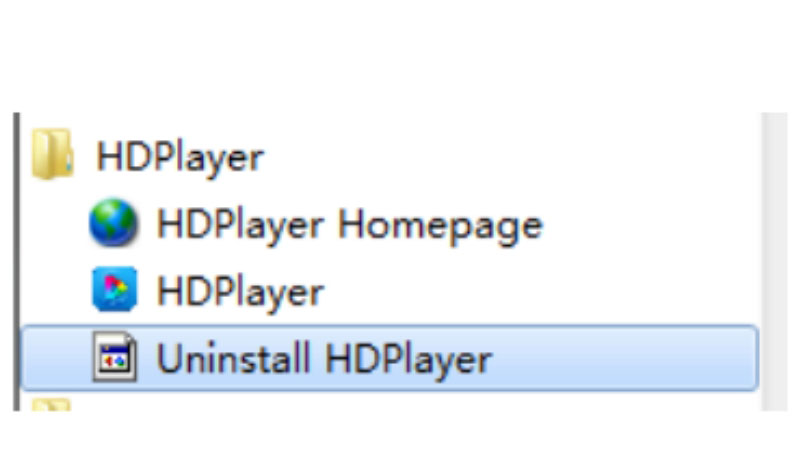
(6) Software Uninstall: “Start”→“All Programs”→“HDPlayer”→“Uninstall HDPlayer”
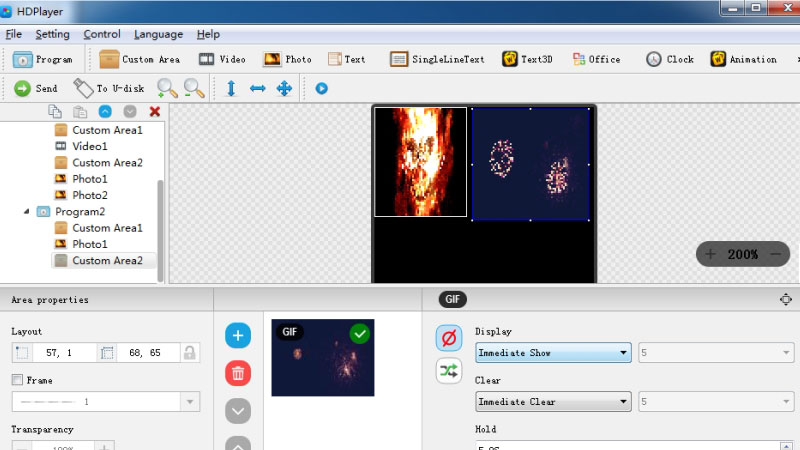
2.3 HDPlayer Interface
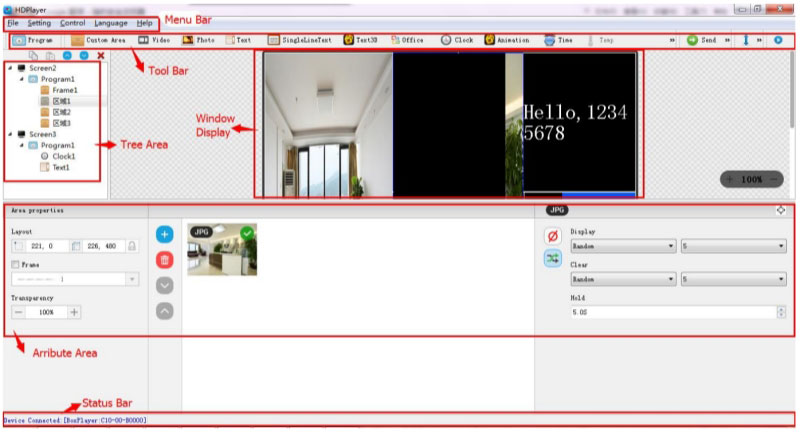
The software interface consists of two main areas: the play window and the edit window.
Play Window:
Displays videos, photos, texts, and other content as shown on the screen.
Edit Window:
Contains several components:
- Menu Bar: Provides access to files, settings, controls, language options, and help.
- Tool Bar: Features tools for program management, area selection, source files, text, documents, clocks, and timers.
- Attribute Area: Displays information about each section, including frame settings, playback effects, and duration.
- Tree Area: Lists all content within the program.
- Status Bar: Monitors and displays card information.
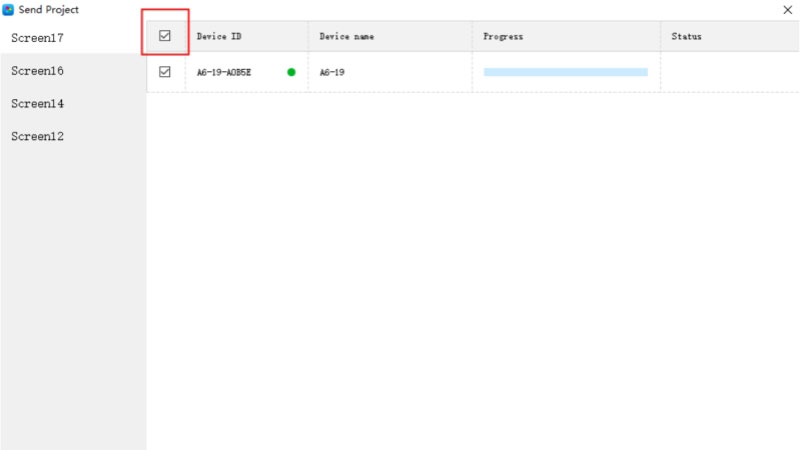
2.4 How to Send Program with HDPlayer?
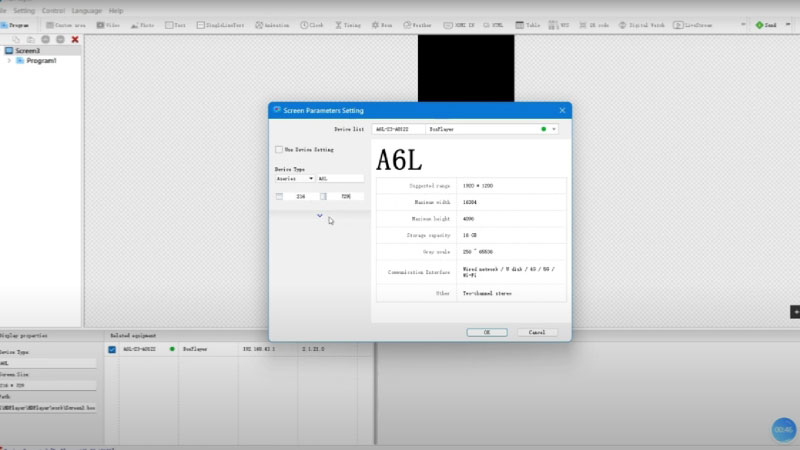
(1) Connect to the Device: You can connect your computer to the A6L device either via WiFi or with a network cable. For WiFi, find the A6L network on your computer and enter the default password: 88888888. Note that if you connect with a network cable, the WiFi option won’t be available.
(2) Open HD Player: Launch the Huidu HD Player software. The connected device will appear in the lower left corner of the interface.
(3) Create a New Screen: Start by creating a new screen in HDPlayer Huidu. Select the type of device you are using and adjust the screen size to match your display requirements.
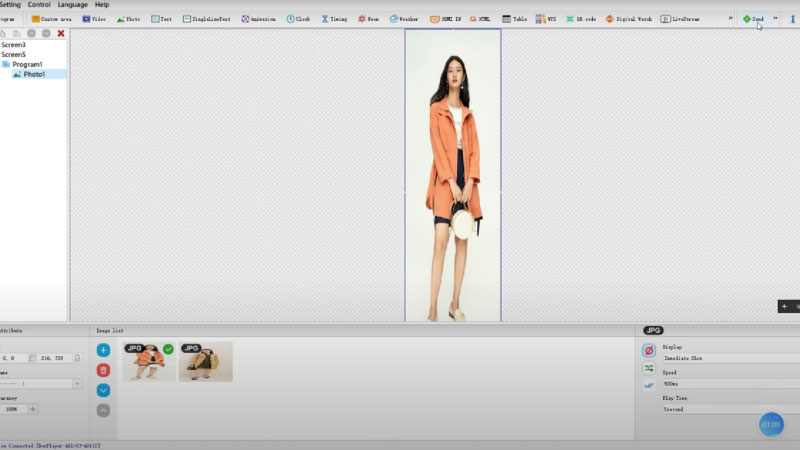
(4) Add Photo Area: Maximize the area and select the photos you want to display. Send the program to the device. Once the sending process is complete, the photos will appear on the screen.
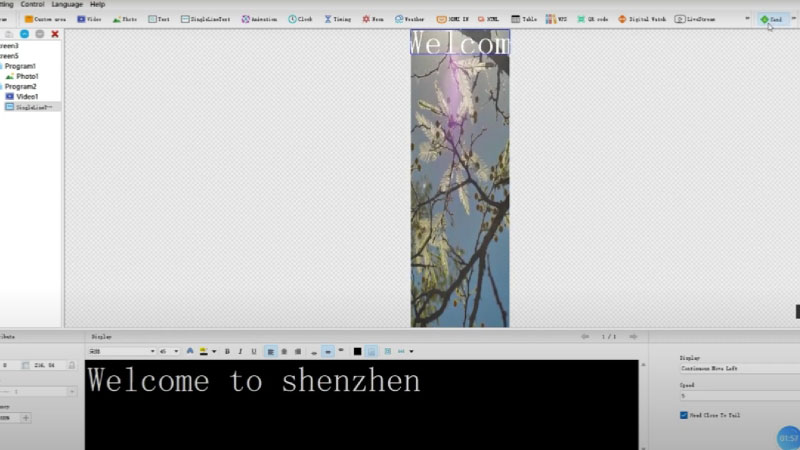
(5) Add Second Program: Close the sending interface for the first program and create a second one. Add a video area and maximize it. Choose the video file and add any text you wish to display.
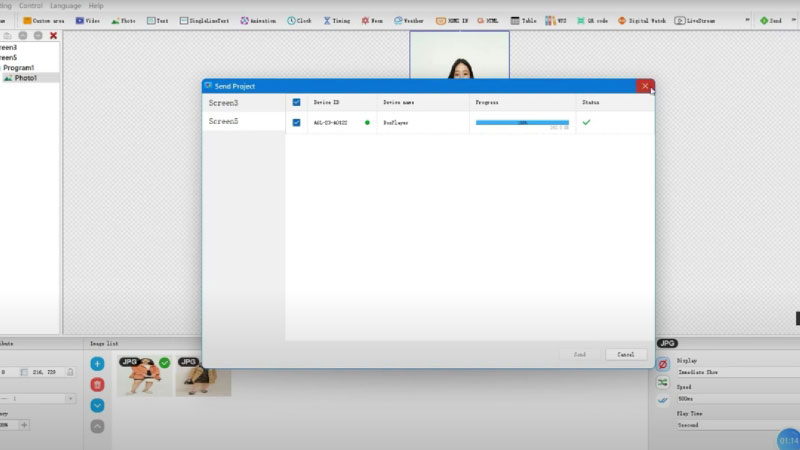
(6) Send Second Program: Send the new program to the device. After sending, the display will show the photos from the first program followed by the video and text from the second program. The content will loop continuously.
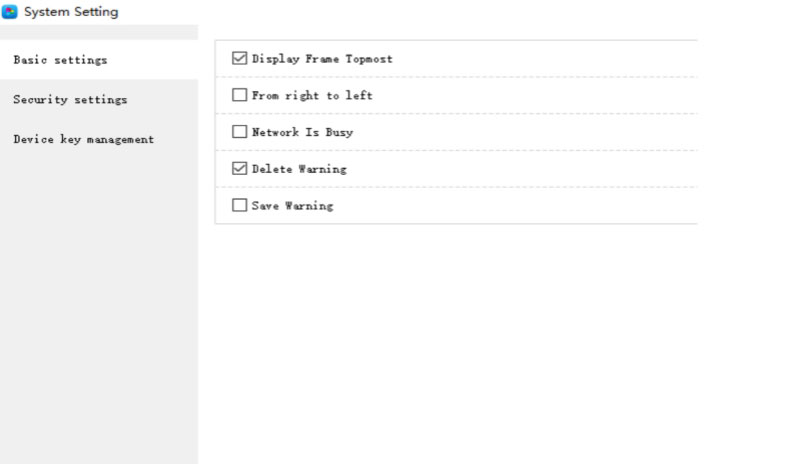
2.5 System Setting
To access the system settings, click on Settings > System Settings. This section includes options like save warning, delete warning, Display Frame Topmost, password usage, and more.
Save Warning: When selected, a save confirmation will appear before exiting the software. If not selected, the software will save automatically without any prompt.
Delete Warning: When selected, a delete confirmation will pop up before exiting the software. If not, deletions will happen automatically without a warning.
Using Password: When selected, a password is required to access features like “Hardware Setting” and “Firmware Upgrade” or to remove the password. Otherwise, the software treats the user as an administrator, bypassing the password. The default password is “168” or “888”.
Change Password: This allows the default password to be replaced with a new one.
Display Frame Topmost: This option keeps the display window on top during playback previews.
2.6 Configuring Network Settings
2.6.1 Connection Modes
Huidu HDPlayer supports two connection types:
Direct Connection: Link the control card to a computer via Ethernet.
Router-Based Connection: Connect multiple control cards to a router for centralized management.
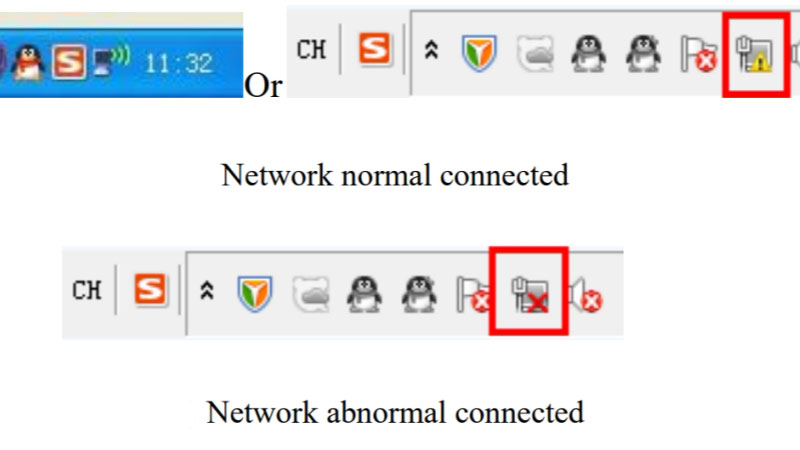
Key Indicators:
Green Light (Network Port): Steady flicker indicates active data transmission.
Orange Light: Solid light confirms physical connection.
2.6.2 Automatic IP Assignment (DHCP)
For most setups, DHCP simplifies connectivity:
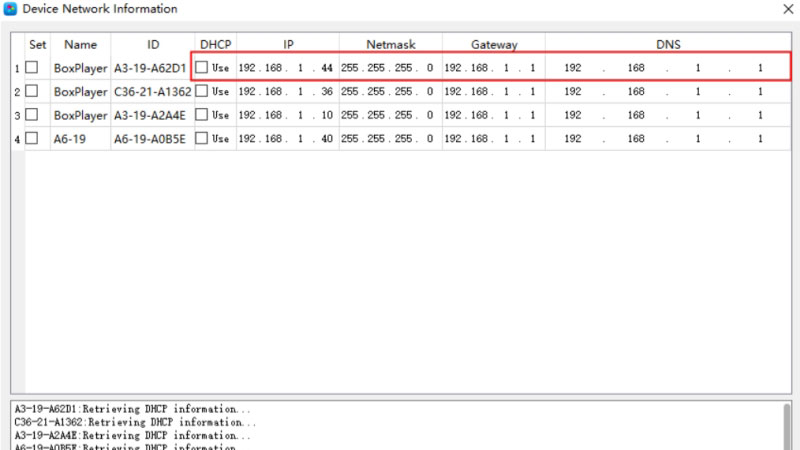
Step 1: Open Control > Other Settings > Device Network Information.
Step 2: Check the “DHCP” box and click “Set” to enable automatic IP assignment.
Step 3: Wait 40–50 seconds (varies by OS) for the software to detect the device.
Note: Ensure the router or computer’s DHCP server is active.
2.6.3 Manual IP Configuration
Use static IPs for cross-subnet control or fixed network segments:
Step 1: In Device Network Information, uncheck “DHCP”.
Step 2: Enter the following:
- IP Address: Must match the computer’s subnet (e.g., 192.168.1.x).
- Subnet Mask: Typically 255.255.255.0.
- Gateway: Router’s IP (e.g., 192.168.1.1).
Step 3: Click “Set” to apply.
Critical Rule: Avoid IP conflicts! Verify no duplicate addresses exist on the network.
2.7 Updating Programs
Program updates allow you to refresh content on LED displays without reconfiguring hardware. Huidu HDPlayer supports three methods:
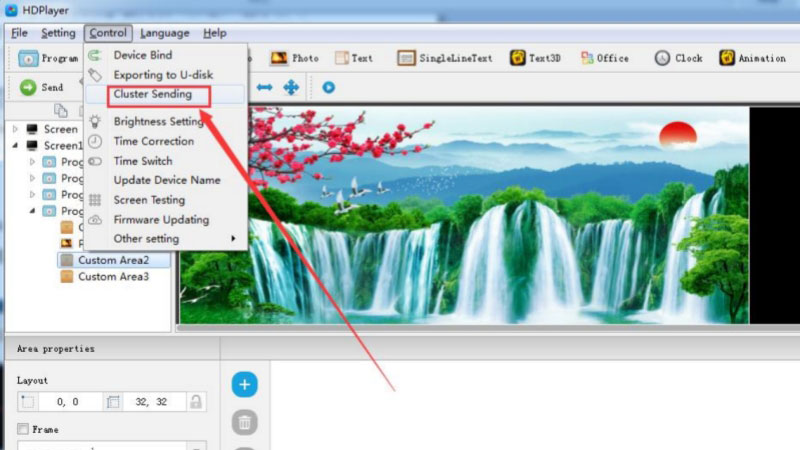
2.7.1 Network Cluster Sending
Ideal for multi-screen setups with identical configurations (e.g., billboard chains, stadiums).
(1) Prerequisites:
All control cards must have the same firmware version and screen resolution.
Programs must be saved in the software’s default folder (D:\HDPlayer\work).
(2) Steps:
Navigate to Control > Cluster Sending.
Check devices in the list (e.g., BoxPlayer A3-19, C36-21).
Click “Send” to synchronize programs across selected screens.
Note: Use Shift or Ctrl to select multiple devices.
(3) Troubleshooting:
Issue: Some screens don’t update.
Fix: Verify network stability and recheck device firmware compatibility.
Issue: Content appears distorted.
Fix: Ensure all screens share identical resolution and aspect ratio.
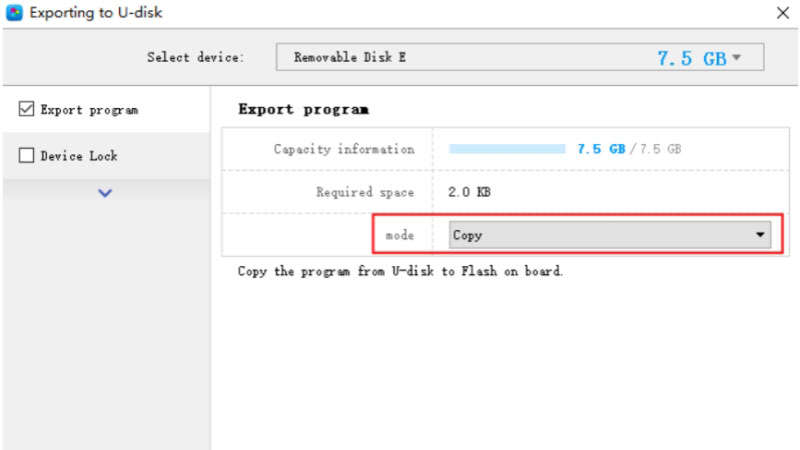
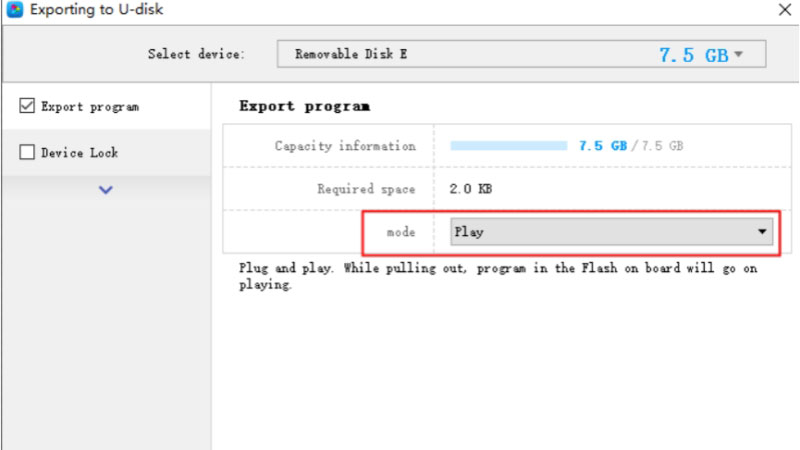
2.7.2 U-Disk Offline Updates
Best for standalone screens or locations without stable network access.
(1) Preparation:
Use a FAT32-formatted USB drive (≤32GB recommended).
Avoid USB 3.0 hubs; direct connection to control card is preferred.
(2) Exporting Programs:
Click Control > Export to U-Disk > Update Program.
Select the target program and click “Export”.
Optional: Enable Device Lock (password: 168) to encrypt content.
(3) Updating the Control Card:
- Insert the U-Disk into the control card’s USB port.
- Wait for the “Copy Complete” prompt (5–20 seconds).
- Remove the U-Disk; the new program auto-plays.
- Critical Tip: For “Plug and Play” mode, leave the U-Disk inserted to expand storage.
(4) Common Errors:
Error: “Device Locked” message.
Solution: Enter the password in Export to U-Disk > Device Lock Setting.
Error: U-Disk not recognized.
Solution: Reformat the drive to FAT32 or replace the USB cable.
2.7.3 Real-Time HDMI/HTML Input
For live broadcasts or dynamic content (requires sync/async playbox).
Add an HDMI IN or HTML zone in the program editor.
Set refresh intervals (e.g., 15 seconds for HTML data pulls).
Connect HDMI sources (e.g., cameras, PCs) or input valid URLs.
Limitation: HTML content may require CSS adjustments for optimal LED display rendering.
2.8 Firmware Upgrades
Firmware updates enhance performance, fix bugs, and add compatibility for new LED modules.
a. Preparing for Upgrade
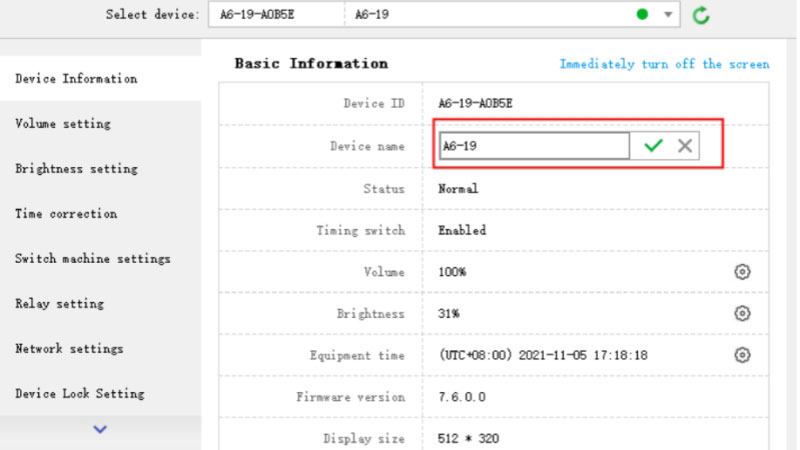
(1) Check Current Version:
Go to Control > Device Information.
Note the “Firmware Version” (e.g., 7.6.0.0).
(2) Download Firmware:
Visit our website or contact LedInCloud support for the latest .bin file.
Save it to D:\Program Files\HDPlayer\Firmware.
b. Upgrading via U-Disk
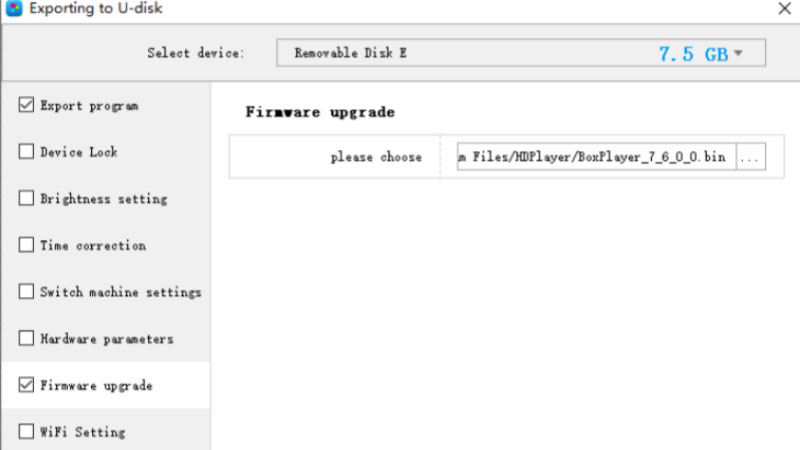
(1) Export the firmware file:
Navigate to Control > Export to U-Disk > Firmware Upgrade.
Select the .bin file and click “Export”.
(2) Install on the Control Card:
Insert the U-Disk; the upgrade starts automatically.
Do NOT unplug the U-Disk or power off during the process (5–10 minutes).
(3) Verify Success:
Post-upgrade, check the firmware version in Device Information.
Test basic functions (e.g., brightness adjustment, screen testing).
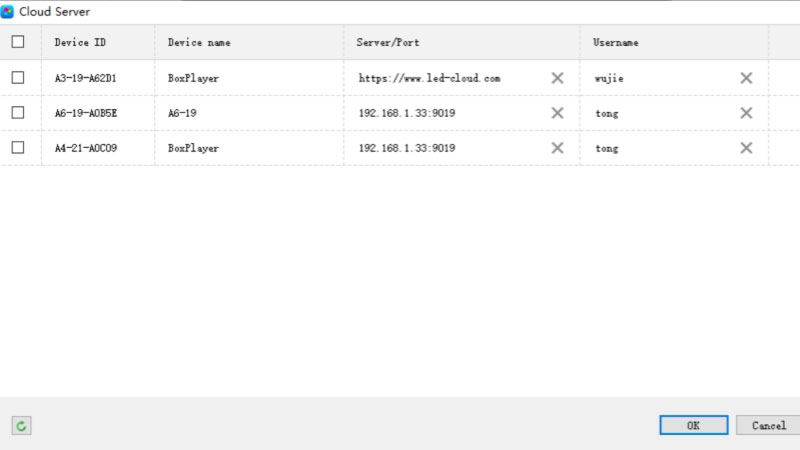
c. Network-Based Firmware Updates
For devices with internet access (cloud-managed systems).
Enable Cloud Server in Setting > Cloud Server.
Upload the firmware file to the cloud dashboard.
Select target devices and click “Remote Upgrade”.
d. Recovery from Failed Upgrades
If a firmware update fails (e.g., power outage):
(1) Manual Recovery Mode:
Press and hold the control card’s TEST button while powering on.
Re-insert the U-Disk with the firmware file.
(2) Factory Reset:
Use a paperclip to press the Reset pinhole for 10 seconds.
Reinstall firmware from scratch.
2.9 Hidden Functions
When sending programs, a loading message often appears. To remove this, open “Control” and click “Device Information.”
Directly input “image” in the search bar. A prompt for icon settings will appear.
Here, you can turn off the “Program Loading Prompt.”
After disabling, resend the program. The loading message on the display screen will disappear.
3. Huidu HDPlayer Manual Download
Click the download link to start the process. The manual will download as a PDF file. Ensure you have a PDF reader installed to view it.
Once downloaded, open the manual and begin exploring its contents. The manual includes installation, setup, and advanced features.
Having the manual on hand ensures you can fully utilize HDPlayer. Keep it accessible for quick reference. It is an invaluable resource for both new and experienced users.
4. Supported Devices
4.1 Huidu HD-C10/HD-C10C/HD-C30 Asynchronous Small and Medium Screen Control Card
These control cards are perfect for medium and small screens. Compared to the classic HD-C1/C3, they offer improved display quality and double the refresh rate. Boot time is optimized to just 25 seconds. They include a cascading feature for better display effects and simpler wiring. New features include SWF animations, neon lights, animated text, and network weather forecasts. Storage is upgraded to 4GB with faster speeds, and they have onboard 3G/4G/Wi-Fi modules for easy remote control.
4.2 Huidu HD-D10/HD-D30 High-Performance Strip Screen Video Card
The HD-D10 (38464 HUB75) and HD-D30 (102464) are designed for high-performance video. With an A9 1GHz processor and HD video decoding, they deliver excellent video quality. Unique video capture ensures no distortion. They can store over 4 hours of content, making them ideal for full-color door signs, taxi top screens, and bus advertising screens. These cards focus on video and animation, offering superior effects compared to traditional text cards.
4.3 Huidu HD-A60X Synchronous and Ssynchronous Dual-Mode High-Definition Playback Box
The Huidu A6, HD-A602 (1280720), and HD-A603 (19201080) support both synchronous and asynchronous modes. They automatically switch between modes and can manage high-definition displays up to 2 million pixels (max 1280720 in synchronous mode). They support HD video decoding and internet management via 3G/4G/Wi-Fi.
4.4 Huidu HD-R50x Series Full-Color Receiving Card
This series includes the R500 (standard interface), R501 (12HUB75), R5018, R505, and R507. They work with HDPlayer sending cards like the A60X, A30/A30+, and C10/C30. These cards offer similar functions and performance as synchronous receiving cards. Recommended loading ranges are R500: 256128 for indoor modules, R501: 256256, R5018: 256256, and R505: 25.
4.5 Huidu HD-A30/HD-A30+ Asynchronous Large Screen Sending Card
These cards support large screens up to 1024512 (500,000 points) and are suitable for community information screens, small-pitch ad machines, and outdoor ad vehicles. The A30 combines a sending and receiving card, saving the need for an extra receiving card. The A30+ offers adjustable loading dimensions: 1024512, 2048256, and 5121024.
5. FAQ About HDPlayer Huidu
5.1 What Types Of Media Formats Does HDPlayer Support?
HDPlayer supports a variety of media formats, including text, images, videos, and animations.
5.2 Can I Manage HDPlayer Remotely?
Yes, HDPlayer offers advanced control features that allow for remote management. You can monitor and adjust your displays from any location after HDplayer download.
5.3 How Can I Quickly Update My Programs in HDPlayer Huidu?
You can make real-time changes to your displays, ensuring that your content remains current and engaging without significant delays.
6. Conclusion
Huidu HDPlayer is an indispensable tool for LED display screens. Advanced control functions and wide compatibility with various control cards provide unparalleled flexibility and convenience. With free download and detailed user manual, it has never been easier to start using Huidu HD Player.