
In today’s digital signage and LED display industry, HD2020 Huidu stands out as a versatile and reliable solution for managing large-scale LED displays, offering a range of features.
It is designed to streamline installation, content scheduling, and real-time video playback. Whether you’re working with indoor or outdoor screens, the HD 2020 Huidu makes controlling and optimizing your display systems simpler and more efficient.
This guide will walk you through everything you need to know—from downloading and installing HD2020 in LED Screen Cloud Platform to setting up your LED display and exploring its key features.
Table of Contents:
1. Huidu HD 2020 Download and Installation
1.1 Download HD 2020 Software
1.2 System Requirements for Installation
1.3 Step-by-Step Installation Guide
4. HD 2020 LED Operation Guide
4.1 HD2020 Password
4.2 Display Program Creation Process
4.3 How to Display Different Contents
4.4 How to Set the Text to Stand Still
4.5 How the Control Card Tests the Display
4.6 How to Upgrade the Control Card
4.7 How to Restore Control Card to Factory Settings
1. Huidu HD 2020 Download and Installation
1.1 Download HD 2020 Software
For the most current version of HD2020 and other Huidu software, we recommend visiting our Huidu Resource Download page, where you can access all available Huidu software and resources.
1.2 System Requirements for Installation
Huidu HD2020 is compatible with a range of operating systems and languages, making it accessible to users worldwide. The software supports English, Chinese, and over 20 other languages, including Spanish, French, Arabic, Russian, Japanese, and more. It is compatible with various versions of Windows, including Windows XP SP3, Win7, Win8, and Win10.
1.3 Step-by-Step Installation Guide
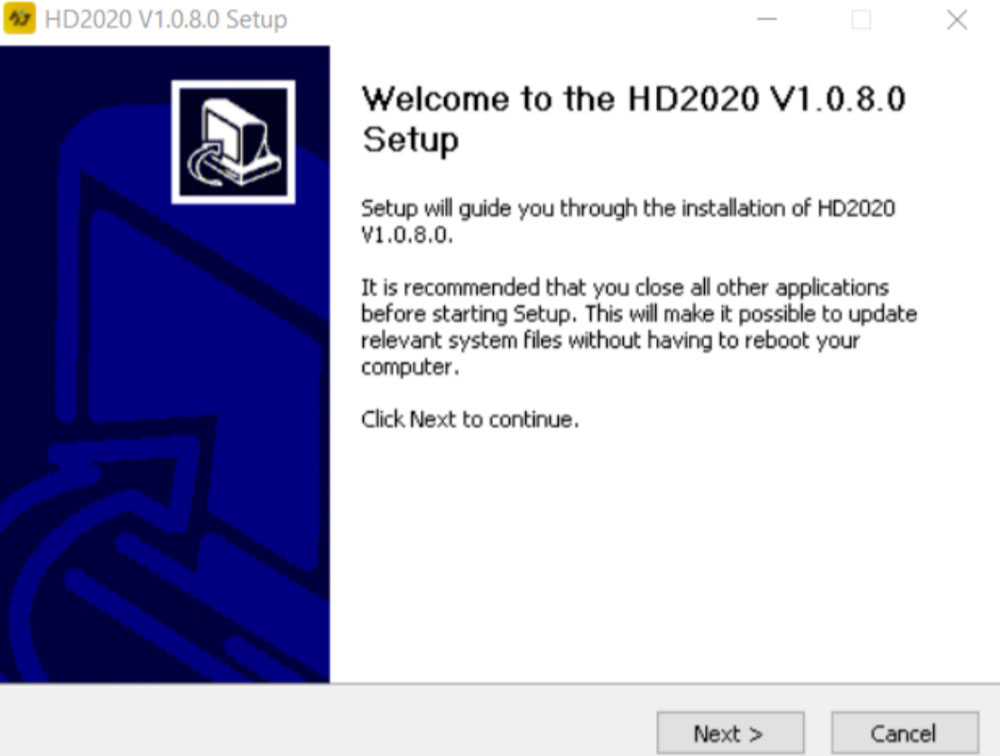
Installing the HD2020 software is a straightforward process. Follow these simple steps to get started:
Locate the file HD2020 V1.3.2.1.exe on your CD or download source.
Double-click the installer file to launch the software installation wizard.
Follow the on-screen instructions by clicking Next to proceed with the installation steps.
Once the installation is complete, you’ll find the HD2020 program group listed under [Start] > [Programs]. You can also launch the software by double-clicking the HD2020 shortcut on your desktop.
The installation process is quick and intuitive, allowing you to get started with Huidu HD2020 in just a few minutes.
2. HD2020 Huidu Introduction
The HD2020 software from Huidu Technology is a powerful and flexible solution designed for controlling and managing single-color and dual-color LED displays. It is specifically tailored for use with various Huidu control cards, including the E6x, W6x, W0x, S6x, U6x, and G6x models, and supports tasks such as debugging, program editing, and data transmission.
This updated version of the HD2020 software allows for easy configuration and control of display parameters, offering a seamless experience for users. Once the tool is launched, it automatically displays all the relevant display parameters. Users can then make adjustments based on program content, text, time settings, and calibration, with changes taking effect immediately. The software’s functionality is robust, for smooth control and editing of various display elements.
As a newly developed iteration of Huidu’s dual-color control software, HD2020 enhances the user experience with an intuitive interface and powerful features. It is compatible with a range of Huidu control cards and facilitates easy connections and operations. The interface remains clean and user-friendly, making it both practical and aesthetically pleasing for everyday use.
2.1 Features
Compatibility: Designed for Huidu’s dual-color control cards, including models E6x, W6x, W0x, S6x, U6x, and G6x.
Media Support: Supports a variety of formats, including JPG, BMP, GIF, as well as text, animated characters, Excel files, and more.
Advanced Display Options: Allows for integration of time, countdowns, lunar calendar, temperature, humidity, weather, and prayer times into your display content.
Flexible Control Methods: Supports multiple connection types, including serial (RS232/RS485), network ports, Wi-Fi, and USB drives, catering to diverse control needs.
User-Friendly Interface: Designed for ease of use, with a simple layout that is both functional and easy to learn.
3. HD 2020 Main Interface
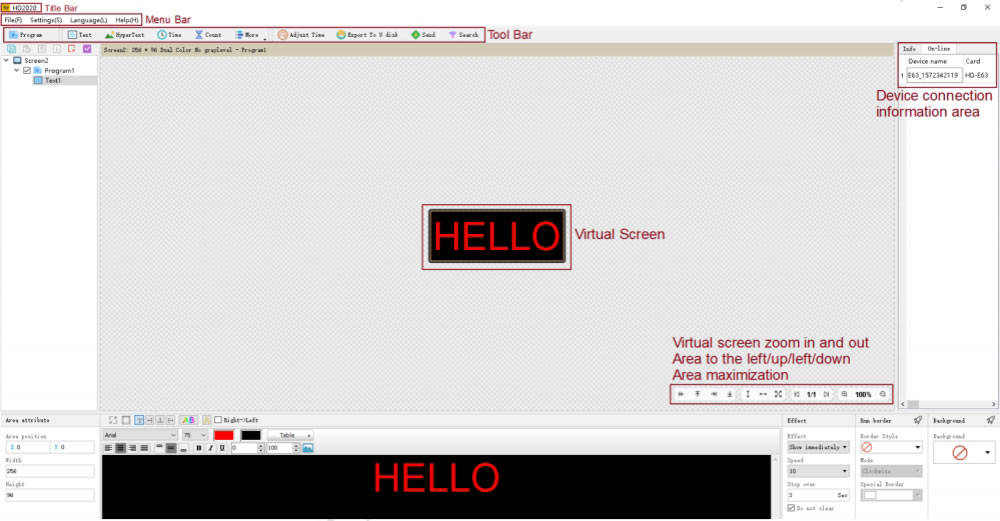
Upon launching the HD2020 software, you’ll be greeted with a clean and intuitive main interface designed to streamline your workflow. The interface is divided into several key sections that make navigation and operation easy.
Key Interface Elements:
Title Bar: Displays the name of the software, ensuring you always know which program you’re working with.
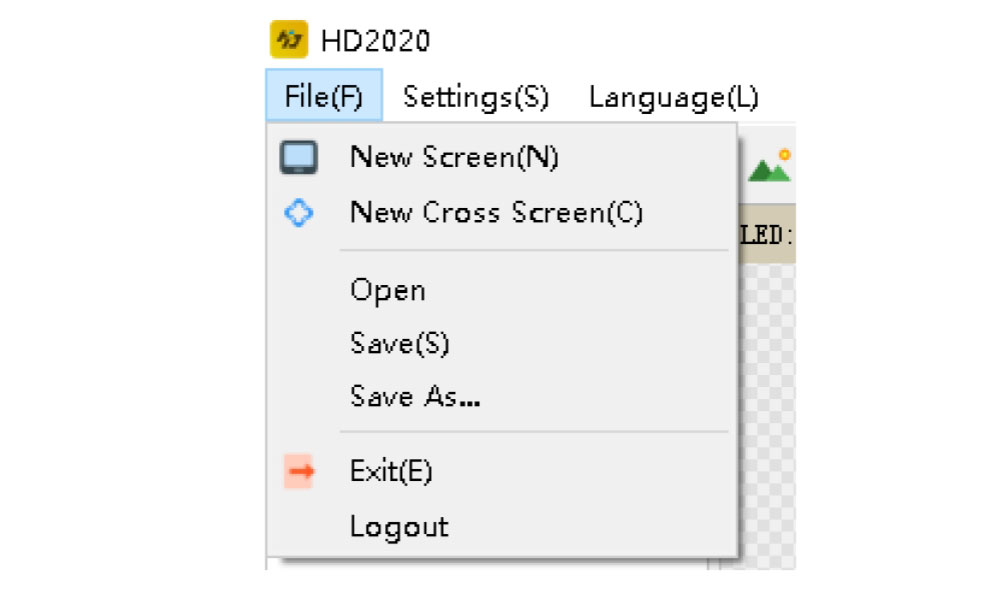
Menu Bar: Located at the top of the window, this menu includes essential options such as File, Settings, Language, and Help, allowing you to adjust preferences or access support features.
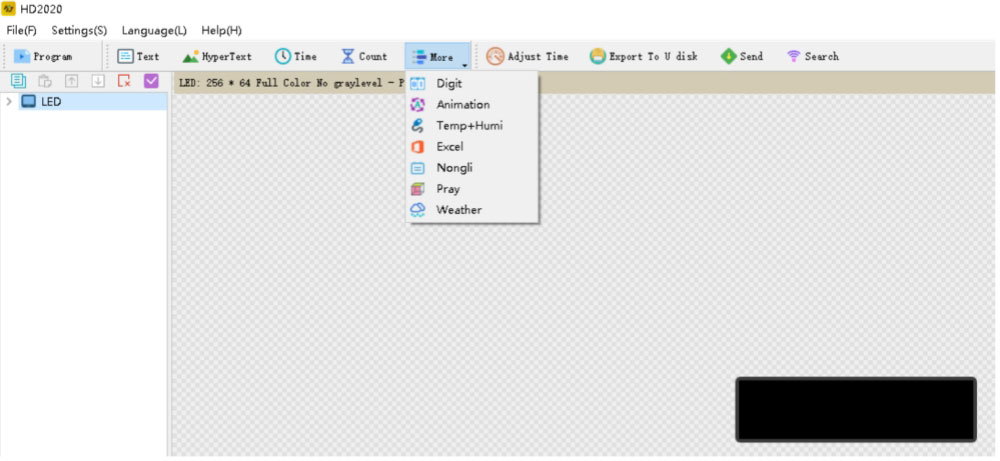
Tool Bar: The toolbar is a central part of the interface, offering quick access to a variety of tools. These include functions for working with programs, text, graphics, time, timing, countdowns, animated characters, temperature and humidity, Excel files, Chinese calendar, prayer times, weather, and more. Additionally, it includes options for U disk export, sending commands, and searching for devices.
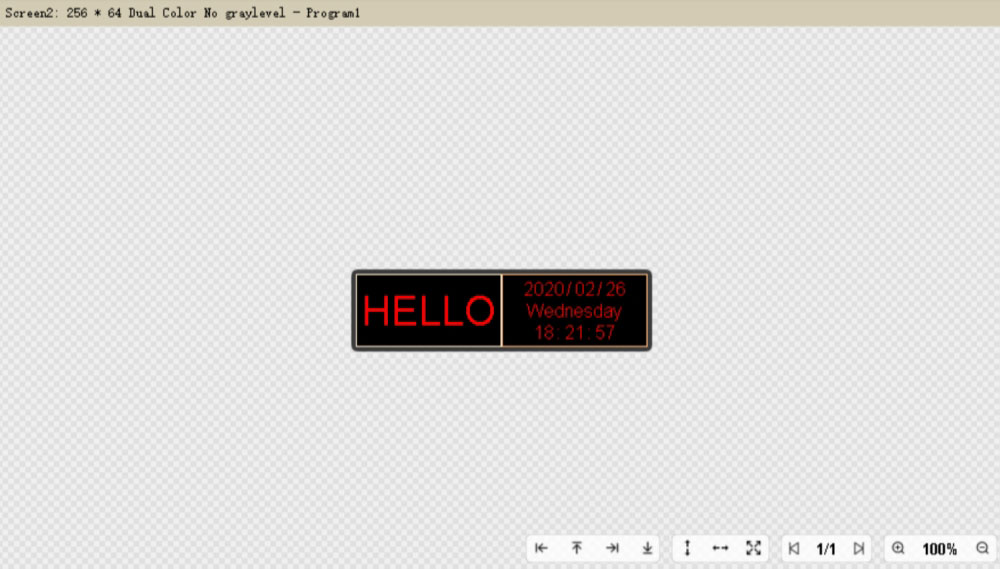
Preview Display: Directly beneath the toolbar, you’ll find a simulation window where you can preview your display. This area allows for real-time adjustments, including zooming in/out, panning the display, maximizing the view, and rotating the content. These features help you work more efficiently and visualize the final output while editing.
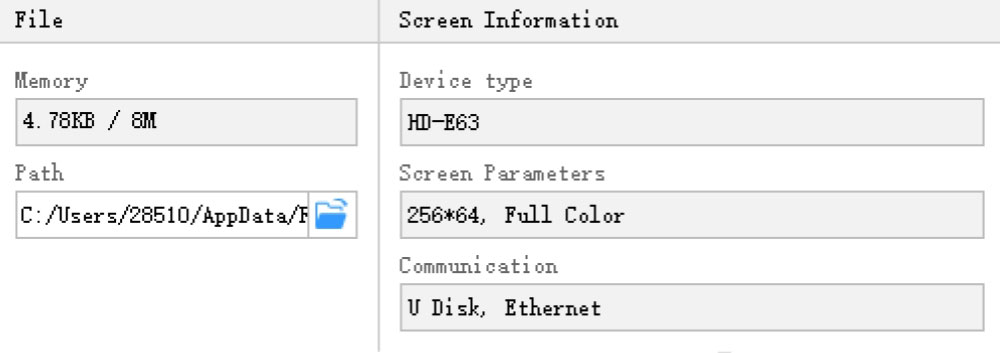
Display Property Bar: On the side of the interface, the display properties bar shows vital information about your current display. This includes details such as device type, screen parameters, communication method, and the display file size. It provides a quick overview of the display setup.
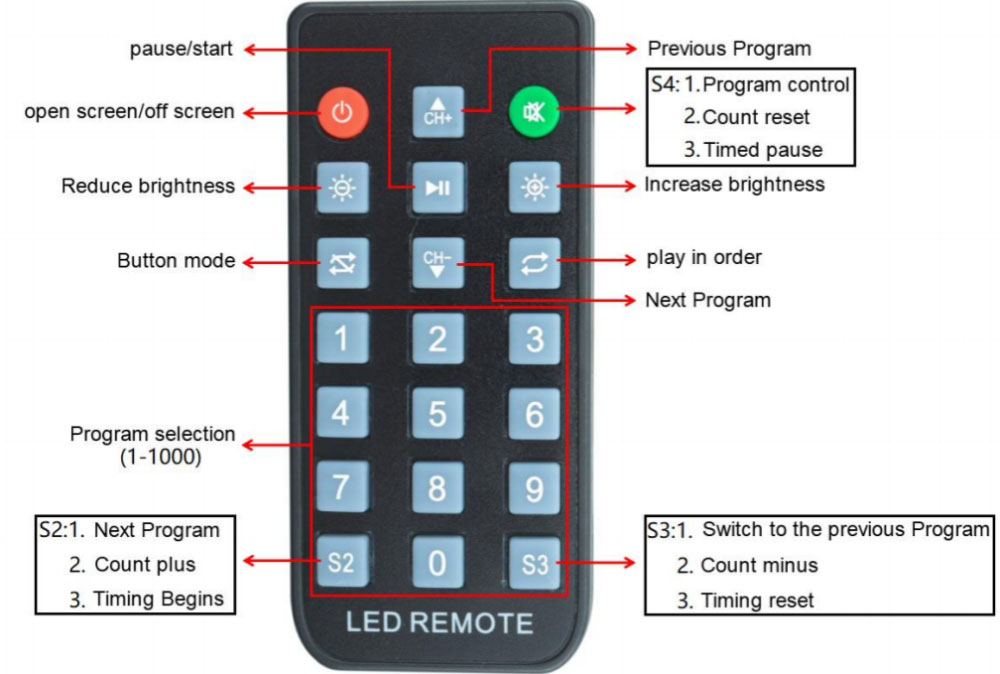
Remote Control (Optional): For those using an infrared remote control, a sensor needs to be installed. The remote control functionality can be accessed directly through the interface, enabling easy management of your display settings from a distance.
4. HD 2020 LED Operation Guide
4.1 HD2020 Password
To connect via Wi-Fi, the default password is “88888888.”
4.2 Display Program Creation Process
4.2.1 Creating a New Display and Program
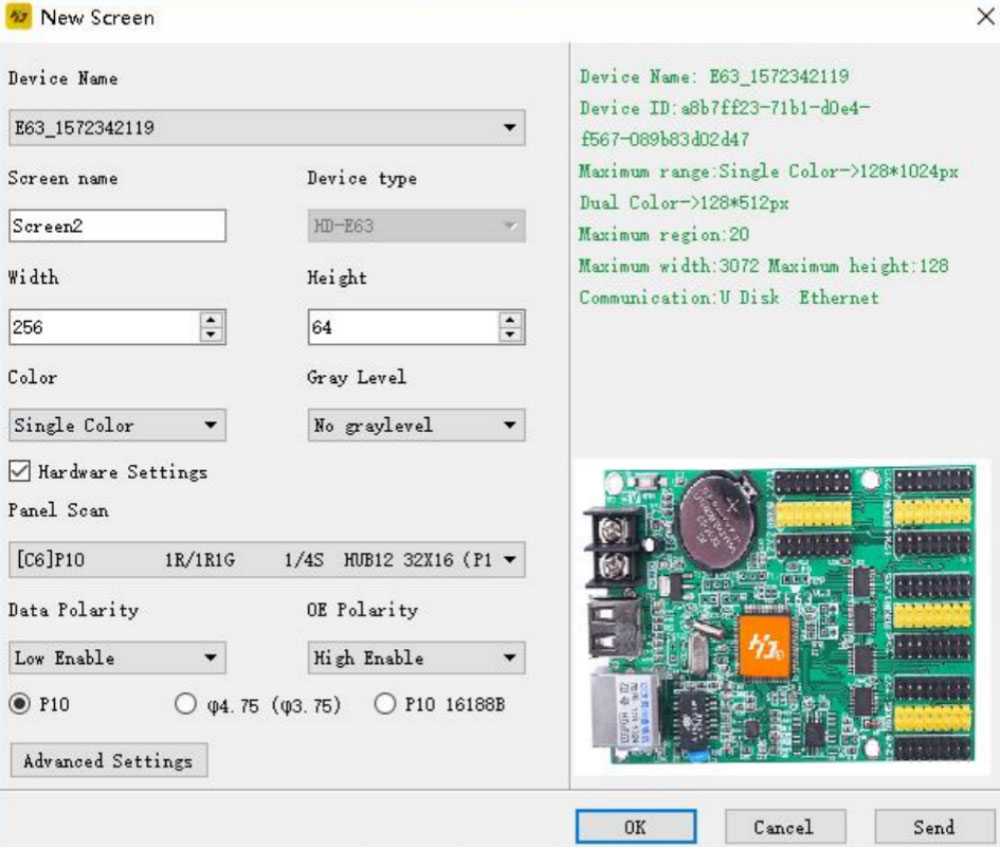
Start by clicking File → New Display (password: 168). The setup page will appear:
- If the control card is set correctly (normal text display), simply click OK to create the display and program.
- If the display doesn’t show text properly, choose the device, set color, width, height, and gray level, and then go to the hardware settings for display adjustments (via network cable, serial cable, or Wi-Fi).
Note: Each of the 1000 programs can have unique settings, such as playback time, fixed duration, and border settings.
4.2.2 Creating a New Partition
For each program, up to 20 partitions can be created. After selecting the program, you can add different partition types (e.g., graphic, text, time, countdown, weather, etc.).
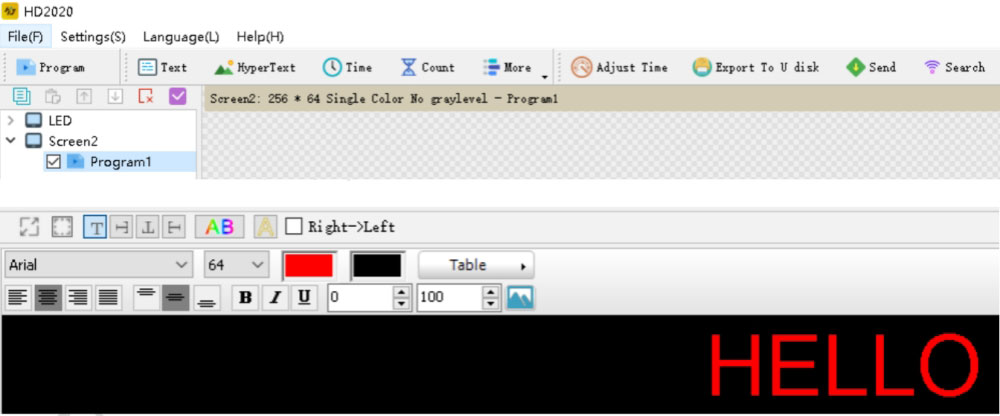
4.2.3 Finalizing the Program
Once the steps above are completed, you can control multiple displays by creating multiple program files. Use the simulation screen for real-time program previews and adjust display modes before sending content to the screen.
4.3 How to Display Different Contents
4.3.1 Text Display
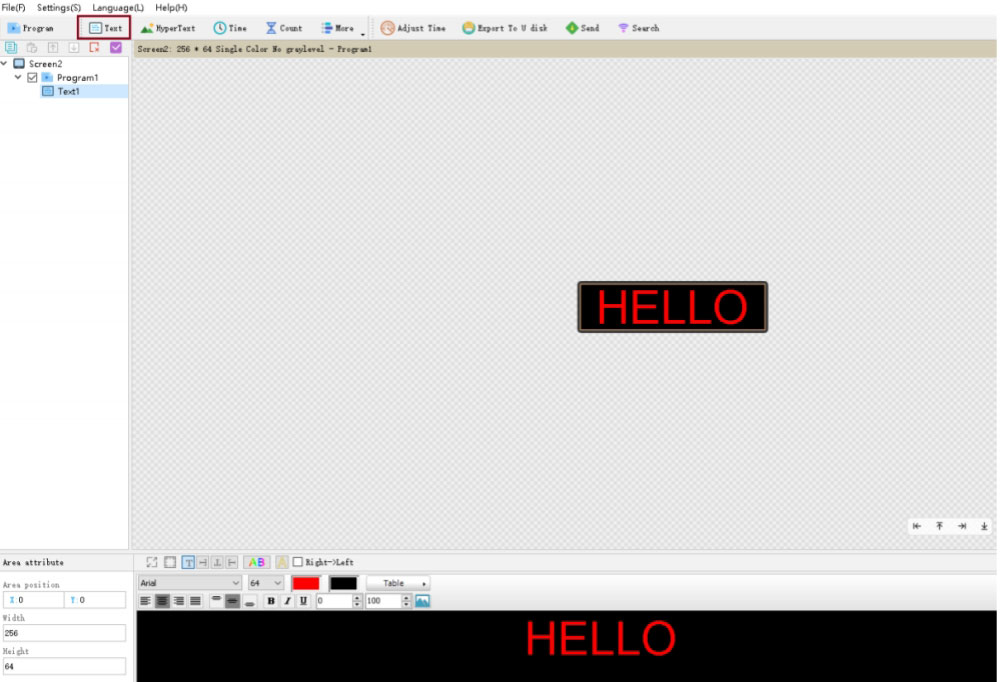
To display text, use the text area which allows customization of font size, rotation (left, right, reverse), and borders.
Steps: Follow the screen creation from 4.2.1, then click Text to place the text area (size and position adjustable).
4.3.2 Graphic Display
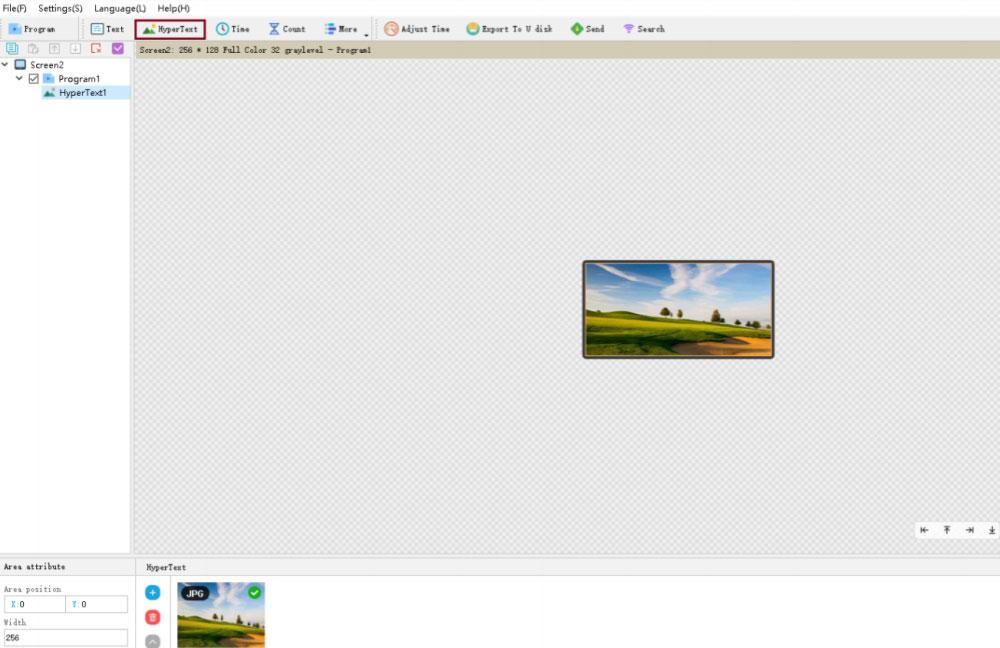
For logos or images, use the Picture and Text area. Supported formats include JPG, BMP, PNG, and GIF.
Steps: After creating the display screen, click Picture and Text, then click the blue icon ![]() upload your image.
upload your image.
4.3.3 Animated Word Display
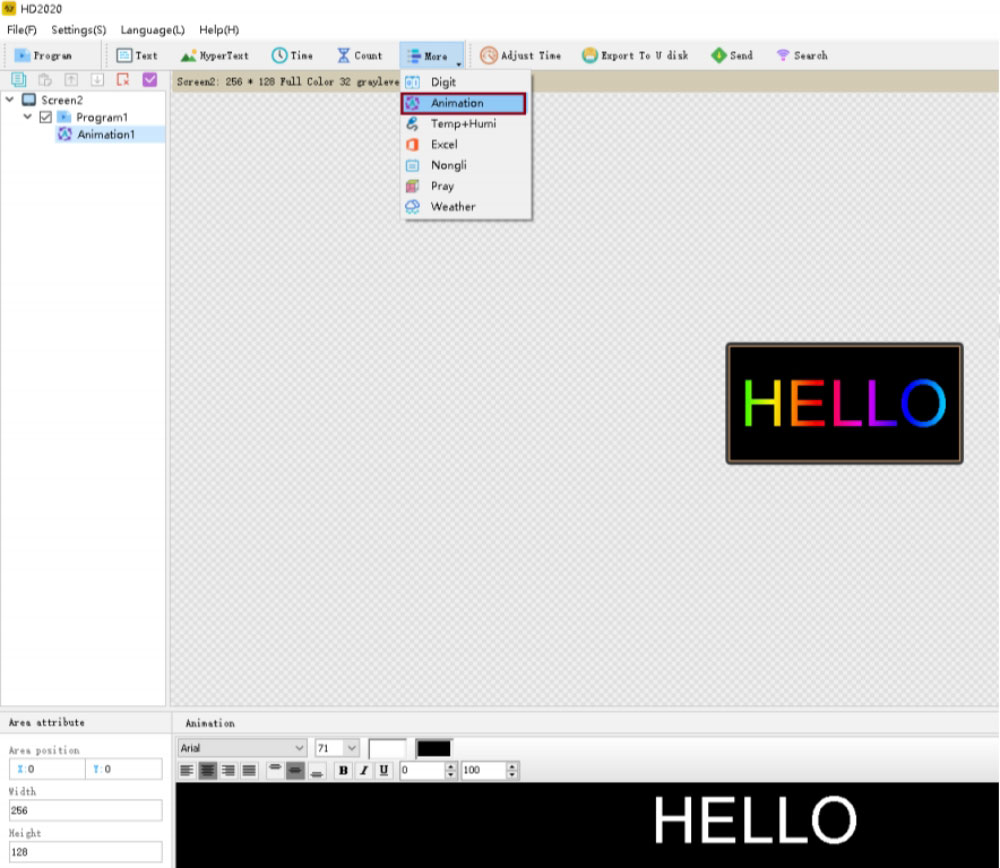
To create animated text, click Animated Word to insert text that can be customized with a background or classic display style.
Steps: Follow the display creation steps from 4.2.1, and click Animated Word to add the content.
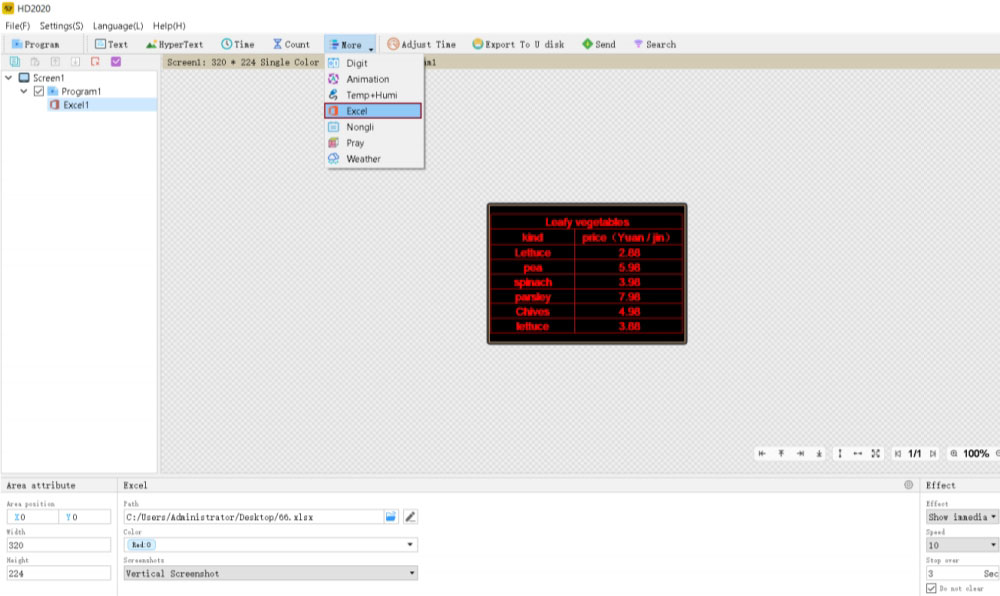
4.3.4 Excel Display
To show an Excel sheet, install full Microsoft software for compatibility.
Steps: After creating the screen, click Excel to add the file. Horizontal or vertical screenshot options are available.
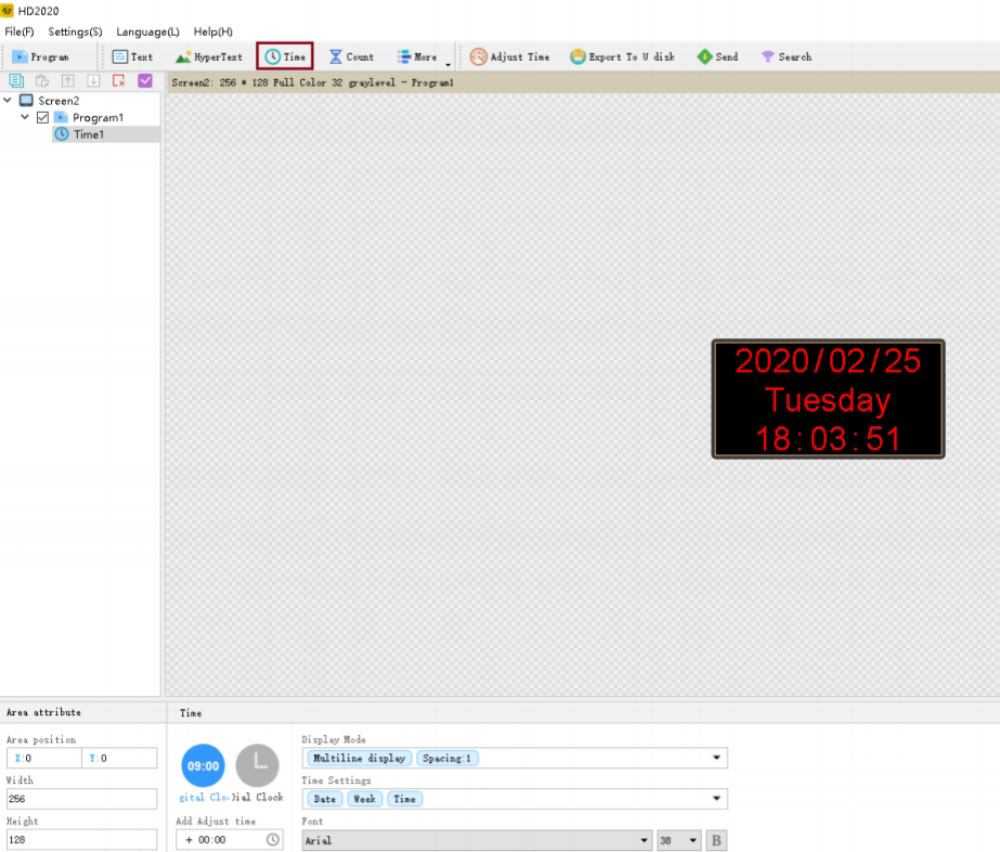
4.3.5 Time Display
For time display, configure the time zone and adjust its position.
Steps: Create the display screen and click Time to add the time display.
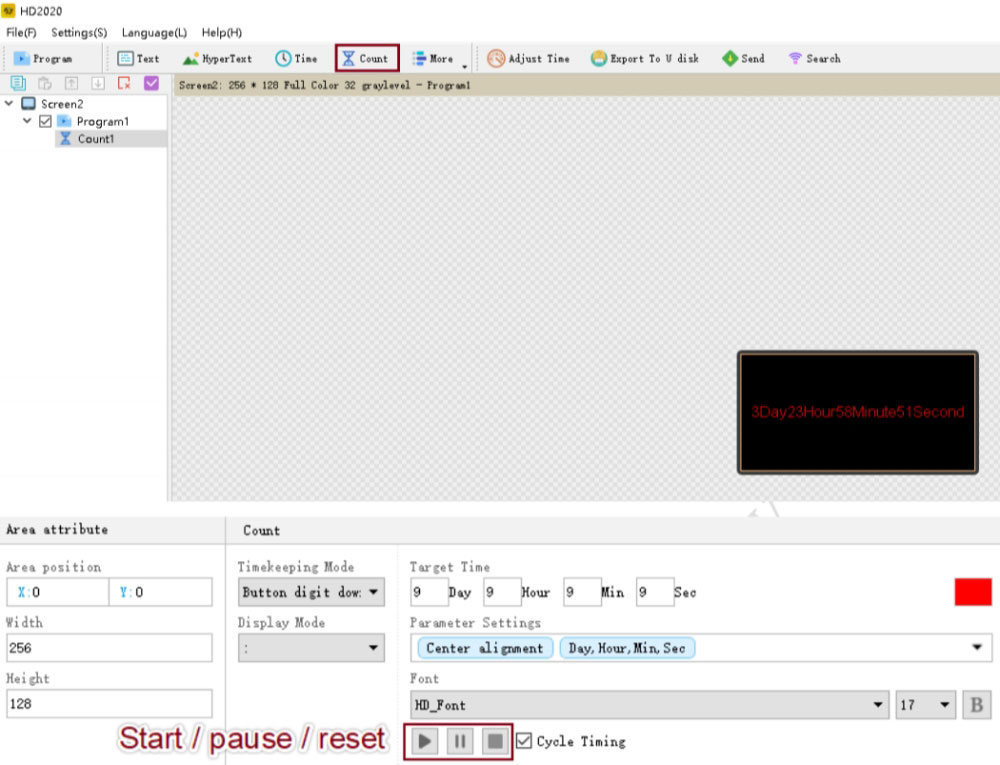
4.3.6 Countdown Display
For countdowns, click Timing to set up a countdown or count-up feature.
Steps: Similar to other displays, adjust coordinates, width, and height.
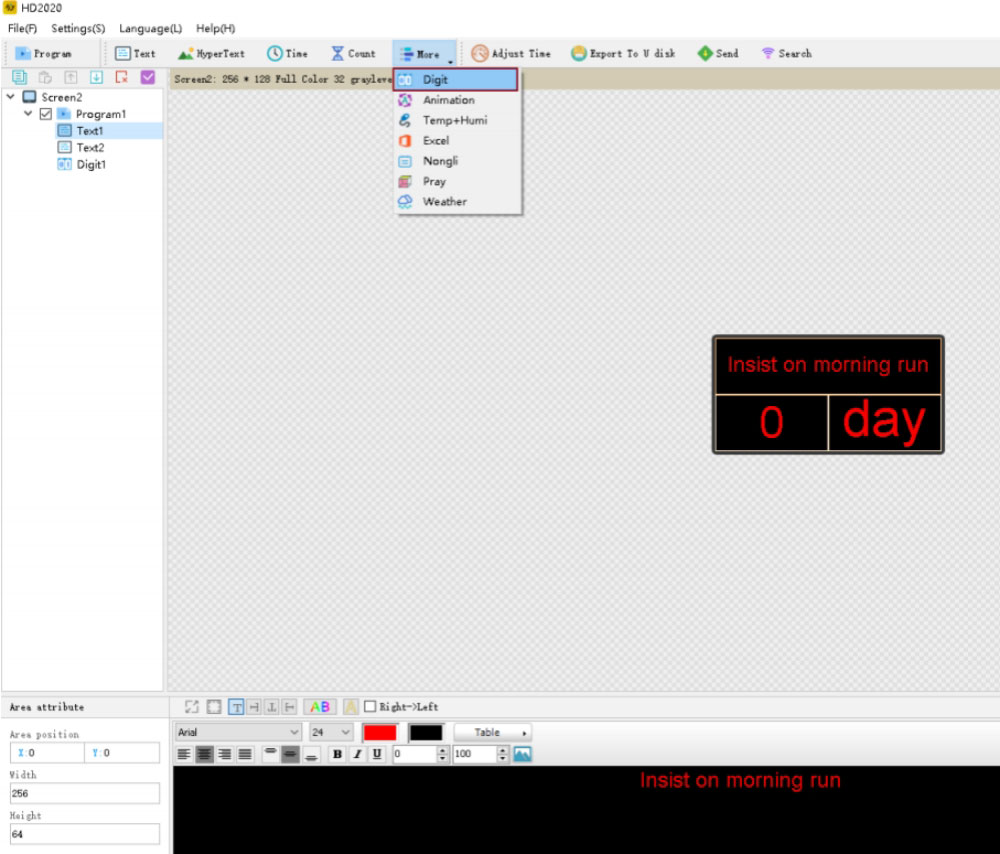
4.3.7 Count Display
To show a count, set it up with adjustable increments and thresholds.
Steps: Create the display screen, click Count, then adjust the count’s settings.
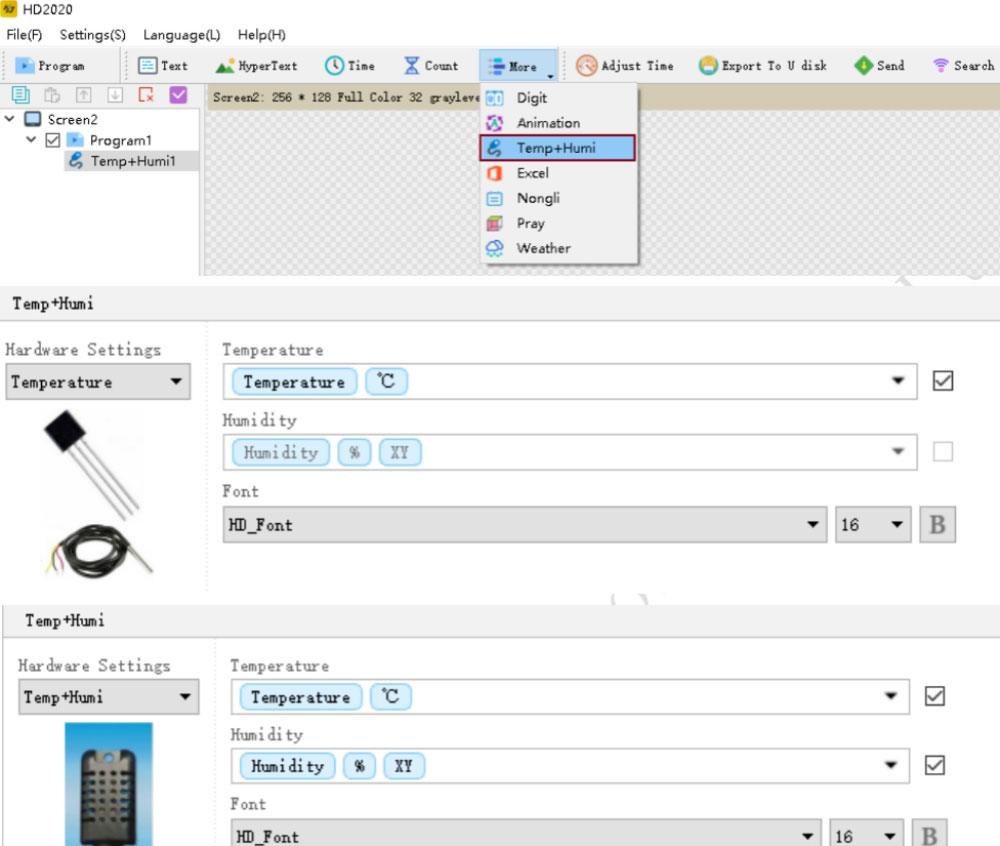
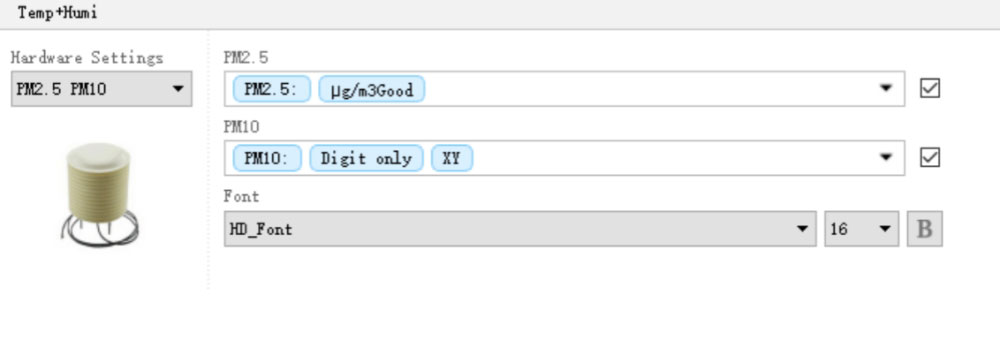
4.3.8 Temperature, Humidity, or PM2.5 Display
For environmental data, sensors are required for accurate readings.
Steps: After creating the screen, select the appropriate sensor to display the data.
The temperature and humidity as shown in the figure:
The PM2.5 sensor as shown in the figure:
4.3.9 Lunar Calendar
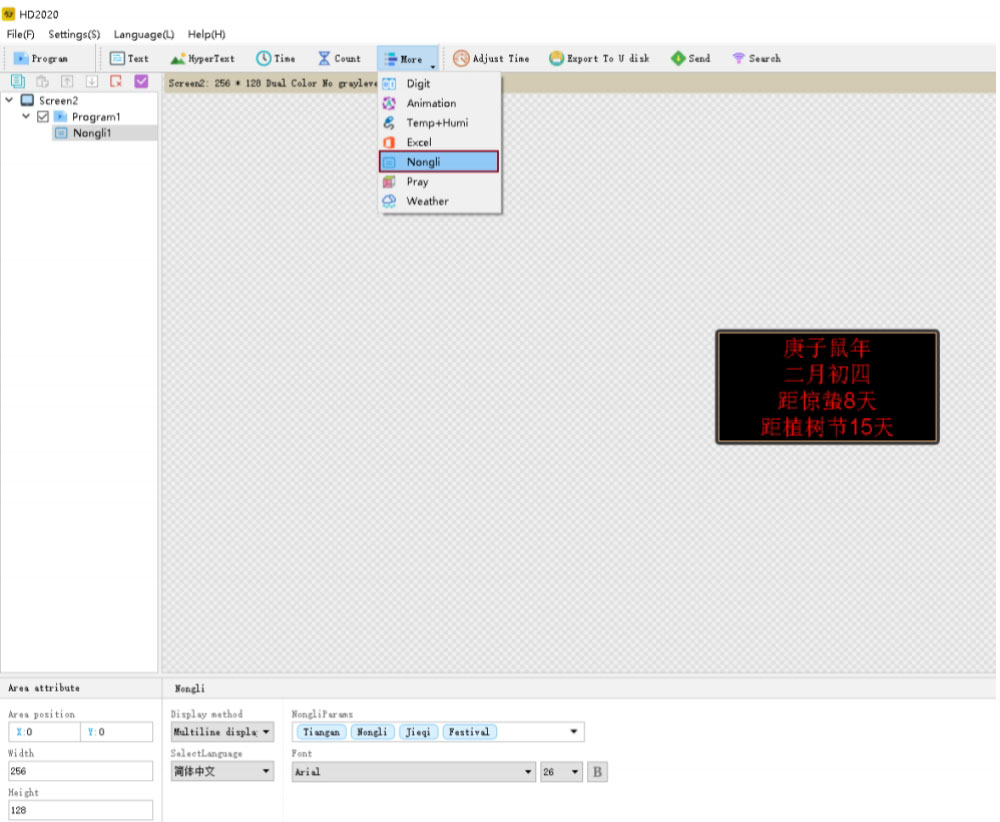
Display lunar dates, festivals, or solar terms.
Steps: After screen creation, click Lunar Calendar to add the calendar data.
4.3.10 Prayer Time Display
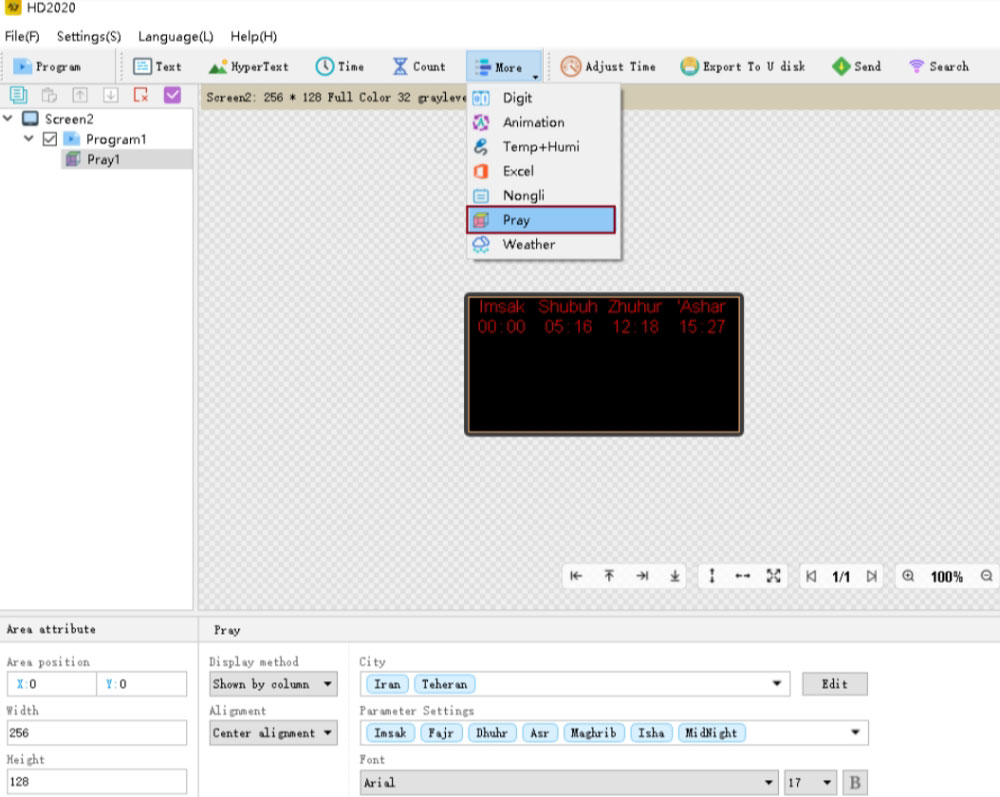
For displaying prayer times, select the country and city.
Steps: Follow the standard display creation steps, then click Prayer.
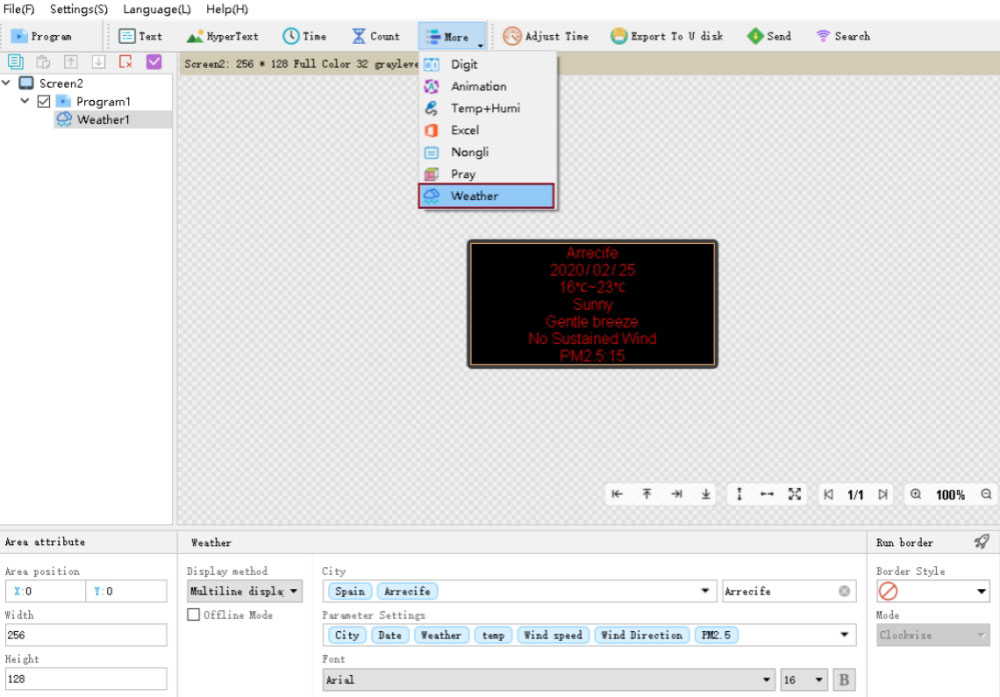
4.3.11 Weather Display
To show local weather, select the relevant country and city.
Steps: After creating the screen, click Weather to configure the display.
4.4 How to Set the Text to Stand Still
To freeze text on the screen, select the Still Display special effect.
Steps: Apply the setting to hold the text in place.
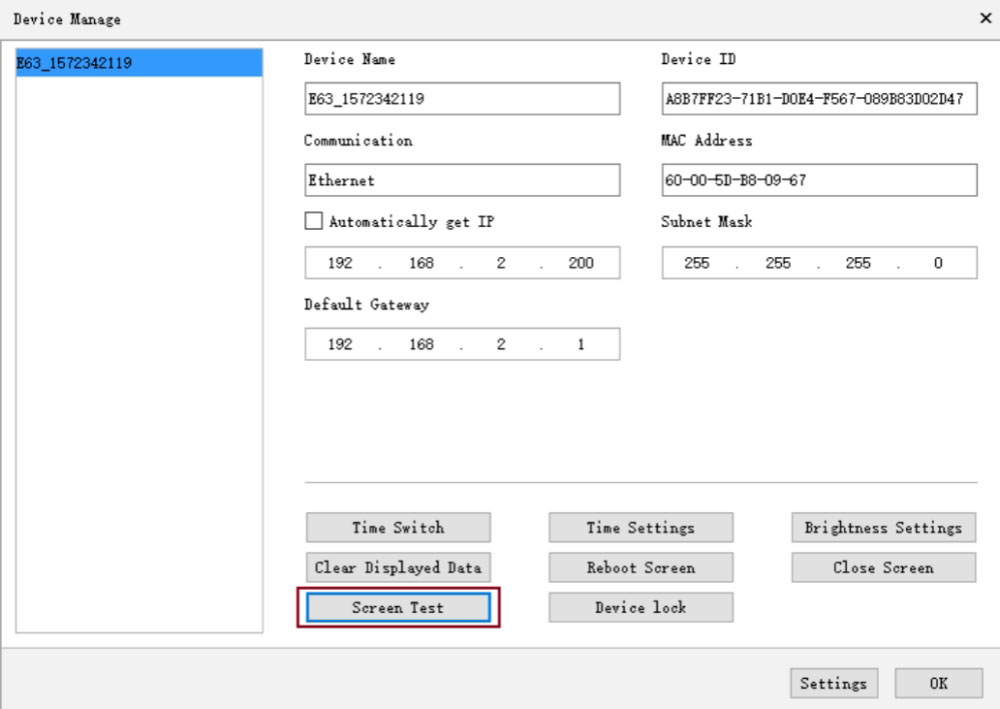
4.5 How the Control Card Tests the Display
There are two ways to test the display:
Hardware Test: Press and hold the S1 button on the control card to initiate the test.
Software Test: Go to Software Settings → Device Management → Display Test to test via software.
4.6 How to Upgrade the Control Card
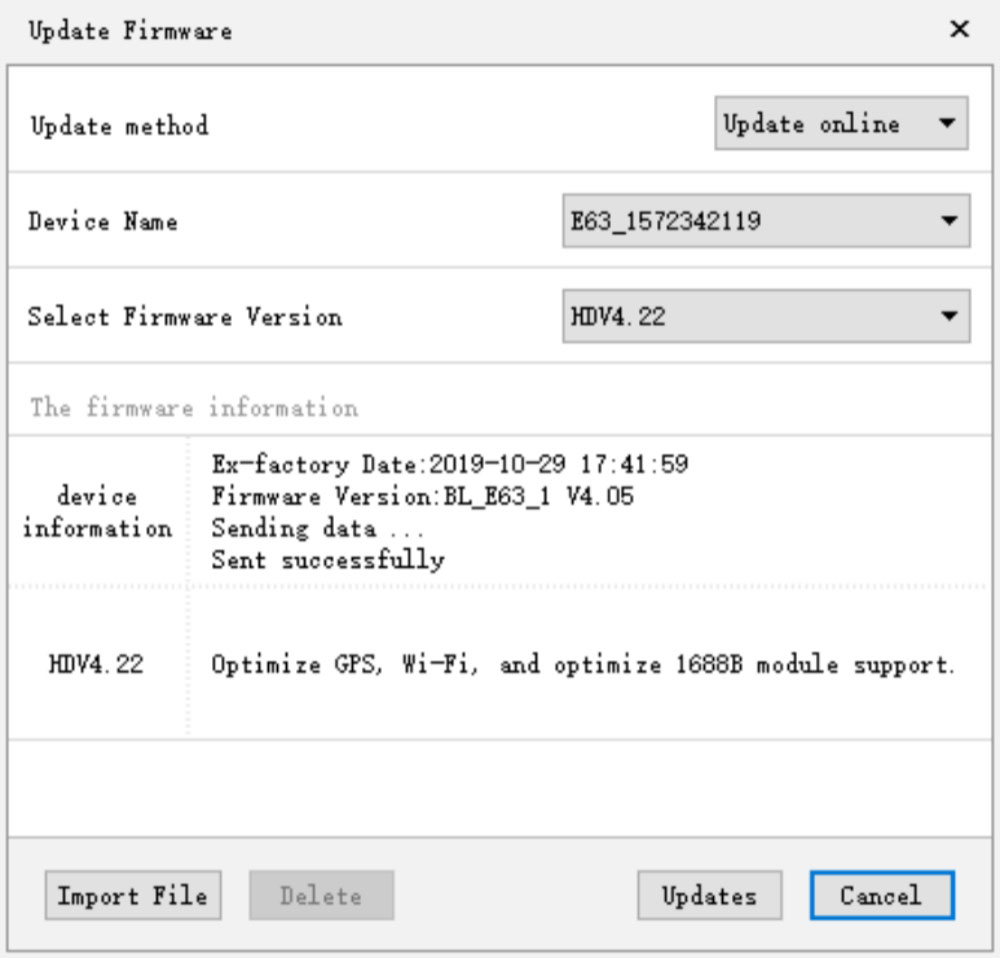
To update the firmware, follow these steps:
1. Go to Settings → Firmware Update
2. Select the appropriate firmware version.
3. Click Update to complete the process.
Firmware can be updated via USB, serial cable, network cable, or Wi-Fi.
4.7 How to Restore Control Card to Factory Settings
To reset the control card:
1. Disconnect the display power.
2. Press and hold the test button.
3. Reconnect power and release the button after 10 seconds.
5. Use Case Scenarios
Huidu HD2020 is a versatile software that caters to a wide range of applications.
5.1 Retail Displays
Retailers are increasingly using digital signage to enhance in-store experiences and promote products. HD2020 is an excellent solution for managing retail LED displays, enabling store owners to:
Showcase Promotions: Retailers can easily schedule promotions, discounts, and offers to be displayed at specific times, ensuring targeted marketing.
Product Information: Display product details, pricing, and stock availability in real-time, keeping customers informed and engaged.
Interactive Content: Retailers can integrate interactive elements like touchscreens or QR codes, allowing customers to explore more information or participate in promotions.
5.2 Event Management
For event organizers, controlling large-scale LED displays during events like concerts, conferences, or festivals is crucial. HD2020 simplifies this task by:
Real-Time Updates: Displaying live updates such as event schedules, speaker details, or live social media feeds.
Advertising and Branding: Managing advertisements, sponsor logos, and event-specific content, ensuring smooth transitions and professional presentations.
Multimedia Integration: Integrating videos, animations, and graphics to create a dynamic atmosphere that engages the audience.
5.3 Public Service Displays
Government agencies and public service organizations often rely on LED displays for broadcasting important information to the public. HD2020 is ideal for:
Emergency Alerts: Quickly transmitting critical alerts, weather warnings, or emergency notices to the public in real-time.
Traffic Updates: Displaying live traffic updates, road closures, or public transportation schedules on large highway or transit display screens.
Community Announcements: Broadcasting local news, government updates, or community events to keep citizens informed.
5.4 Corporate Communication
Companies with large campuses or office buildings can use HD2020 to manage internal LED displays, providing employees with valuable information:
Employee Communication: Display company news, HR updates, meeting schedules, and other important announcements across office buildings.
Performance Dashboards: Use real-time data to display performance metrics, sales numbers, or team achievements, boosting employee engagement.
Event Scheduling: Keep employees informed of internal events, training sessions, or corporate meetings through easily scheduled content.
6. Conclusion
In conclusion, Huidu HD2020 stands out as a powerful and versatile software solution for managing and controlling LED displays. Whether you are setting up dynamic content for a single screen or managing multiple displays across different locations, HD2020 provides the tools necessary for seamless control and efficient operation.
The software’s integration with other Huidu products further enhances its capability, offering users a complete and scalable LED display management system. Coupled with its easy-to-use interface and wide compatibility with various devices, HD2020 ensures that users can maximize their display’s potential while maintaining smooth, uninterrupted operation.
Whether you are a business owner, event organizer, or public service provider, HD2020 is designed to simplify your workflow, improve content delivery, and provide reliable control over your LED displays. By leveraging its advanced features, users can easily create engaging, high-quality content and keep their audiences informed and entertained.
For more information, resources, and software downloads, be sure to Register LedInCloud, where you can access everything you need to get started with HD2020.
