
NovaStar VMP adopts an open-platform design philosophy, providing users with comprehensive convenience. It streamlines everything from device connection and management to input source and output configuration, along with image quality adjustments, color processing, scene mode presets, and display monitoring, delivering a seamless, intuitive experience where users achieve exactly what they see.
1. NovaStar VMP Software Advantages
1.1 Group Management for Effortless Control
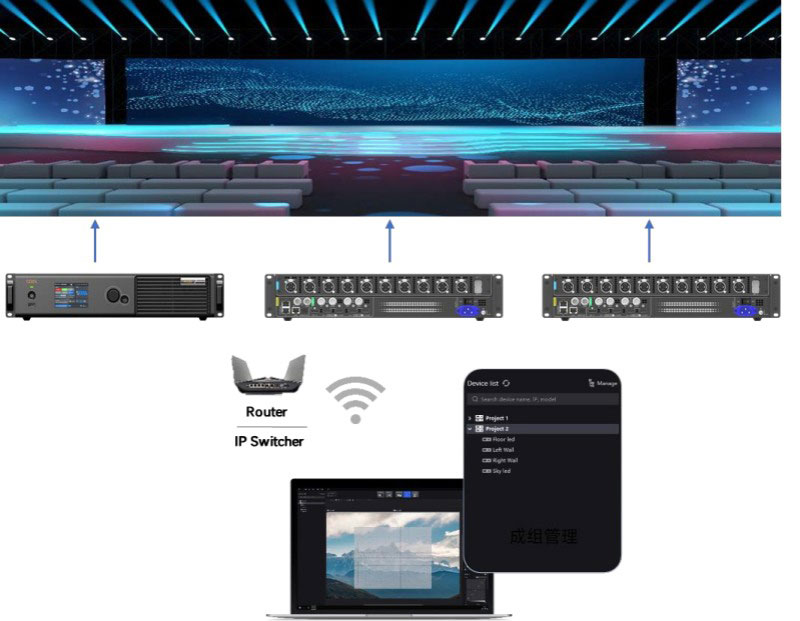
Managing multiple devices becomes a breeze with VMP’s group management feature, allowing users to organize screens into cohesive groups.
This functionality is particularly beneficial during large-scale live events, where coordinating several displays simultaneously can often be a challenge. With VMP, effortless control over multiple screens is just a few clicks away.
1.2 Flexible Screen Layouts, No Rectangular Limitations
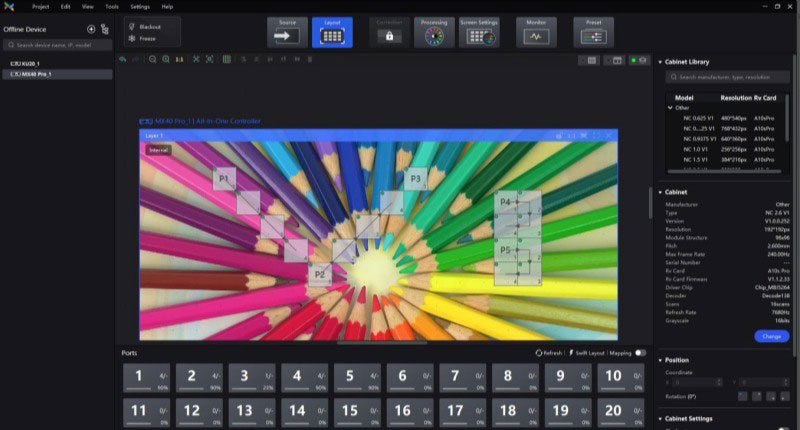
Gone are the days of being confined to rectangular screen designs. VMP accommodates irregular screen layouts, allowing for a creative and flexible arrangement that meets the specific needs of any project. When calculating screen resolutions, blank pixels are excluded, optimizing the load capacity of the Ethernet port for more efficient performance.
1.3 One-Click Application of Presets
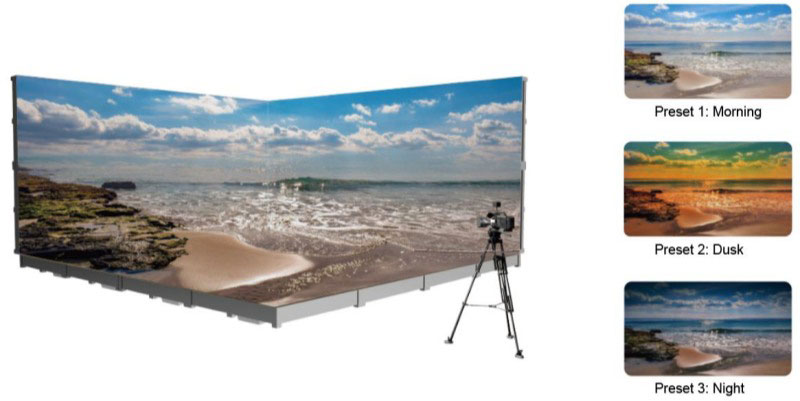
For rapid adjustments during various scenarios, VMP allows users to save display settings—like brightness, color temperature, and gamma—as customizable presets. With the capability to store up to 50 presets, switching between configurations becomes instantaneous, enabling quick responses during live presentations or events.
1.4 Pre-Configuration in Offline Mode
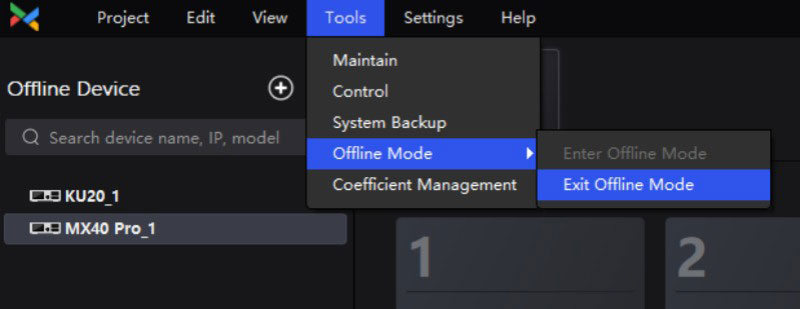
Before setting up an LED screen on-site, users can take advantage of the offline mode to add devices and configure screen settings in advance. This functionality simplifies the setup process, as pre-configured settings can be easily imported for immediate use once the screen is operational. Activating offline mode is as simple as selecting Tools > Offline Mode from the VMP toolbar.
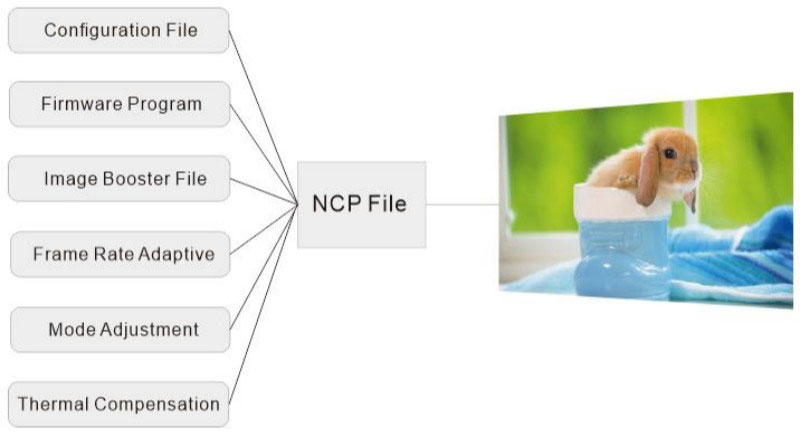
1.5 One-Stop Management with NCP Files
The NCP file streamlines operations by combining multiple configurations into a single file. This includes the cabinet configuration, receiving card firmware, image booster settings, frame rate parameters, and thermal compensation data. By uploading this NCP file either from a computer or pre-loading it into the control system, users can quickly activate their screens and achieve optimal display quality. To create an NCP file, it is recommended to consult with our technical team before the screen’s factory departure.
1.6 Open Protocol for Enhanced Development
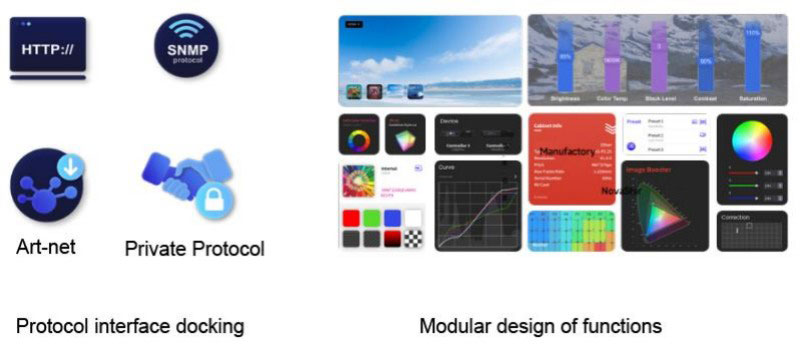
VMP promotes flexibility and adaptability through its open protocol design, which is easy to navigate. Users can access comprehensive protocol documents on the NovaStar website. The protocol supports modular design, allowing for tailored configurations and combinations of functional components, making VMP a versatile choice for developers and technicians alike.
2. COEX Control System Solution
2.1 Solution Introduction
In response to the unique demands of xR virtual shooting, NovaStar Technology has launched its innovative COEX control system solution. Tailored specifically for the nuances of virtual shooting, this system is equipped with a remarkable array of image-enhancing technologies. It effectively resolves common challenges such as unsightly scan lines, color discrepancies, and detail loss, resulting in images that exhibit exceptional clarity and accurate color representation. The outcome is a visually stunning and lifelike shooting experience, providing users with an immersive “what you see is what you get” environment.
Enhancing this solution further is NovaStar’s Vision Management Platform (VMP), which integrates the essential functions of design, debugging, management, and monitoring into a single cohesive package. This synergy simplifies the management of the display system, making it more efficient and user-friendly than ever before. With the COEX control system, users can navigate the complexities of virtual shooting with ease, and every production is as seamless and striking as possible.
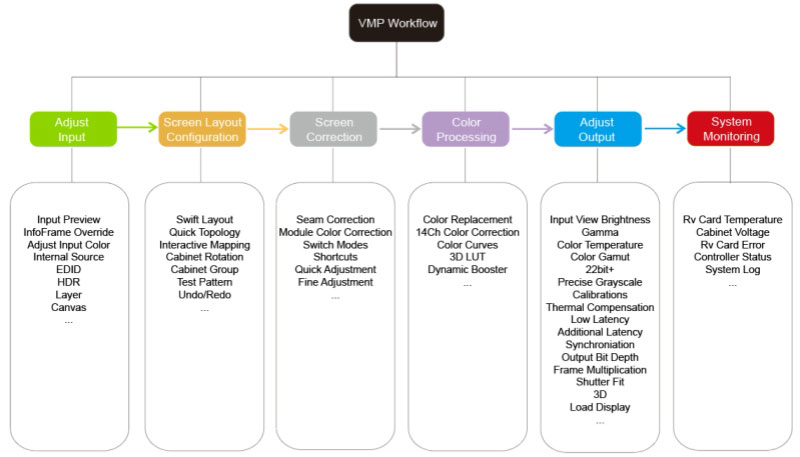
2.2 COEX Solution Build
The COEX Solution is compatible with various receiving cards, depending on the specific LED controllers used.

2.2.1 1G Solution
| Feature | VMP A10s Pro | VMP MX40 Pro Other AXs | VMP MX30 A10s Pro | VMP MX30 Other AXs | VMP KU20 A10s Pro | VMP KU20 Other AXs |
| Controller Load | 9,000,000 pixels | 6,500,000 pixels | 3,900,000 pixels | |||
| Inputs | 3x HDMI 2.0 (IN + LOOP) 1x DP1.2 1x 12G-SDI (IN + LOOP) | 1x HDMI 2.0 (IN +LOOP) 1x HDMI 1.4 (IN +LOOP) 1x DP1.1 2x 3G-SDI (IN + LOOP) | 1x HDMI 1.3 (IN + LOOP) | |||
| Outputs | 20x 1Gbps Neutrik 4x 10G OPT 1x SPDIF | 10x 1Gbps Neutrik 2x 10G OPT 1x SPDIF | 6x 1Gbps 1x 10G OPT 1x SPDIF | |||
| Genlock | 1x (IN + LOOP) | 1x (IN + LOOP) | \ | |||
| Control Method | TCP/IP protocol, RJ45 connector RS232 protocol, RJ45 connector (connect to the control device) | TCP/IP protocol, RJ45 connector RS232 protocol, RJ45 connector (connect to the control device) | TCP/IP protocol, RJ45 connector RS232 protocol, RJ45 connector (connect to the control device) | |||
| Maximum Resolution | 4096×2160@60Hz | 4096×2160@60Hz | 1920×1200@60Hz | |||
| Max Input Width & Height | Max width: 8192 pixels Max height: 8192 pixels | Max width: 8192 pixels Max height: 7680 pixels | Max width: 3840 pixels Max height: 2560 pixels | |||
| Frame Rate | Customizable from 23.97 Hz to 120/144/240 Hz. Step: 0.01 Hz | Customizable from 23.98 Hz to 120/144/240 Hz. Step: 0.01 Hz | Customizable from 23.98 Hz to 120 Hz. Step: 1 Hz | |||
| No Rectangle Restriction | √ | √ | √ | |||
| Bit Depth | 8bit, 10bit, 12bit | 8bit, 10bit | 8bit, 10bit (custom) | |||
| Max Output Width & Height | Max width: 800 to 16,384 pixels Max height: 600 to 16,384 pixels | |||||
2.2.2 5G Solution
| Feature | VMP CX80 Pro CA50E | VMP CX40 Pro CA50E |
| Controller Load | 35,389,440 pixels | 9,000,000 pixels |
| Video Interface | Selectable Card 1: 4x HDMI 2.0 + 4x 12G-SDI Selectable Card 2: 1x HDMI 2.1 + 1x DP1.4 + 4x 12G-SDI | 2x HDMI 2.0 (IN + LOOP) 1x DP 1.2 2x 12G-SDI (IN + LOOP) |
| Outputs | 16x 5Gbps Neutrik 2x 40Gbps QSFP+ 1x SPDIF | 6x 5Gbps Neutrik 1x 40Gbps QSFP+ 1x SPDIF |
| Genlock | 1x (IN + LOOP) | |
| Control Method | TCP/IP protocol, RJ45 connector RS232 protocol, RJ45 connector (connect to the control device) | TCP/IP protocol, RJ45 connector RS232 protocol, RJ45 connector (connect to the control device) |
| Maximum Resolution | 7680×4320@60Hz | 4096×2160@60Hz |
| Max Input Width & Height | HDMI 2.1 card: fixed output 7680×4320@60Hz HDMI 2.0 card: max width: 8192 pixels, max height: 8192 pixels | Max width: 8192 pixels Max height: 8192 pixels |
| Frame Rate | Customizable from 23.97 Hz to 120/144/240 Hz. Step: 0.01 Hz | Customizable from 23.97 Hz to 120/144/240 Hz. Step: 0.01 Hz |
| Bit Depth | 8bit/10bit/12bit | |
| No Rectangle Restriction | √ | |
| Single Ethernet Port Output Load | 8bit – 60 Hz, 2,592,000 pixels 10bit – 60 Hz, 2,073,000 pixels 12bit – 60 Hz, 1,728,000 pixels | |
| Max Output Width & Height | Max width: 800 to 16,384 pixels Max height: 600 to 16,384 pixels | |
3. User Manual and Software Download
The NovaStar VMP user manual provides detailed guidance on the software’s features. This manual covers everything from initial setup and configuration to advanced features, making it an invaluable tool for both beginners and experienced users.
In addition to the user manual, we offers a convenient software download option, allowing users to easily access the latest version of VMP.
We recommend visiting LED Screen Cloud Platform, where you can find the user manual and the most recent software updates in our NovaStar Resources Download page.
4. COEX VMP Operation Tutorial
4.1 UI Introduction
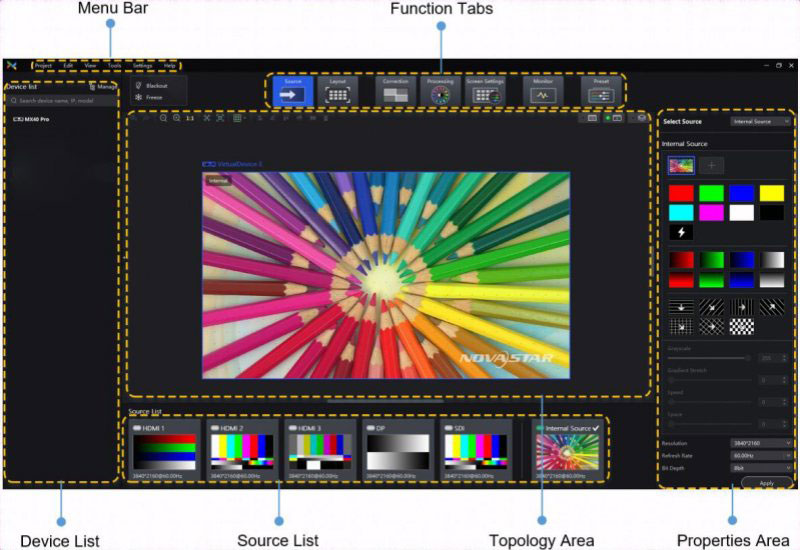
4.2 Installation
4.2.1 Windows
A computer that meets the following specifications:
Operating System: Windows 10 (64-bit) or newer
Processor: Intel i5 or higher
Memory: 8 GB RAM or more
Installation method:
To install VMP, simply run the Coex VMP Setup.exe file. Follow the prompts provided by the setup wizard to complete the installation process. If your firewall prompts you during the installation, make sure to select the option to allow the installation to proceed.
4.2.2 MacOS
A computer that meets these requirements:
Operating System: MacOS 10.15 or newer
Processor: Intel i5 or Apple M1 or later
Memory: 8 GB RAM or more
Note:
Please be aware that the MacOS version of VMP does not support calibration functions. For optimal use of the LED Image Booster feature, it is recommended to use VMP on Windows.
Installation method:
Step 1: Once the installation package is downloaded, open Finder on your desktop, navigate to the Downloads folder, and double-click on VMP.dmg to open it.
Step 2: In the window that appears, drag VMP.app into the Applications folder.
Step 3: Navigate to the Applications folder, right-click on VMP.app, and select Open > Cancel. Next, right-click on VMP.app once more and choose Open > Open.
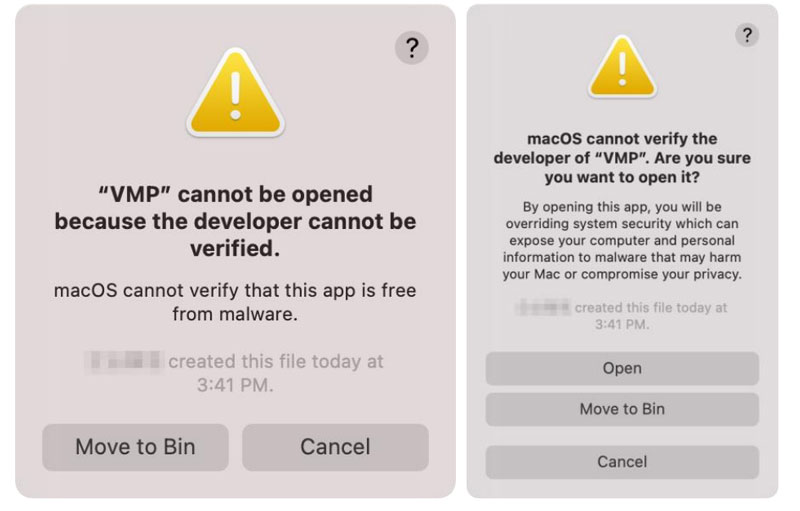
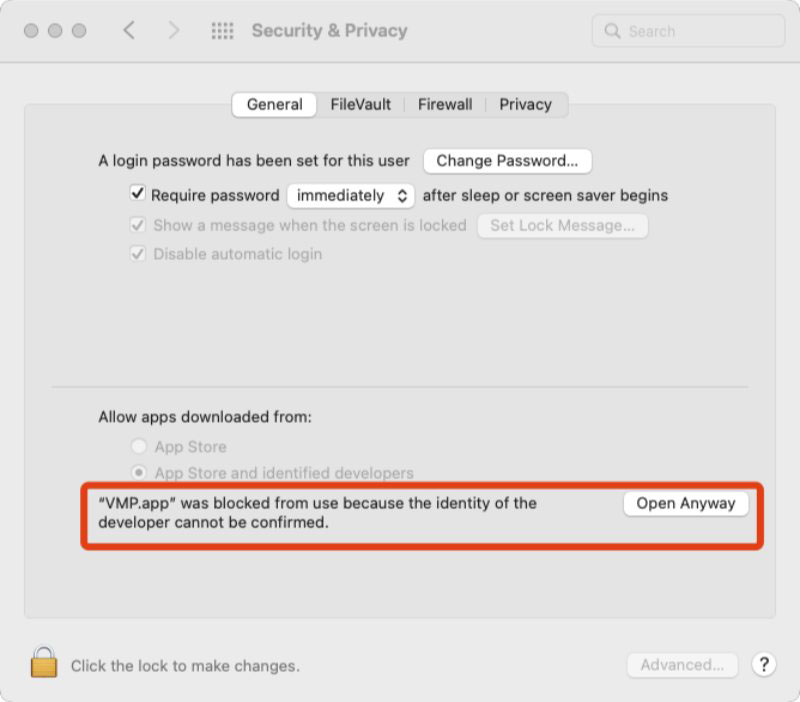
If you attempt to run VMP by double-clicking, you may encounter a prompt stating, “VMP.app can’t be opened because it is from an unidentified developer.” In this case, click ![]() at the top-left corner of the screen and go to System Preferences > Security & Privacy > General, then click “Open Anyway” to proceed.
at the top-left corner of the screen and go to System Preferences > Security & Privacy > General, then click “Open Anyway” to proceed.
4.3 Connect Devices
4.3.1 Via Ethernet Cable
To establish a direct connection between the controller and the control PC, use an Ethernet cable and configure a static IP address for the controller. This ensures that both devices are on the same network segment. In this section, we’ll use the MX40 Pro LED display controller as an example.
Step 1: Refer to the following picture to complete the hardware connections.
Step 2: Press the knob on the controller to access the menu, then navigate to Communication Settings > Network Settings.
Step 3: Change the Mode to Manual.
Step 4: Enter the IP Address, Subnet Mask, and Default Gateway, ensuring that both the controller and the control PC are aligned on the same network segment. To restore the network settings to their default values, select Reset and press the knob.
Step 5: Once all settings are configured, select Apply and press the knob to save your changes.

4.3.2 Via LAN
For a more flexible setup, connect both the controller and the control PC to the same local area network (LAN) through a router. In this scenario, the controller will be set to automatically obtain an IP address, again using the MX40 Pro LED display controller as the example.
Step 1: Follow the picture to establish the hardware connections.
Step 2: Access the controller’s menu by pressing the knob, and navigate to Communication Settings > Network Settings.
Step 3: Set the Mode to Auto.
Step 4: Select Apply and press the knob to finalize the configuration.

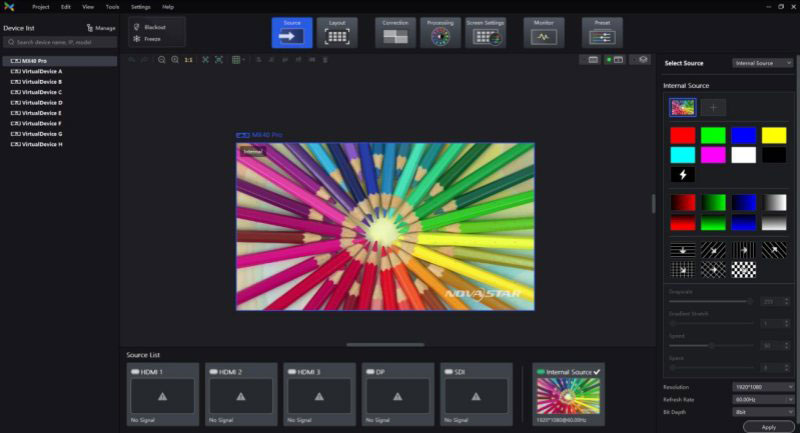
4.4 Set Input Source
To optimize your display, start by selecting the appropriate input source and configuring its resolution and frame rate. When the resolution of the input source matches that of the screen, the image will be displayed pixel for pixel, providing a clear and precise visual experience. Keep in mind that a lower frame rate may lead to flickering images, while a higher frame rate generally stabilizes the display, resulting in smoother visuals.
Step 1: Choose the Input Source.
Step 2: In the device list on the left side, locate and select the desired controller.
Step 3: To select a source, either double-click on a source thumbnail in the list at the bottom of the page or choose an option from the drop-down menu next to Select Source in the properties area on the right.
Step 4: Adjust the resolution and refresh rate, then click Apply. If you’re working with an internal source, you can also set the bit depth here. For SDI sources, this step can be skipped.
5. NovaStar R5 Processor FAQs
What is Coex VMP?
Coex VMP, or the COEX Vision Management Platform, is an innovative control system designed specifically for managing LED displays. It integrates various functionalities to enhance user experience and streamline operations in dynamic environments.
What is VMP short for?
VMP stands for Vision Management Platform, reflecting its focus on providing a comprehensive solution for visual display management.
Why is VMP important?
NovaStar VMP is crucial because it simplifies the complexities of LED display management. By providing user-friendly tools for configuration and monitoring, it enhances efficiency and ensures high-quality visual output, making it essential for professionals in the industry.
Is VMP compatible with all LED displays?
VMP is designed to work with a wide range of NovaStar LED display controllers and models. However, it’s advisable to check compatibility with your specific hardware before installation.
6. Conclusion
The NovaStar Vision Management Platform (VMP) represents a cutting-edge solution designed to enhance the management of LED displays, particularly in dynamic environments like virtual shooting and live events. With its advanced features, including group management, flexible screen layouts, and efficient input source configuration, VMP streamlines the complexities of display management. Users can easily connect devices, install the software on various operating systems, and utilize the platform’s capabilities for optimal performance.
Overall, NovaStar VMP is an essential tool in the world of LED display technology.
