
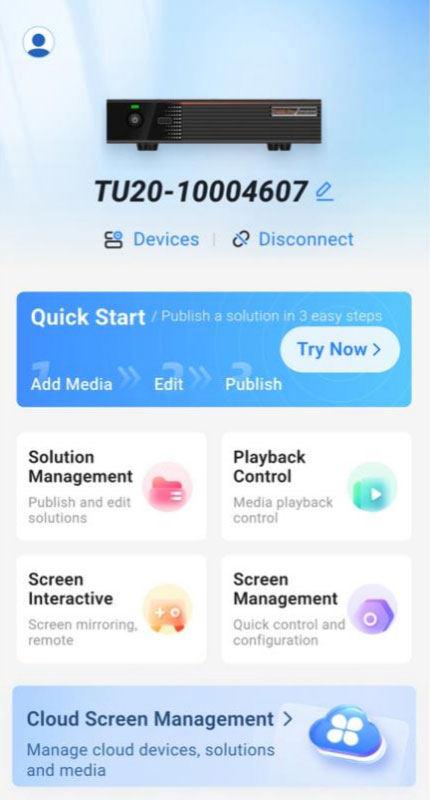
ViPlex Handy is a powerful screen management app designed for Android and iOS devices, created by NovaStar Technology. This app allows you to seamlessly manage various devices, including the Taurus series multimedia players (The second generation multimedia player launched by NovaStar for small and medium-sized LED asynchronous full-color display screens) and the JT100 traffic multimedia player.
ViPlex Handy offers comprehensive features like program editing, system settings, and quick display configuration. It provides an intuitive user experience, enabling users to easily control brightness, schedule content, and manage LED displays with convenience.
Catalogs:
1. NovaStar Viplex Handy Key Advantages
2. Core Functions
2.1 Screen Management
2.2 Program Editing
2.3 System Settings
2.4 Media Library
3. Viplex Handy APP and Manual Download
4. Device Control Methods
4.1 LAN Control
4.2 Internet Control
5. Viplex Handy APP Tutorial
5.1 Connect to Local Devices
5.2 Publishing Local Solutions
5.3 Upgrade Firmware Version
5.4 Screen Connection
1. Key Advantages
User-Friendly Interface: The app features an intuitive interface, thoughtfully designed to match user habits, allowing for a smoother and more enjoyable user experience.
Flexible Control Options: Offering both LAN and Internet control, ViPlex Handy provides users with the flexibility to manage devices either locally or from remote locations, adapting to different needs.
Convenient Wireless Access: Devices can be easily connected through wireless networks, offering a hassle-free setup process and making device management quick and straightforward.
Synchronous Playback: The app allows users to display the same content on multiple screens at once, providing a cohesive viewing experience across different displays.
Smart Brightness Adjustment: With options for automatic or scheduled brightness control, the app adapts screen brightness based on timing or environmental needs, helping to optimize the visual impact.
Dual Wi-Fi Modes: ViPlex Handy supports both Wi-Fi AP and Wi-Fi Sta modes, offering flexibility in how devices connect to networks, whether it’s for direct connections or broader network access.
4G Connectivity: For devices with 4G modules, the app supports mobile data connections, making it possible to manage devices in areas where Wi-Fi isn’t available.
Dual Video Output Modes: Users can switch between synchronous and asynchronous video output, allowing for greater flexibility in how content is displayed, whether it’s real-time or scheduled playback.
Auto Screen Adaptation: Content is automatically resized to fit the screen, removing the need for manual adjustments and ensuring the display looks right every time.
Unified Device Management: With the ability to bind multiple terminals to VNNOX, ViPlex Handy offers streamlined control over multiple devices from a single platform, which is especially useful for managing larger networks of displays.
2. Core Functions
2.1 Screen Management
ViPlex Handy connects control cards within a local area network (LAN) effortlessly, providing streamlined connectivity.
It offers quick screen configuration, real-time monitoring, playback management, brightness adjustment, and cloud platform integration, serving as an all-in-one tool for LED display control.
2.2 Program Editing
The app provides a seamless experience for creating programs, making it easy to design and manage content.
Users can incorporate various media types, such as images, videos, text, clocks, and weather, enabling diverse and dynamic displays.
With customizable window templates, content layout becomes flexible, and programs can be quickly sent to Taurus series multimedia players with just one click.
2.3 System Settings
ViPlex Handy includes a demo mode for testing and presentation purposes.
Both landscape and portrait screen orientations are supported, offering versatility for different display setups.
The app also includes settings for language preferences and access to help documentation, ensuring a tailored and guided experience.
2.4 Media Library
Users can browse and manage multimedia files directly from their phone, making it simple to select and use content for their LED displays.
3. Viplex Handy APP and Manual Download
To get started with ViPlex Handy, you can click on the file you need below to download. The user manual will walk you through the Viplex Handy screen configuration.
In addition to the app, we highly recommend registering on the LED Screen Cloud Platform. By registering, users gain access to a wide range of NovaStar Resources Download, including software, user manuals, firmware, and more—all available for free.
4. Device Control Methods
4.1 LAN Control
When devices are linked to ViPlex Handy through Wi-Fi AP or LAN, the control method is set to LAN Control. This enables users to manage devices, create solutions, and publish them locally without relying on the Internet. This method is typically used for local network setups, keeping a stable and direct connection.
4.2 Internet Control
Internet Control is used when devices are connected to the web, providing remote access and control over your LED displays from virtually anywhere.
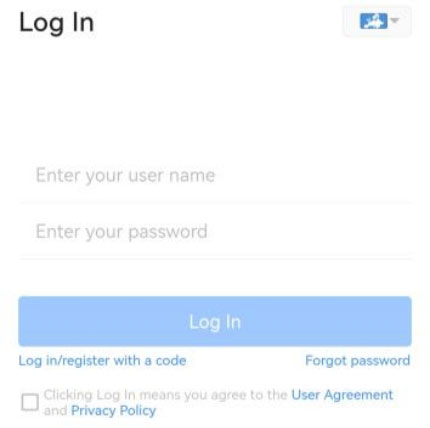
Once the devices are online, simply select Internet Control and follow the prompts to log in to the VNNOX cloud platform. Through this method, you can remotely manage devices, create solutions, and publish content via the Internet, perfect for scenarios where the displays are deployed in different locations.
5. Tutorial
5.1 Connect to Local Devices
Step 1: Connect to the WiFi AP of the Taurus series multimedia players or an external router.
Step 2: Open ViPlex Handy.
System can automatically detect the Taurus series products and refresh the local device list. Users can also swipe down to manually refresh the local device list.![]() : The Taurus is online and can be connected.
: The Taurus is online and can be connected.![]() : The Taurus is offline and cannot be connected.
: The Taurus is offline and cannot be connected.
Step 3: Tap Connect next to the device name.
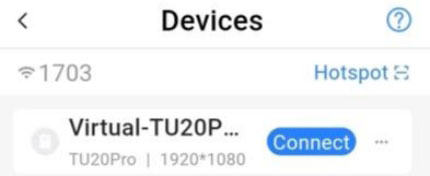
Step 4: Enter user name and password, and then tap OK.
Upon successful connection, ![]() is displayed and ViPlex Handy automatically saves the account information.
is displayed and ViPlex Handy automatically saves the account information.
| Item | Account Name | Default Password |
| Log in to Taurus | admin | 123456 |
| Connect to Taurus Wi-Fi AP | AP+ last 8 digits of the SN For example: AP10000033 | 12345678 |
| Connect to an external router (Wi-Fi Sta mode) | N/A | N/A |
5.2 Publishing Local Solutions
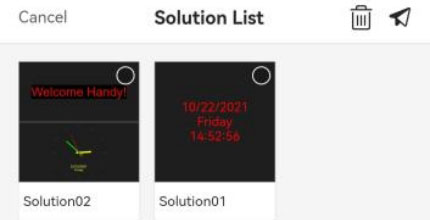
Step 1: Choose Solution List > Local Solutions.
Step 2: Tap ![]() to add a solution.
to add a solution.
Step 3: Set the name and resolution for the solution. Select a template and tap OK.
Step 4: Tap anywhere on a window in the solution. If you want to edit the area on the left, tap the area.
Step 5: Tap Add Media and select a media type.
Step 6: Set the media properties.
Step 7: Tap ![]() to continue adding media to the selected window.
to continue adding media to the selected window.
Step 8: If the solution contains multiple windows, repeat Steps 4 to 7 to add media for other windows.
Step 9: After the solution edits are complete, tap ![]() to publish the solution.
to publish the solution.
5.3 Upgrade Firmware Version
If a device’s firmware version is earlier than V2.3.0, it must first be upgraded to V2.3.0 before updating to the latest version. If the firmware is V2.3.0 or later, it can be directly updated to the latest version.
Step 1: Open ViPlex Handy.
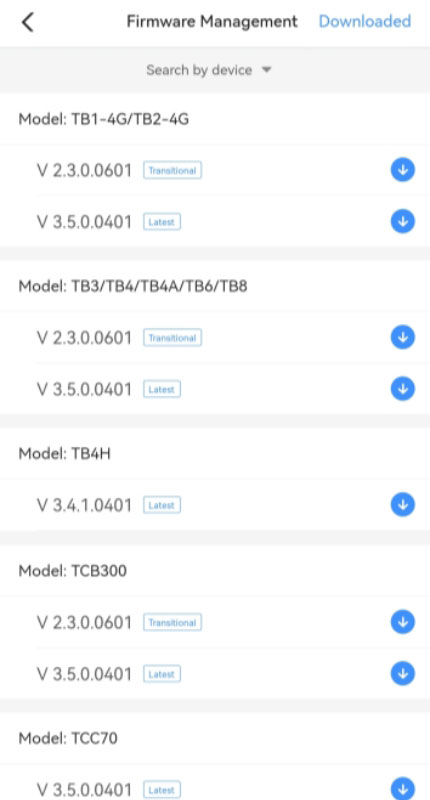
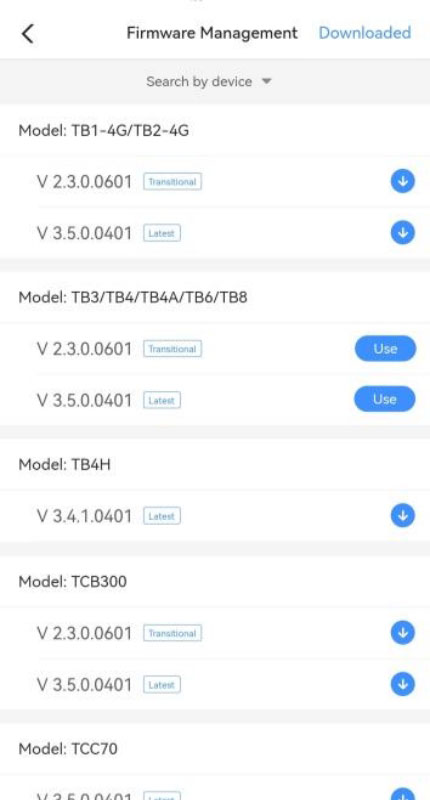
Step 2: Go to Me > Firmware Management, as shown in the second picture below.
Step 3: Connect your phone to a Wi-Fi network or enable mobile data. ViPlex Handy will automatically display the firmware upgrade packages for different devices, as the following picture.
If the required firmware package is already downloaded, skip to Step 5.
Step 4: Download the firmware package:
Tap the download button ![]() next to the needed package.
next to the needed package.
Or tap Search by device, choose the device, and tap OK to filter the packages, then tap the download button ![]() .
.
After downloading, the button ![]() changes into a Use button, as the following picture. You can also delete downloaded packages by tapping Downloaded at the top right.
changes into a Use button, as the following picture. You can also delete downloaded packages by tapping Downloaded at the top right.
Step 5: Tap Use next to the package to send it to the device, as shown in the second picture below.
If filtered, the device connects automatically after you tap Use.
If not filtered, select the target device from the list of recently connected devices and tap Upgrade.
If connection fails or no devices are found, manually connect to the device’s Wi-Fi AP and tap Use.
Once the firmware is sent, the device will automatically upgrade and restart. Reconnect to the device in Local Devices.
5.4 Screen Connection
Step 1: On the Local Devices page, select the device name to access its Device Management page.
Step 2: Navigate to Screen Configuration.
Step 3: On the Screen Configuration page, tap Screen Connection.
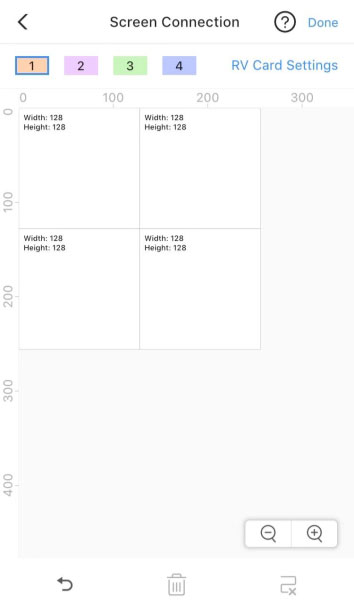
If this is the first time connecting screens for the current device, a default 400×400 px receiving card will appear (as shown in picture). If a configuration has been done previously, it will display the configured receiving cards and connections.
ViPlex Handy will automatically detect and show all Ethernet ports on the current device, including backup ports. As shown in the following picture, the number![]() corresponds the four Ethernet ports on the device.
corresponds the four Ethernet ports on the device.
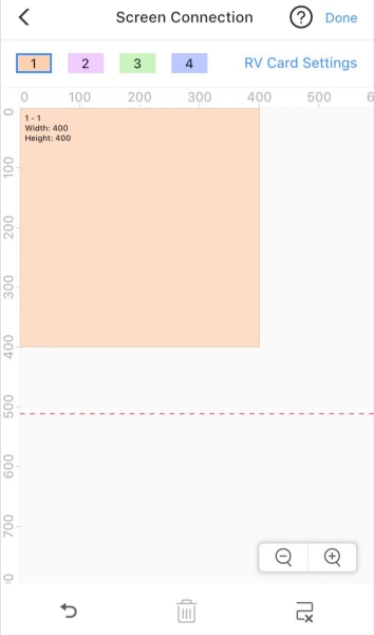
Step 4: Tap RV Card Settings at the upper right corner of the page.
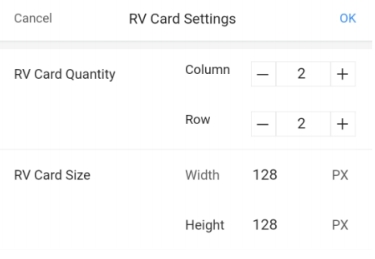
Step 5: In the RV Card Settings page, specify the columns and rows of receiving cards and adjust the loading capacity for each receiving card as per the actual setup.
Notes:
The number of columns and rows for receiving cards must be an integer between 1 and 600, while the width and height values should be integers ranging from 16 to 1024.
Ensure that the total loading capacity across all receiving cards does not exceed the device’s maximum capacity.
Step 6: Once settings are adjusted, tap OK at the top right to return to the Screen Connection page. As illustrated in the following picture, each square now represents a configured receiving card.
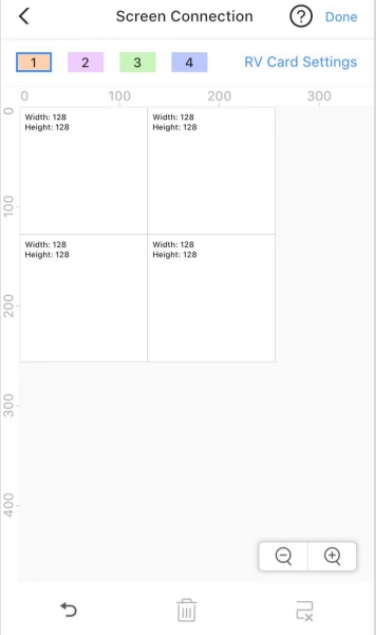
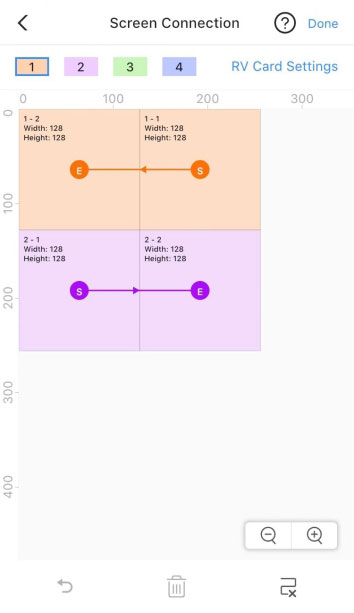
Step 7: Select an Ethernet port, then swipe your finger across the receiving cards to assign them to that port. Note that Ethernet ports 3 and 4 are designated as backup ports, and connections cannot be assigned to them.
As shown in the picture, upon completion, each Ethernet port’s connected receiving cards will be highlighted in the same color as the port. The Ethernet port number is displayed at the top left of each receiving card (e.g., “1-2” indicates the second receiving card on Ethernet port 1).
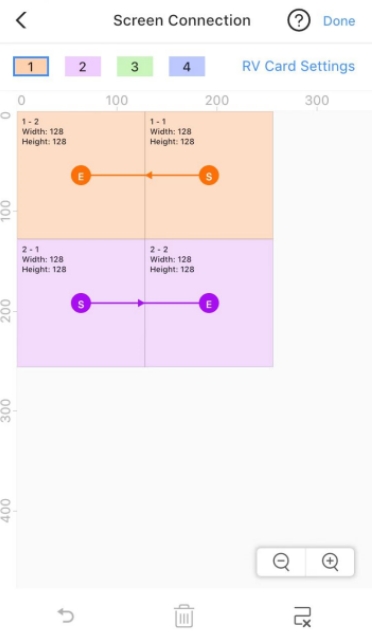
Step 8: Once the screen connection setup is complete, tap Done.
This completes the configuration for screen connection using Viplex Handy.
6. FAQs
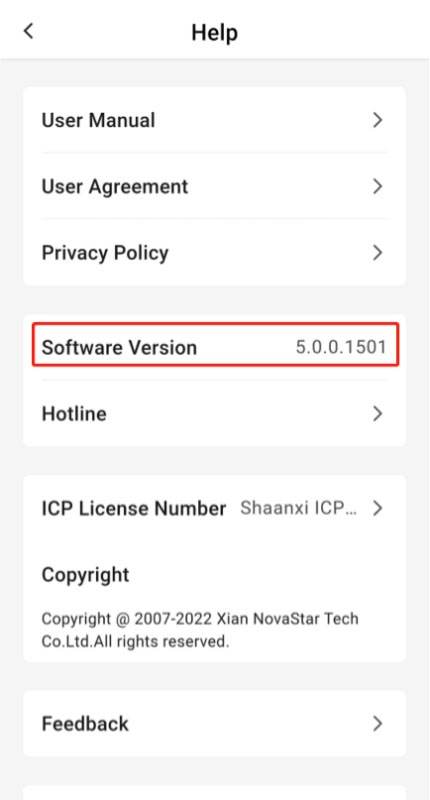
How to check the version of ViPlex Handy?
Step 1: Go to Me > Help.
Step 2: View the version of ViPlex Handy.
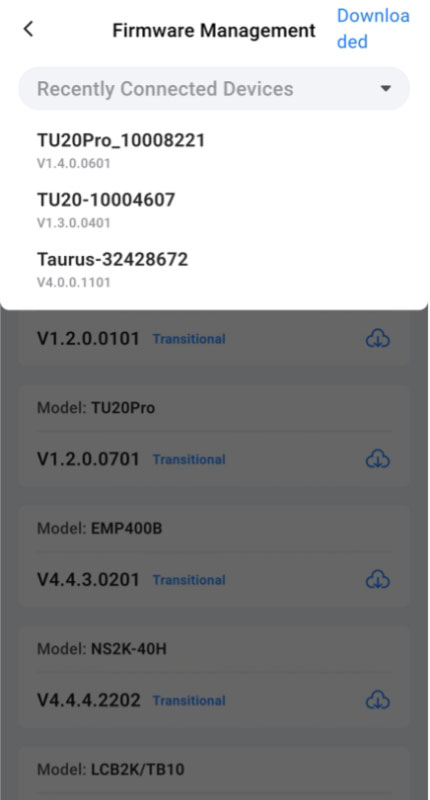
How to check the firmware version of a device?
Step 1: Connect to a local device.
Step 2: On the Firmware Management page, tap the device name to access the Recently Connected Devices page.
Step 3: View the software version and sub-software version of the device.
What media formats does ViPlex Handy support?
ViPlex Handy supports a wide range of media formats, including images, videos, text, clocks, and weather data.
Can I use ViPlex Handy to manage content remotely?
Yes, by using Internet Control mode and connecting to the VNNOX cloud platform, you can manage content and control devices from anywhere with an Internet connection.
